The Complete Bokashi + Vermicompost System
This innovative two-stage home composting system transforms kitchen waste into two premium agricultural resources: nutrient-dense vermicompost and biologically active vermiwash. By combining anaerobic fermentation with aerobic vermicomposting, you maximize nutrient retention, microbial diversity, and compost quality.
System Design Philosophy
Traditional composting methods often lose valuable nutrients through leaching and volatilization. Our integrated approach:
- Preserves nutrients through acidic fermentation that locks in nitrogen, phosphorus, and micronutrients
- Accelerates decomposition by pre-digesting materials for earthworms
- Eliminates common problems of odor, pests, and slow decomposition
- Creates a continuous cycle that processes kitchen waste year-round
System Components
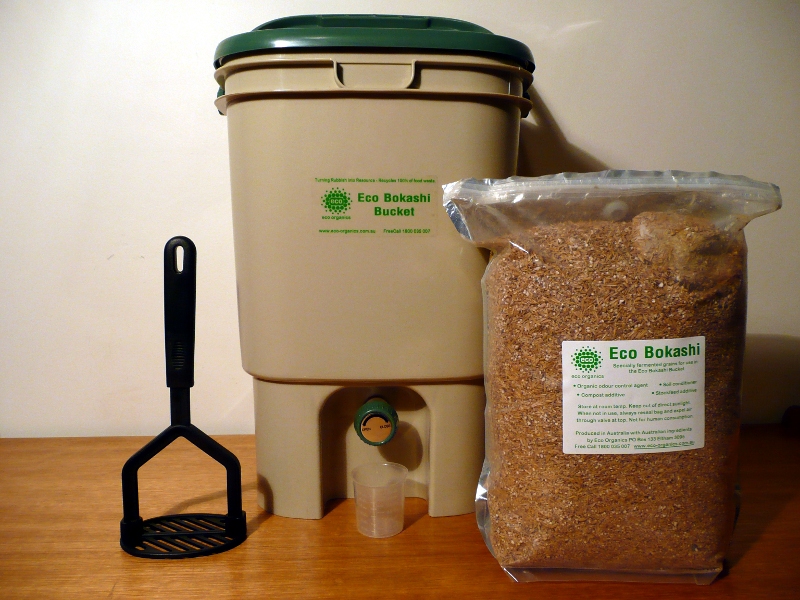
Fermentation Bucket
20L with airtight lid and leachate drain
Enhanced Bokashi Bran
Microbial inoculant with humic acid & minerals
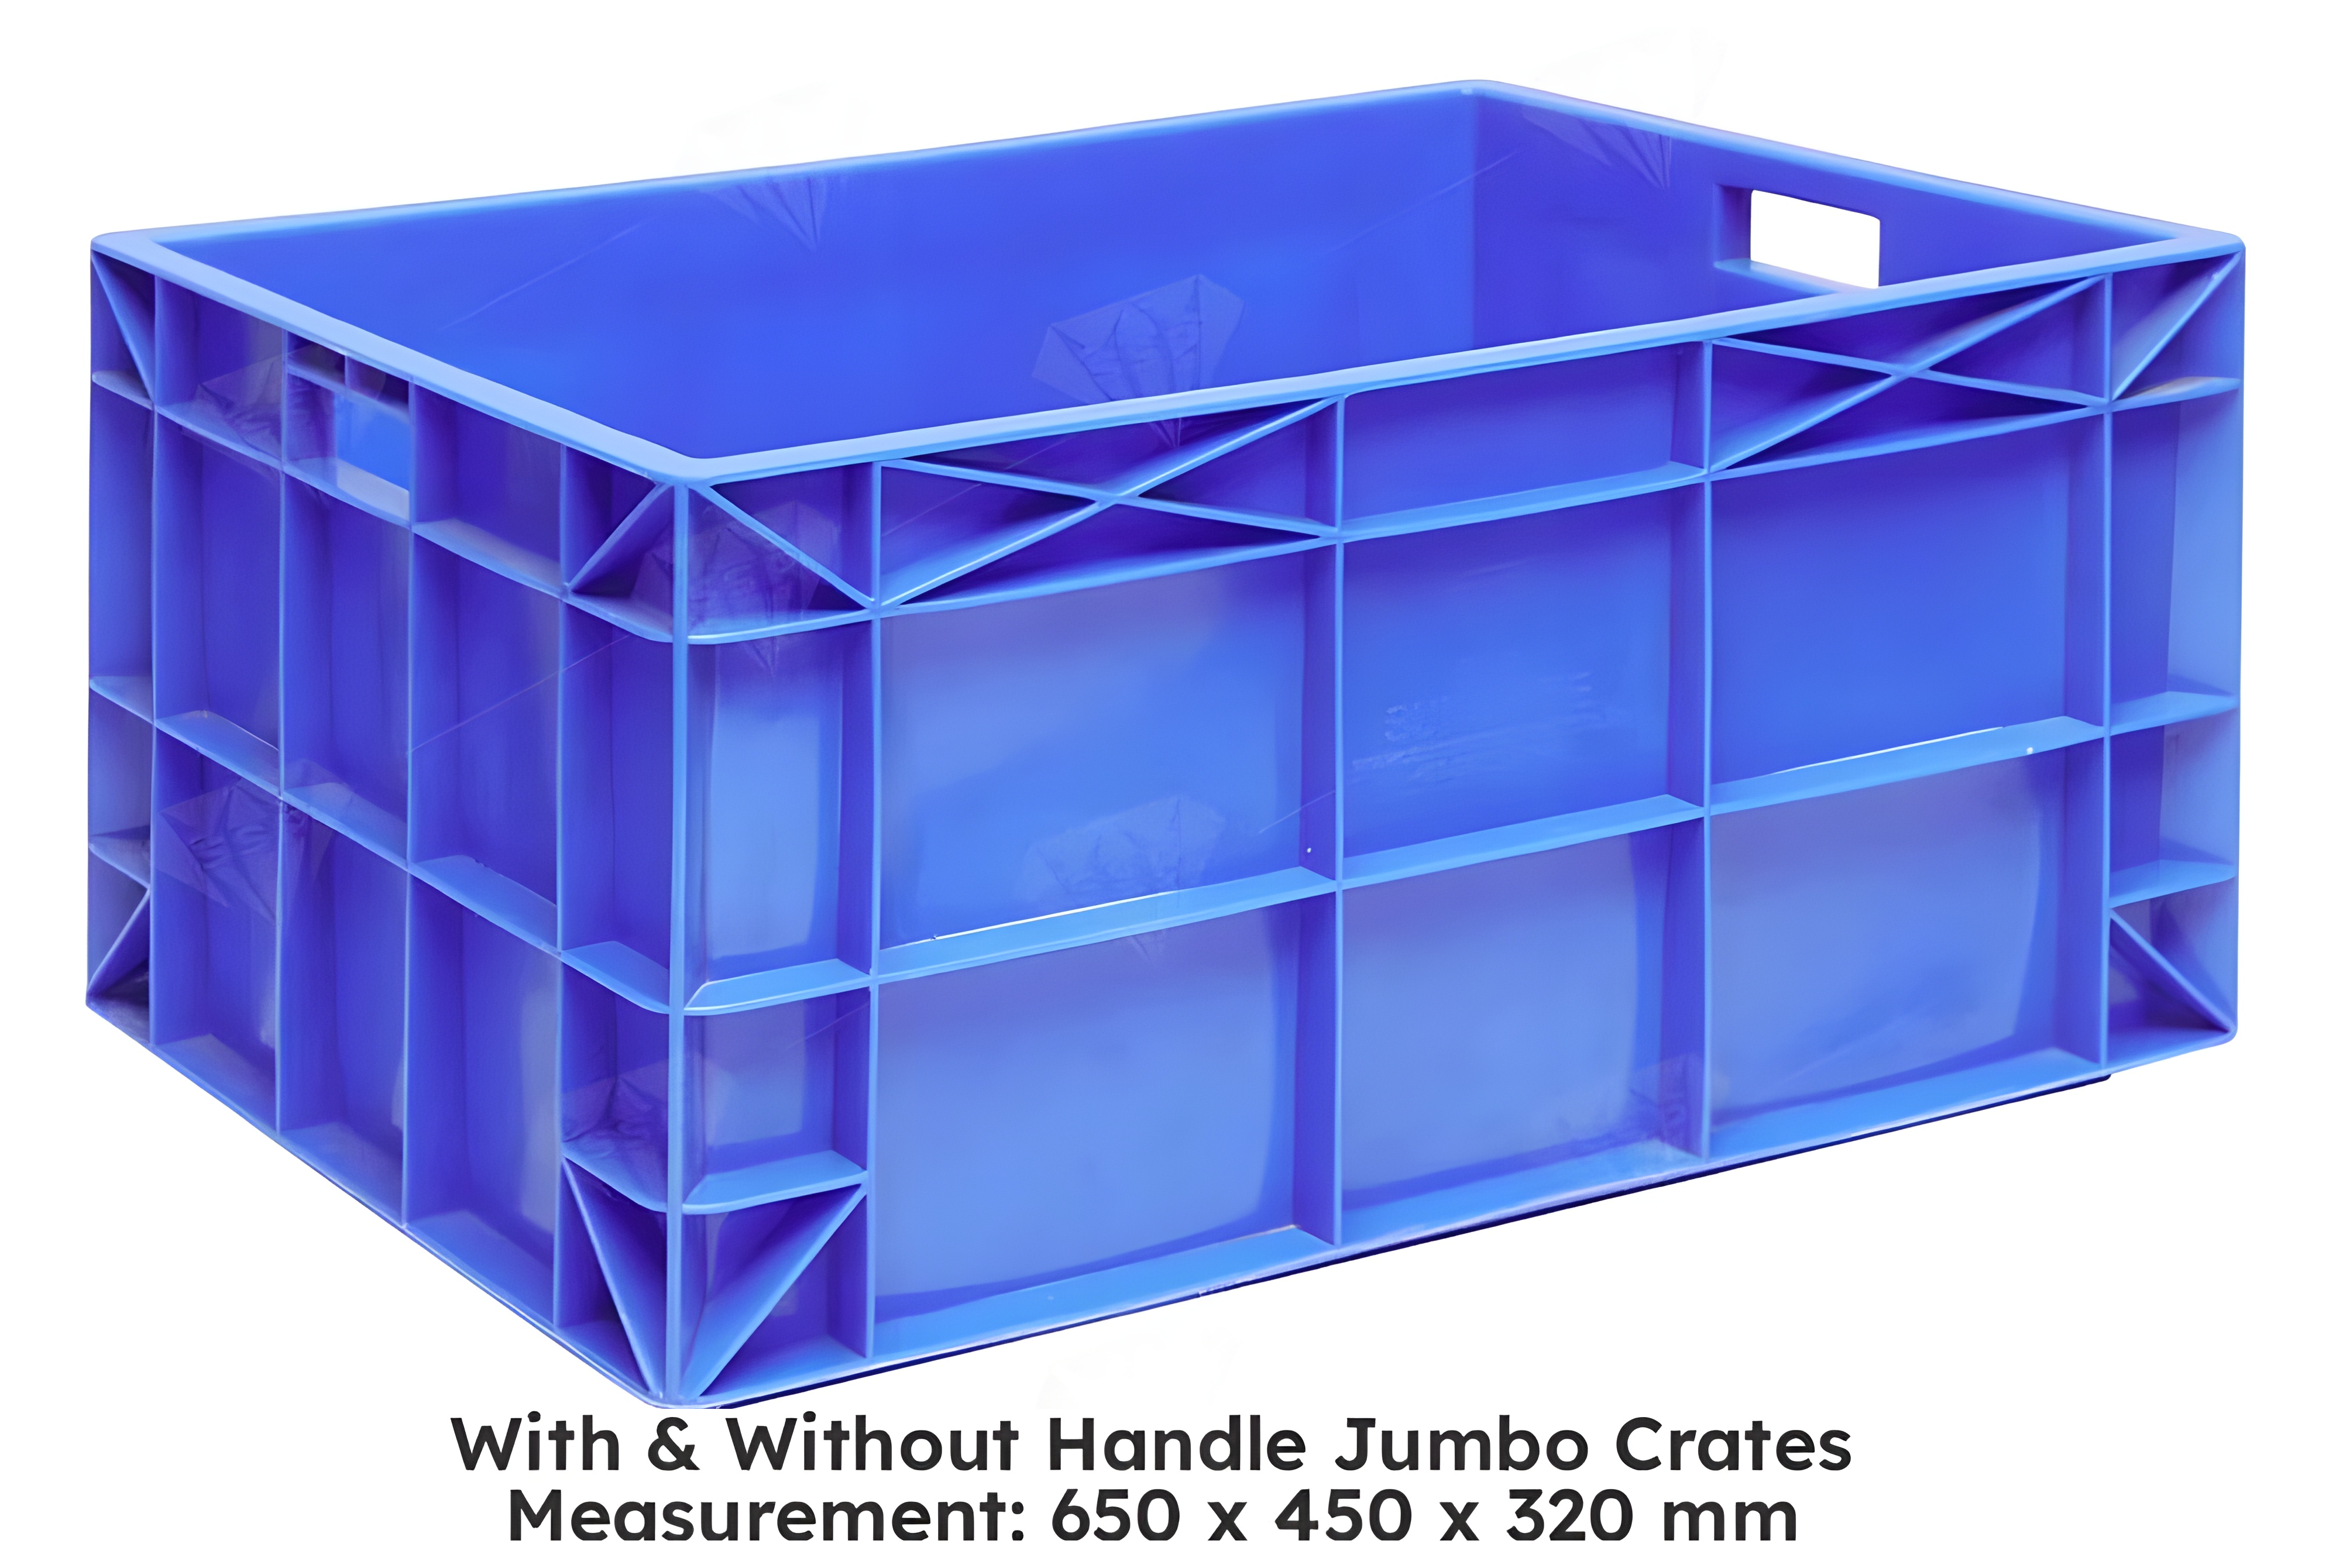
Worm Composting Crate
Aerated design with drainage collection
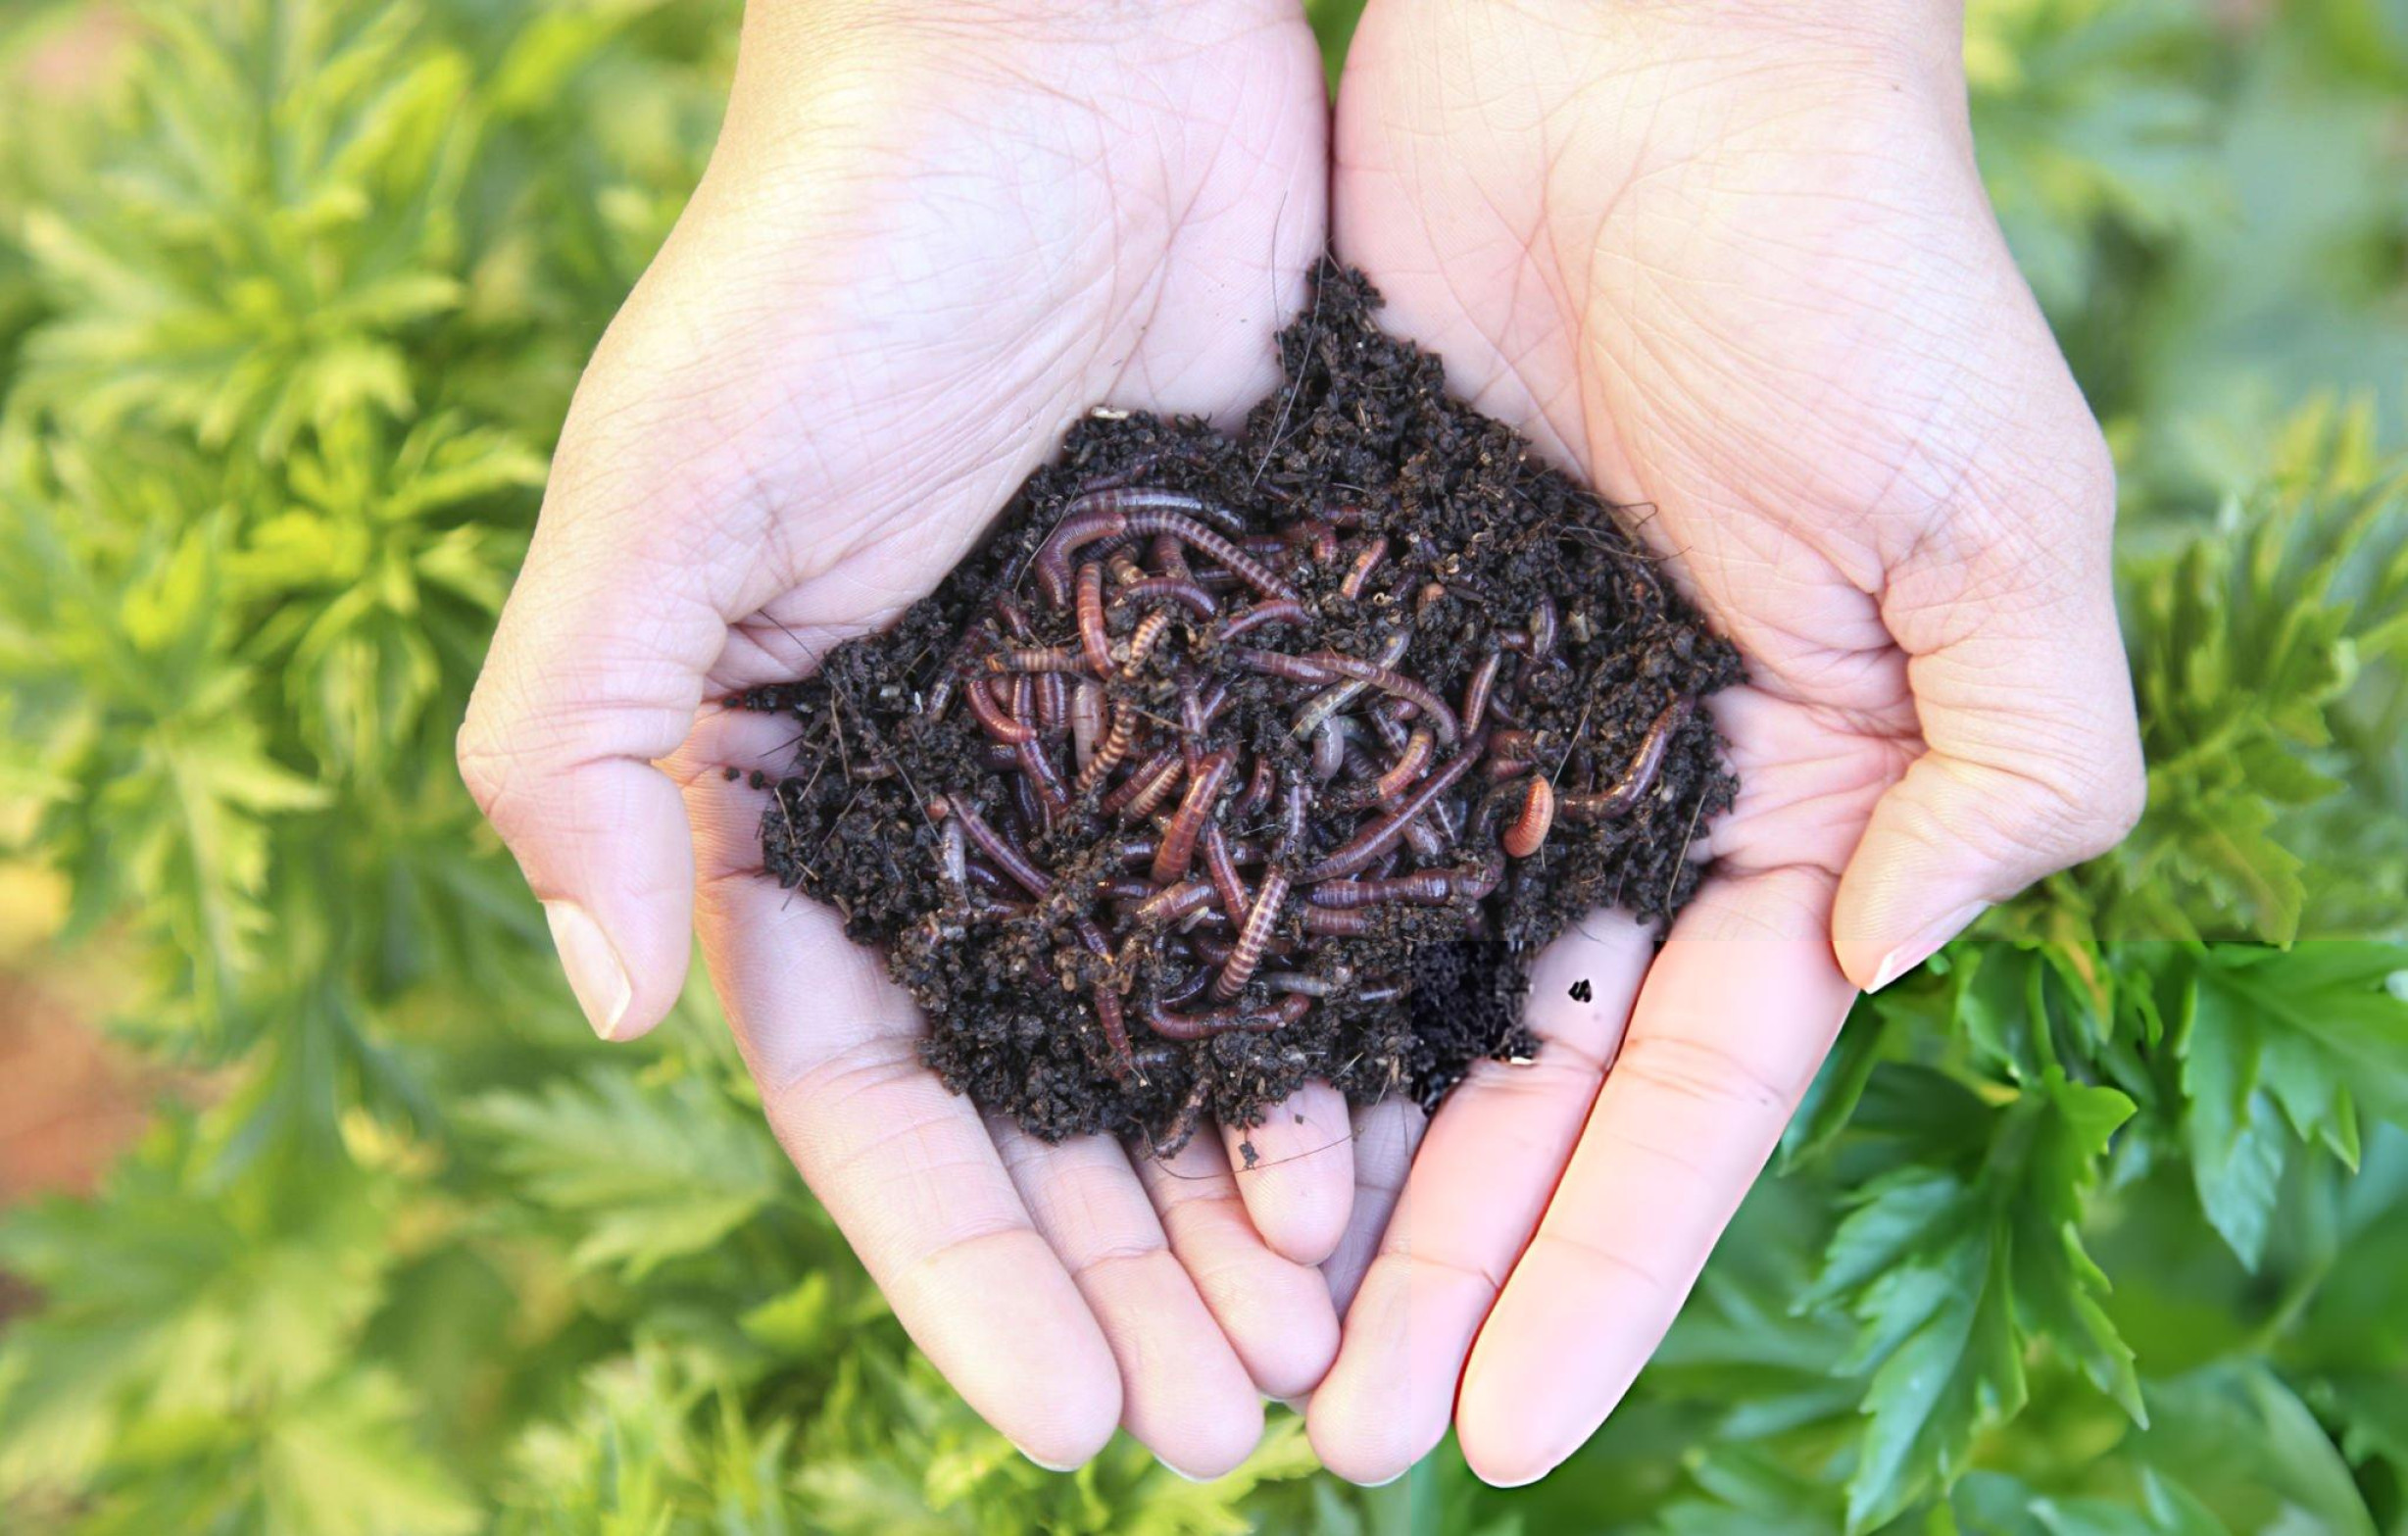
Eisenia fetida Worms
500-1000 composting worms to start with
Fermentation Stage
- Two 20-Liter Bokashi Buckets: Food-grade plastic with airtight lids and spigots for leachate collection
- Enhanced Bokashi Bran: Supercharged with humic acid, Tata Ralligold granules, and Biovita X for complete fermentation
- pH Test Strips: Monitor fermentation acidity (target pH 3.5-4.5)
Vermicomposting Stage
- Two 70-Liter Professional Crates: Superior side and bottom aeration, stackable design, UV-resistant plastic
- Eisenia fetida Worms: 500-1000 composting worms to start, specifically adapted to process fermented material
- Bedding Material: Combination of cocopeat, shredded newspaper, and aged compost
Biological Additives
- Microbial Inoculants: Lactic acid bacteria, yeasts, and phototrophic bacteria for complete fermentation
- Mineral Amendments: Rock dust, eggshell powder, and basalt grit for mineral balancing
- Jaggery/Molasses: For preserving vermiwash and feeding beneficial microbes
Scientific Foundation
Nutrient Preservation Principle
Traditional aerobic composting loses 30-50% of nitrogen as ammonia gas. Bokashi fermentation creates an acidic environment (pH 3.5-4.5) that converts nitrogen into stable ammonium ions (NH₄⁺), preventing volatilization. The lactic acid bacteria also solubilize phosphorus and potassium, making them more plant-available.
Microbial Succession
The system follows natural ecological succession: anaerobic microbes break down complex compounds → neutralization introduces aerobic microbes → earthworms and their microbiome create stable humus. Each stage prepares the material for the next, maximizing efficiency.
Two Valuable Liquid By-Products
This integrated system harnesses two separate processes, each yielding a unique liquid resource. Bokashi leachate (often called "bokashi tea") is the acidic, nutrient-rich runoff from the anaerobic fermentation stage. It contains beneficial microorganisms from the fermentation process and soluble minerals. In contrast, vermiwash is produced during the aerobic vermicomposting stage. It is a complex solution containing not only nutrients from decomposed matter but also plant growth hormones, enzymes, and microbial compounds derived directly from earthworm activity.
The Three-Stage Transformation
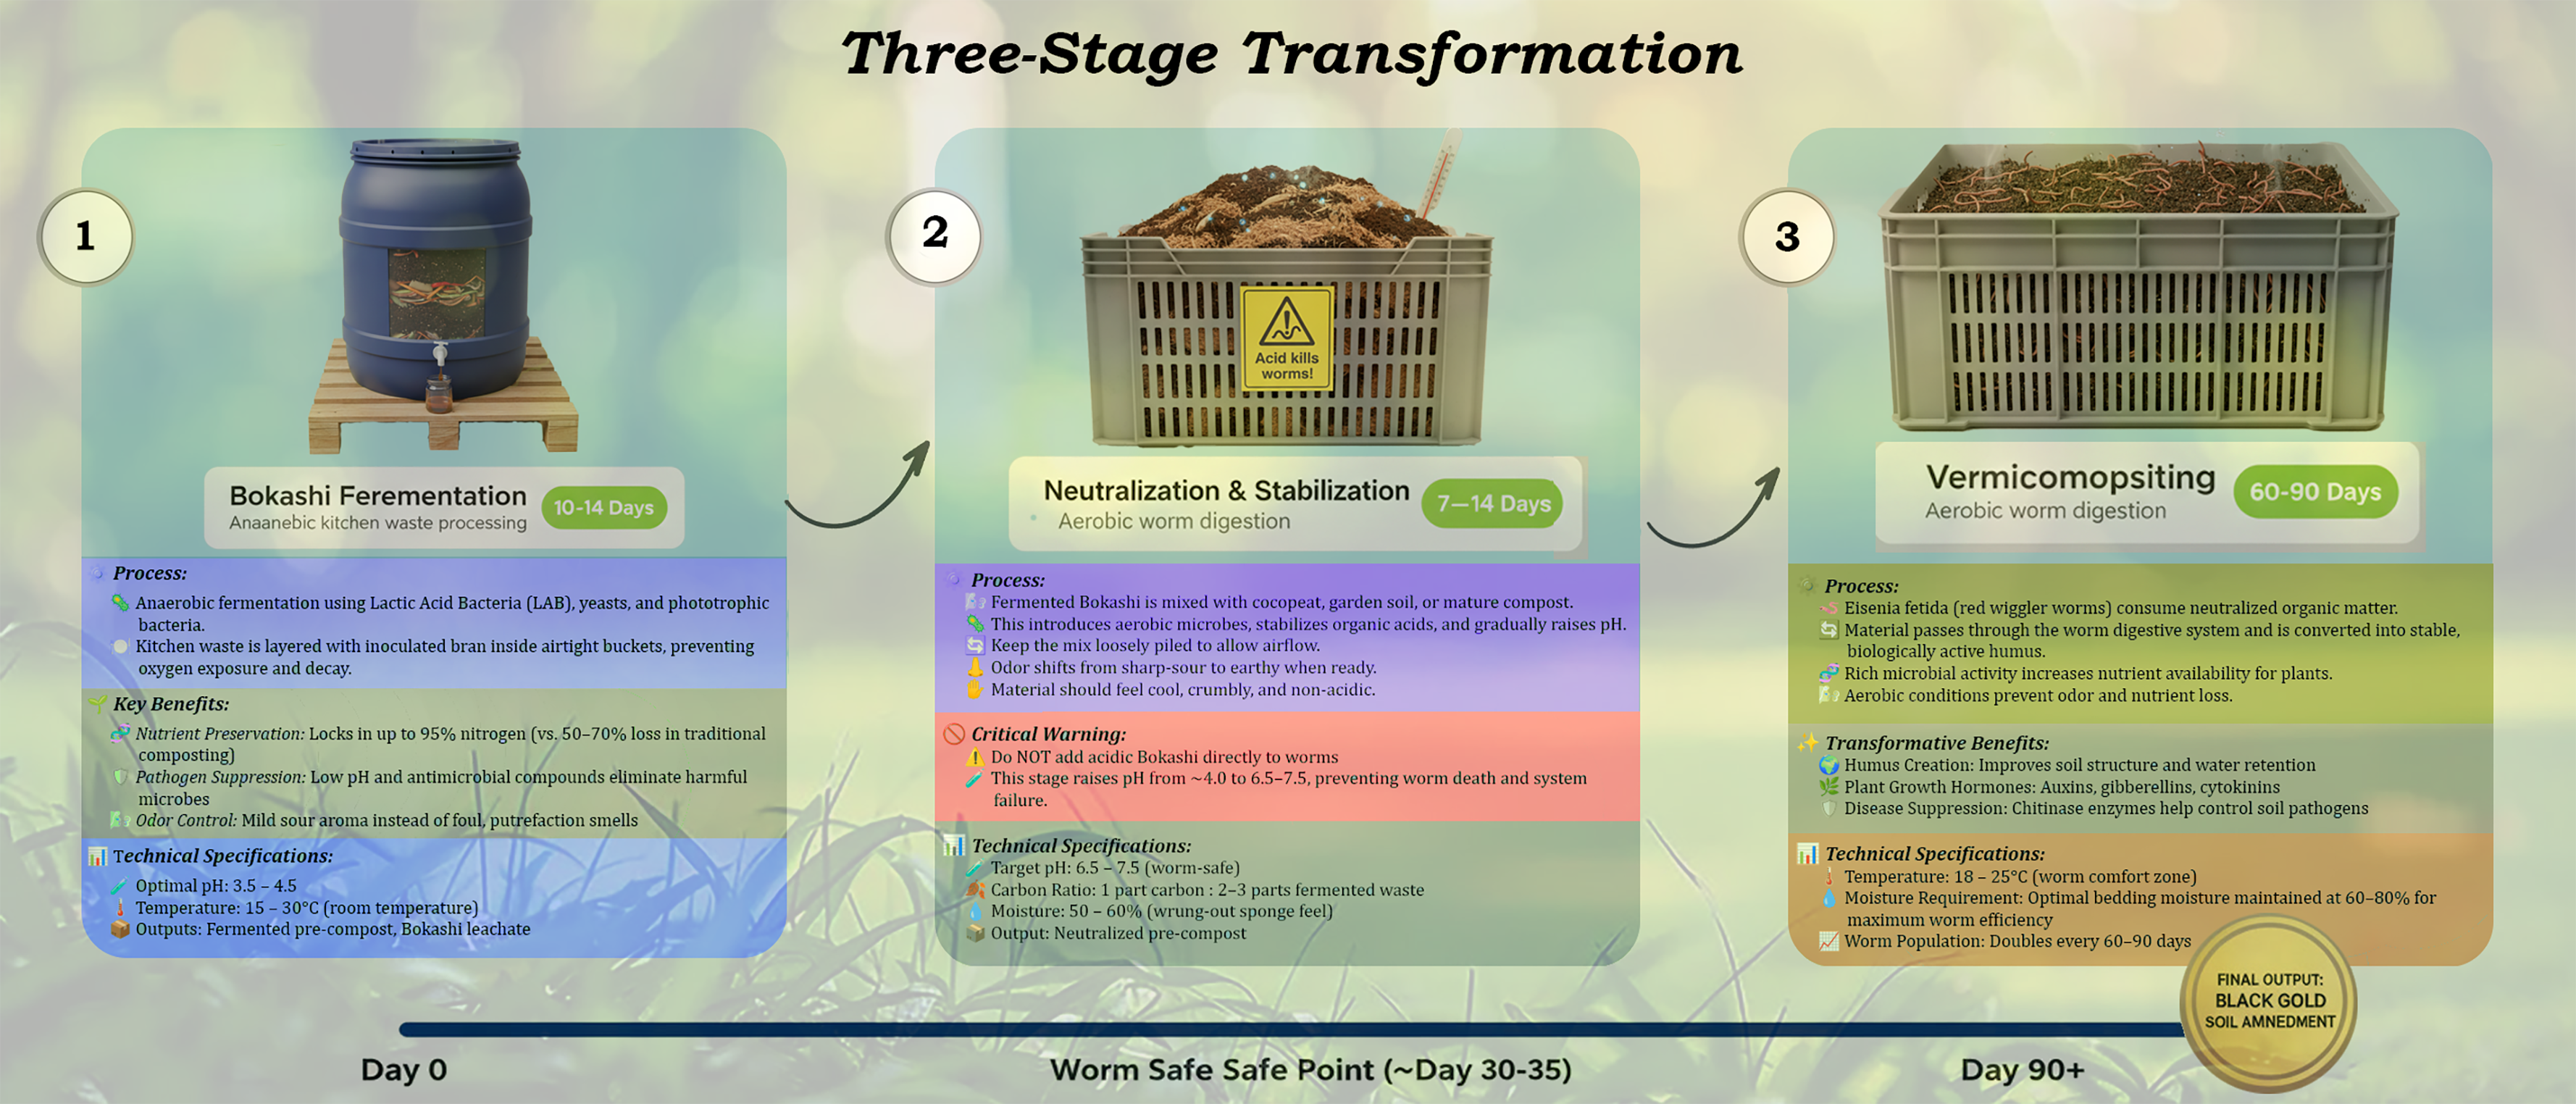
Bokashi Fermentation
Anaerobic fermentation process
Process: Anaerobic fermentation using Lactic Acid Bacteria (LAB), yeasts, and phototrophic bacteria. Kitchen waste is layered with inoculated bran in airtight buckets.
Key Benefits
- Nutrient Preservation: Locks in 95% of nitrogen vs. 50-70% in traditional composting
- Pathogen Suppression: Low pH and antimicrobial compounds eliminate harmful bacteria
- Odor Elimination: Pleasant sour aroma instead of putrefaction smells
Technical Specifications
- Optimal pH: 3.5 - 4.5
- Temperature: 15 - 30°C (room temperature)
- Outputs: Pre-compost (fermented waste), Bokashi leachate
Neutralization & Stabilization
pH balancing & aerobic transition
Process: Aerobic stabilization where fermented material is mixed with cocopeat, garden soil, and existing compost to balance pH and introduce oxygen-loving microbes.
⚠️ Critical Warning: Do not add acidic bokashi directly to worms! The 7-14 day neutralization phase raises pH from 4.0 to 6.5-7.5 (worm-safe range) and prevents worm mortality.
Technical Specifications
- Target pH: 6.5 - 7.5 (neutral)
- Carbon Ratio: Add 1 part carbon (cocopeat/soil) to 2 - 3 parts fermented waste
- Moisture: 50 - 60% (feels like a wrung-out sponge)
Vermicomposting
Aerobic worm digestion
Process: Eisenia fetida (red wiggler worms) consume neutralized material, transforming it through their digestive system into stable humus rich in microbial life and plant growth regulators.
Transformative Benefits
- Humus Creation: Produces stable organic matter that improves soil structure and water retention
- Plant Growth Hormones: Worms secrete auxins, gibberellins, and cytokinins
- Disease Suppression: Chitinase enzymes control soil pathogens naturally
Technical Specifications
- Worm Population: Doubles every 60 - 90 days under optimal conditions
- Temperature: 18 - 25°C (worm comfort zone)
- Outputs: Vermicompost (castings), vermiwash, worm cocoons (for reproduction)
System Efficiency Comparison
Bokashi + Vermicompost vs Traditional Composting
Complete System Timeline
Weeks 1-3: Bokashi Accumulation Phase
Daily Activity: Add kitchen waste to Bucket A, sprinkle bokashi bran, compress to remove air, drain leachate daily. Meanwhile, Bucket B completes its 2-week fermentation.
Pro Tip: Start second bucket when first is ¾ full to maintain continuous flow. Collect leachate, dilute 1:100 with water for immediate plant use or preserve for vermiwash enhancement.
Week 4: Neutralization Transition
Critical Step: Transfer fully fermented material from Bucket B to neutralization container. Mix thoroughly with cocopeat (1:2 ratio) and 10% garden soil. Monitor pH daily until stable at 6.5-7.5.
Weeks 5-15: Active Vermicomposting
Weekly Maintenance: Feed worms 2-3 kg of neutralized material weekly. Maintain 70-80% moisture, 18-25°C temperature. Collect vermiwash weekly, preserve with jaggery.
Week 16: Harvest & System Reset
Full Cycle Completion: Harvest finished vermicompost using light separation method. Preserve 20% of material with cocoons for next batch. Transfer worms to second crate with fresh bedding.
Preservation: Store finished vermicompost in breathable containers. Preserve vermiwash with jaggery (1 tbsp per liter) for 6-month shelf life.
System Advantages
Efficiency Advantages
- 40% Faster Processing: Fermentation pre-digests materials, reducing vermicomposting time from 120+ to 60-90 days
- Higher Nutrient Retention: Preserves 95% of nitrogen vs. 50-70% in traditional composting
- Dual Outputs: Produces both solid humus (vermicompost) and liquid fertilizer (vermiwash) from same input
Practical Benefits
- Odor-Free Operation: Properly managed system produces only pleasant sour or earthy smells
- Pest-Proof Design: Airtight fermentation prevents flies; enclosed crates exclude rodents
- Space Efficient: 1.5m² footprint suitable for balconies, utility areas, or small gardens
- Year-Round Operation: Works in all seasons with minimal temperature adjustment
Agricultural Superiority
- Superior Microbial Diversity: Contains 10¹⁰-10¹² CFU/g vs. 10⁸-10⁹ in traditional compost
- Plant Growth Regulators: Natural auxins, cytokinins, and gibberellins stimulate plant growth
- Disease Suppression: Chitinase enzymes and beneficial nematodes control soil pathogens
Ready to Begin?
The following sections provide detailed, step-by-step instructions for each phase of the system. We recommend reading through the complete guide once before beginning, then following along as you implement each stage. Remember that consistency in small daily actions leads to extraordinary long-term results in waste transformation and soil creation.
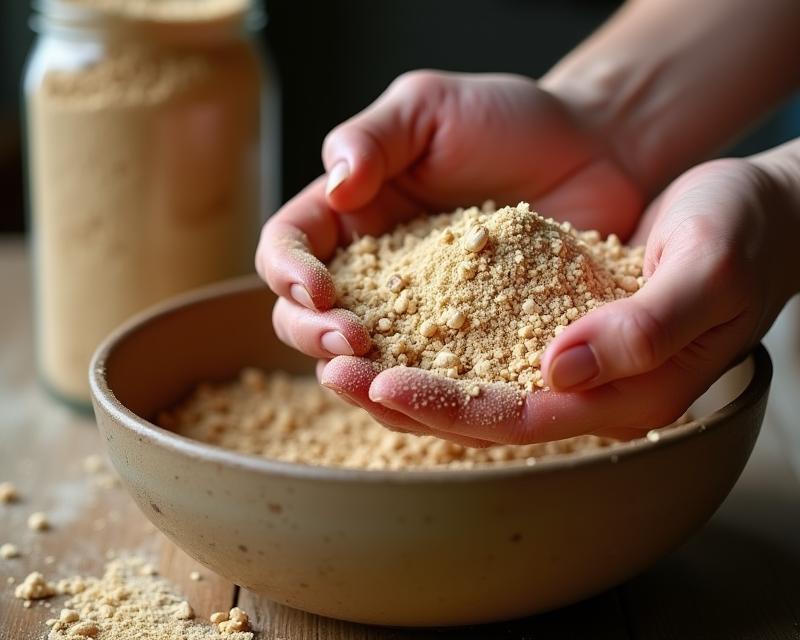
Step 1: Crafting Ultimate Enhanced Bokashi Bran
This is not a recipe — it is a controlled microbial cultivation protocol. We engineer a superior biological inoculant by transforming simple ingredients into a nutrient-charged, microbially-diverse powder that drives rapid fermentation, enhances nutrient cycling, and creates the perfect pre-digested feed for vermicomposting.
Core Scientific Philosophy: Building a Complete Ecosystem
Standard Bokashi bran relies primarily on Lactic Acid Bacteria (LAB). This enhanced protocol cultivates a complete functional guild of microorganisms, each with a specific role, supported by mineral and organic amendments that elevate the entire process from preservation to biological enrichment.
The Microbial Consortium & Their Roles:
- Lactic Acid Bacteria (LAB): Lactobacillus, Pediococcus. Primary fermenters. Produce lactic acid, lowering pH to ~3.5-4.0. This creates a selective environment that suppresses pathogens (E. coli, Salmonella) and preserves nutrients via acidification.
- Yeasts: Saccharomyces, Candida. Produce ethanol, CO₂, and B-vitamins. Ethanol acts as a secondary preservative; yeasts outcompete spoilage microbes for sugars.
- Photosynthetic Bacteria (PSB): Rhodopseudomonas. Anaerobic photoheterotrophs. Metabolize foul-smelling hydrogen sulfide and volatile fatty acids, eliminating odors. Produce plant growth promoters like 5-aminolevulinic acid (ALA).
- Actinomycetes & Fungi: Streptomyces, Trichoderma. Decompose complex chitin and cellulose. Produce geosmin (earthy smell) and chitinase enzymes, offering natural biocontrol against pests.
- Plant Growth-Promoting Rhizobacteria (PGPR): From Biovita X & soil: Azotobacter (N-fixer), Pseudomonas (P-solubilizer). Initiate nutrient cycling and produce phytohormones (IAA, Gibberellins).
The Mineral & Organic Matrix Enhancements:
- Humic Acid: A powerful chelating agent. Binds to micronutrients (Fe, Zn, Mn) from rock dust, preventing them from becoming "locked up" and making them 40-70% more plant-available. Acts as a microbial prebiotic, stimulating activity.
- Tata Ralligold / Rock Dust: Provides a slow-release bank of essential trace elements in oxide/silicate forms. The acidic fermentation environment and microbial exudates slowly solubilize these minerals over time.
- Oilseed Cakes (Mustard & Neem): Beyond NPK, mustard cake contains glucosinolates (sulfur compounds) with mild antimicrobial properties that suppress unwanted fungi. Neem cake adds azadirachtin, a natural nematicide and insect growth regulator.
- Wheat Bran Carrier: Its porous, lignocellulosic structure provides maximum surface area for microbial colonization and an ideal carbon source for sustained fermentation.
The Result: A bran that doesn't just pickle waste, but pre-digests it into a buffet of organic acids, solubilized minerals, and microbial biomass. This leads to faster vermicomposting, increased worm reproduction, and a final compost with superior nutrient availability and disease-suppressive properties.
Stage 1: Formulating the Dry Base Matrix
Precision preparation of the nutrient-dense carrier
This stage creates a perfectly balanced, sterile, porous, and nutrient-rich medium capable of supporting extremely high microbial density during fermentation. Use a precision scale with 1g accuracy for consistent results.
Master Dry Ingredient Formulation (Yield: ~1 kg)
| Ingredient | Quantity | Preparation & Scientific Purpose |
|---|---|---|
| Wheat Bran | 600 g |
Preparation: Sieve, then lightly toast (5 — 7 mins) to 60 — 70°C to reduce surface microbes without destroying nutrients.
Scientific Role: Main carbon substrate for LAB, Bacillus, Rhodopseudomonas, and yeast. Its porous lignocellulosic structure provides large microbial attachment surfaces. Toasting reduces native bioload, giving inoculant microbes a competitive advantage and ensuring predictable fermentation. |
| Rice Husk Powder (Fine) | 80 g |
Preparation: Grind to <2 mm for consistent texture.
Scientific Role: Increases aeration and prevents clumping. High silica improves enzymatic anchoring, buffers acidity during fermentation, and enhances moisture distribution. Keeps the bran structurally stable even when moistened. |
| Mustard Cake Powder | 100 g |
Preparation: Grind to ≤1 mm. Avoid oil-rich or rancid material.
Scientific Role: Supplies nitrogen (5 — 6%) for microbial biomass. Glucosinolates suppress unwanted molds but are tolerated by LAB and Bacillus, helping maintain a selective LAB-dominant fermentation environment. |
| Peanut Cake Powder | 60 g |
Preparation: Use only fresh, cold-pressed cake; grind ≤1 mm.
Scientific Role: Rich protein (45 — 50%) acts as an amino-acid source for rapid growth of yeasts and Bacillus. Enhances protease activity for deeper fermentation. Lipids stabilize moisture. Avoid rancid cake to prevent butyric contamination. |
| Neem Cake Powder | 40 g |
Preparation: Use as a fine powder.
Scientific Role: Azadirachtin suppresses nematodes (Meloidogyne), soil fungi (Pythium, Fusarium), and harmful insects. Does not inhibit LAB. Prevents external fungal contamination during fermentation and makes the final bokashi pest-resistant. |
| Mineral Mix | 25 g |
Composition: Tata Ralligold (10 g), Basalt Rock Dust (10 g), Sterilized Eggshell Powder (5 g).
Scientific Role: Provides Fe, Mn, Zn, Cu, Mg, Si, and Ca — essential enzyme cofactors that accelerate microbial metabolism. Basalt’s paramagnetic silicates boost redox reactions. Eggshell buffers acidity and prevents over-acidification. |
| Powdered Jaggery / Molasses Powder | 10 g |
Preparation: Use a fine powder to ensure uniform distribution.
Scientific Role: Provides simple sugars (glucose + sucrose) for instant microbial energy. Accelerates LAB and yeast activation, stabilizes early fermentation, and ensures a strong anaerobic environment. Prevents slow/uneven fermentation. |
| Mycorrhizal Spores (Glomus spp.) | 1 g |
Preparation: Add only in dry stage before moistening.
Scientific Role: Spores stay dormant during anaerobic fermentation. In soil, they colonize roots and enhance uptake of P, K, Zn, Fe while boosting drought resistance. Converts bokashi into a biological growth enhancer, not just a fertilizer. |
| Old Bokashi Bran | 50 g |
Preparation: Use only from a well-fermented, sweet-smelling batch.
Scientific Role: Contains an adaptive consortium of LAB, yeasts, phototrophic bacteria, actinomycetes, and Bacillus. Ensures reliable fermentation by seeding proven microbial communities and suppressing contaminants. |
Pro Technique: Geometric Dilution for Ultra-Uniform Microbial Distribution
To distribute small-dose material (1g spores) evenly across 1kg bran:
1. Combine the 1g mycorrhiza with 10g wheat bran in a small jar. Shake vigorously.
2. Mix this 11g blend with 100g more bran. Blend thoroughly for 2 - 3 minutes.
3. Add this 111g pre-mix into the full dry matrix and mix using a lifting - folding motion for 8 - 10 minutes.
Result: Every gram of your final bran becomes biologically identical — ensuring even fermentation and maximum microbial density.
Stage 2: Cultivating the Liquid Microbial Library
Brewing six high-density microbial cultures with maximum species richness
Diversity equals resilience. Begin this phase 21 days before mixing your dry bran. Each liquid culture below is a carefully engineered micro-ecosystem that contributes LAB, yeasts, PSB, filamentous fungi, actinomycetes, and plant-growth - promoting rhizobacteria.
Master Cultivation Timeline
Start PSB & Pond Water
Start FPJ (Optional Early)
Start Forest Soil Extract
Start LAB Serum
Start Seaweed/Tulsi FPJ
Start Wild Yeast Water
Culture 1: Lactic Acid Bacteria (LAB) Serum
Primary Function: Establishes the acidic, low-pH environment needed for long-term bran preservation. LAB produce bacteriocins that suppress pathogens.
Method A: From Dairy Whey (Most Reliable & High LAB Count)
- Strain 500 - 700 ml fresh curd through cheesecloth to collect 250 - 350 ml whey.
- Dissolve 50g jaggery in 50ml warm water (≤40°C) and mix with whey.
- Ferment in a clean jar with a loose lid at 25 - 30°C for 5 - 7 days.
- Success Indicators: pH 3.5 - 4.0, sharp sour aroma, clear separation.
Method B: Rice-Wash Fermentation (Broader LAB Spectrum)
- Collect cloudy wash from rinsing 1 cup rice with 2 cups water.
- Ferment uncovered 5 - 7 days until a mildly sour smell appears.
- Strain, add equal jaggery water, ferment 2 more days.
Pro Tip: Mix whey-LAB and rice-LAB in a 1:1 ratio for maximum strain diversity (L. plantarum + L. casei synergy).
Culture 2: Fermented Plant Juice (FPJ) — Tulsi + Seaweed (Dual Extract)
Primary Function: Introduces plant hormones (IAA, GA, cytokinins), wild yeasts, and epiphytic microbes. Tulsi adds antimicrobial essential oils; seaweed boosts mineral profile & alginates.
- Use 150g Tulsi leaves + 50g fresh seaweed (or 5g dry). Chop coarsely.
- Mix with 200g jaggery/brown sugar in a wide-mouth jar.
- Press down firmly to remove air pockets.
- Cover with cloth, ferment 5 - 7 days at 25 - 28°C.
- Strain. Liquid should be dark, fragrant, sweet-sour. Ideal yield: 120 - 150 ml.
Upgrade: Add 1 tsp Giloy stem powder for extra microbial polysaccharides.
Culture 3: Photosynthetic Bacteria (PSB) & Activated Pond Water
Primary Function: Adds Rhodopseudomonas, Rhodobacter, and aquatic actinomycetes. These microbes control foul odor and break down complex organics.
Long-Ferment Pond Activation (Best Quality)
- Collect 1L water from a clean, algae-rich pond.
- Add 1 tbsp molasses + a pinch of rock dust (trace minerals).
- Place in a clear container, cover with loose lid, and keep in bright, indirect sunlight for 10-20 days.
- Success Signs: Water develops a reddish-purple hue (PSB growth) and a clean, earthy smell. No black sludge. No foul odor.
Accelerated PSB Method (If You Have Starter)
- Mix 1g of commercial PSB starter, 5g ammonium sulfate, 1 tbsp molasses in 1L non-chlorinated water.
- Keep in bright light for 7-10 days until deep red.
Upgrade: Add 0.5g Spirulina powder to accelerate PSB multiplication.
Culture 4: Wild Yeast Water from Fruit Skins
Primary Function: Boosts yeast population for ethanol & B-vitamin synthesis. Essential for rapid anaerobic fermentation in bran.
- Take 100g of organic fruit skins (banana, grape, apple). Do not wash heavily.
- Add to 500ml non-chlorinated water with 2 tbsp jaggery.
- Ferment at 25-30°C for 2-3 days until bubbly and fruity-smelling.
- Strain. Use within 1 week.
Baker’s Yeast Boost: For guaranteed activity, dissolve 0.5g of active dry baking yeast in 50ml of this culture 12 hours before use. This supercharges the yeast population.
Culture 5: Forest Soil / Compost Microbial Extract
Purpose: Introduces actinomycetes, Trichoderma, and lignin-degrading fungi. Foundation for a mature microbial community.
- Mix 2 cups forest humus or old compost with 2L water.
- Add 1 tbsp molasses + 1 tsp rice bran.
- Aerate with aquarium pump 48 hours.
- Rest 6 hours, then strain. Yield: 1.5 - 1.7 L.
Upgrade: Add 0.5g Trichoderma powder for stronger fungal colonization.
Culture 6: Fortified Jaggery - Molasses Mineral Solution
Purpose: Provides high-energy sugars and essential micronutrients for peak microbial growth during fermentation.
- Dissolve 200g jaggery + 50g blackstrap molasses in 500ml warm water.
- Add 1g Epsom salt (Mg), 1g zinc sulfate, and a pinch of rock dust.
- Cool fully. Yield: ~750 ml.
Upgrade: Add 1 - 2 ml seaweed extract for potassium & alginates.
Final Liquid Blend Protocol for 1kg Dry Mix
On mixing day, combine your activated cultures into ~500 - 550 ml total liquid.
- LAB Serum: 200 ml (Core acidifier & pathogen control)
- Fortified Jaggery Solution: 150 ml (Primary microbial food)
- PSB Pond Water: 50 ml (Odor control + PSB boost)
- FPJ (Tulsi - Seaweed): 50 ml (Hormones + wild yeasts)
- Forest Soil Extract: 30 ml (Fungi + actinomycetes)
- Wild Yeast Water: 20 ml (Yeast amplification)
Critical Integration Step:
Warm 100ml of the blend to 40°C and dissolve the following for perfect distribution:
- 5g Humic Acid
- 1g Biovita X (microbial consortia)
- 1g Mycorrhiza (Glomus spores)
Re-mix this concentrated slurry into the remaining liquid and proceed to moisten the bran to 35 - 40% moisture.
Stage 3: Inoculation & Controlled Anaerobic Fermentation
The critical 28-day microbial colonization process
Step-by-Step Inoculation & Packing
- Sanitize: Clean all surfaces and tools with food-grade hydrogen peroxide or vinegar.
- Create a Well: Place dry mix in a large bowl. Form a deep well in the center.
- Gradual Mixing: Pour ¾ of your liquid blend into the well. Using gloved hands, mix from center outward. Ensure no dry pockets remain.
- The Clench Test (Most Critical):
- Grab a fistful and squeeze with maximum force.
- Perfect: Forms a solid ball that holds shape. When you press your thumb into it, it cracks and crumbles. 1-2 drops of liquid max.
- Too Wet (>50% moisture): Water streams out, feels muddy. Remedy: Mix in additional dry wheat bran (50g at a time).
- Too Dry (<35% moisture): Falls apart, no moisture. Remedy: Add more liquid blend, one tbsp at a time.
- Anaerobic Packing:
- Pack moist bran tightly into a glass jar or fermentation crock.
- Use a tamper to compress every 2-inch layer and eliminate air pockets.
- Fill only to 70% capacity. Sprinkle a thin layer of sea salt on top to deter surface mold.
- Seal airtight. Label with "Day 0" and expected finish date.
Fermentation Monitoring Parameters
- Ideal Temperature: 28-30°C (82-86°F)
- Acceptable Range: 24-35°C (75-95°F)
- Too Cold (<20°C): Fermentation stalls
- Too Hot (>35°C): Risks killing LAB, favors putrefying bacteria
- Duration: Minimum 14 days, Optimal 28 days
- Golden Rule: DO NOT OPEN.
The Four Phases of Fermentation: A Biological Timeline
| Phase | Timeline | Microbial Activity & Chemical Changes | Visual/Olfactory Signs & Actions |
|---|---|---|---|
| 1. Lag Phase | Days 0-3 | Microbes activate, acclimate, and begin metabolizing simple sugars and organic acids. Initial pH drop begins. | Container may feel slightly warm.
Action: Place in dark, stable-temperature location. DO NOT OPEN. |
| 2. Exponential (Log) Phase | Days 4-14 | Explosive growth of LAB and yeasts. Rapid production of lactic acid, ethanol, and CO₂. pH drops sharply to ~4.0-4.5. | Strong sour, pickle-like smell near seal. Container may bulge from CO₂.
Action: If bulging excessively, briefly "burp" lid (1-2 sec) and reseal. Avoid frequent opening. |
| 3. Stationary Phase | Days 15-25 | Nutrient depletion slows growth. LAB dominate. PSB and actinomycetes become more active. pH stabilizes at ~3.5-4.0. | Aroma remains strong but less aggressive. Pressure buildup decreases.
Action: No action needed. Maintain stable temperature. |
| 4. Maturation Phase | Days 26-28+ | Fermentation complete. Microbial activity slows as they enter dormant state, preserved by acidity and lack of oxygen. | Aroma is pleasant, complex, and stable.
Action: Prepare for drying. Batch is ready. |
Advanced Troubleshooting Guide
Problem: Foul, Putrid Odor (Like Rotten Eggs) Upon Opening.
Causes: 1) Moisture >50% causing anaerobic rot (Clostridium). 2) Contaminated liquid culture. 3) Temperature too high (>35°C).
Solution: Batch is likely lost. Discard. Review moisture test and ensure culture sterility.
Problem: No Sour Smell, Sweet or No Aroma After 10 Days.
Causes: 1) Temperature too low (
<20°C). 2) Inactive or dead LAB culture. 3) Antagonistic chemicals in ingredients.
Solution: Move to warmer spot. If no change, unpack, add 100ml fresh LAB serum, repack.
Problem: Excessive White, Fuzzy Mold on Surface (When Opened).
Causes: 1) Air pockets in packing. 2) Insufficient LAB dominance initially. 3) Opened during fermentation.
Solution: Scrape off top 2cm. Underlying bran is usually fine. Ensure better compaction next time.
Problem: Black or Green Mold.
Cause: Significant oxygen exposure or gross contamination.
Solution: Discard entire batch. Sterilize all equipment.
Stage 4: Precision Drying, Storage & Viability Assurance
Preserving microbial viability for 18-24 months
The goal is to reduce moisture to below 10% without killing microbes through heat or UV damage.
Three-Stage Drying Protocol
Stage 1: Primary Drying (Days 1-3) - Moisture: 45% → 25%
- Action: Spread fermented bran 2cm thick on stainless steel screens or trays lined with unbleached paper.
- Environment: Dehumidified room or well-ventilated box with gentle fan for cross-flow.
- Check: Bran will feel damp but no longer wet, and will begin to crumble.
Stage 2: Secondary Drying & Curing (Days 4-10) - Moisture: 25% → 12%
- Action: Break into pea-sized pieces. Reduce layer thickness to 1cm. Move to dark, ventilated cupboard.
- Action: Turn bran thoroughly twice daily.
- Purpose: This slower drying allows microbial communities to stabilize into dormancy.
Stage 3: Final Desiccation (Day 11+) - Moisture: 12% → <10%
- Action: Use a food dehydrator at 35°C (95°F) max for 2-4 hours, or continue air-drying in low humidity.
- The Ultimate Dryness Test: Grind a pinch between fingers. It should feel bone-dry, make a crisp sound, and not stick to the side of a glass jar. Place a sample in a sealed jar overnight — zero condensation should form.
Pro Method: DIY Desiccant Chamber for Humid Climates
For climates with >70% humidity, build a chamber:
1. Place bran on trays inside a large, airtight plastic storage tote.
2. At the bottom, place an open container with 2kg of reusable silica gel beads or calcium chloride (industrial desiccant).
3. Seal the tote. The desiccant will actively pull moisture from the air and the bran.
4. Reactivate desiccant weekly by drying in an oven (silica gel) or replacing (calcium chloride).
This can dry bran perfectly in 5-7 days even at 80% RH.
Advanced Storage Strategy for Maximum Shelf Life
| Tier | Method | Procedure | Shelf Life | Best For |
|---|---|---|---|---|
| Working Supply | Airtight Kitchen Container | Store in opaque, airtight jar with 5g silica gel packet. Keep in cool pantry. | 1-2 months | Frequent use |
| Medium-Term | Vacuum Sealed Portions | Seal in 200g food-grade bags with oxygen absorber packet. Store in dark cupboard. | 12-18 months | Seasonal use |
| Long-Term Archive | Mylar Bag + Refrigeration | Vacuum seal as above, then place inside a Mylar bag with large oxygen absorber. Store at 4°C. | 24+ months | Backup stock |
Comprehensive Viability & Potency Testing
Test 1: Milk Curdling Test (Basic Activity)
Confirms live, active LAB.
Procedure: Mix 1 tbsp bran into 1 cup warm milk. Keep at 25-30°C for 24-48 hours.
Success: Milk separates into solid curds and clear whey, with a clean yogurt smell.
Test 2: Seed Germination Bioassay (Phytotoxicity & Growth Promotion)
Tests for harmful by-products and beneficial compounds.
Procedure:
1. Make a 1% bran extract (10g bran in 1L water, shake, filter).
2. Soak 20 radish seeds in extract; 20 in plain water (control).
3. Place on moist paper towels for 72 hours.
Success: Extract-soaked seeds show equal or faster germination and longer root hairs than control.
Test 3: Decomposition Performance Test (Real-World Efficacy)
The ultimate test of your bran's function.
Procedure:
1. Take two identical containers with 100g of kitchen scraps.
2. Mix 15g of your bran into one (Test). Leave other untreated (Control).
3. Seal and keep at 25°C for 10 days.
Success: Test scraps show white mold, sour pickle smell, minimal decomposition. Control is likely putrid and slimy.
The Complete Master Timeline: 36 Days to Perfection
This process is a commitment to quality. Here is the integrated timeline for a 28-day fermentation batch.
Phase 1: Liquid Library Cultivation (Days -21 to -1)
Sequential start of PSB Pond Water, Forest Soil Extract, LAB Serum, FPJ, Wild Yeast, and Jaggery Solution.
Day 0: Mixing & Inoculation
Prepare dry matrix, blend liquids, inoculate, pack, and seal for fermentation.
Phase 2: Anaerobic Fermentation (Days 1 to 28)
Undisturbed fermentation at 28-30°C. Microbial succession through Lag, Exponential, Stationary, and Maturation phases.
Phase 3: Drying & Curing (Days 29 to 36)
Three-stage drying to below 10% moisture. Performance testing.
Day 36+: Storage & Use
Package using tiered storage strategy. Your Ultimate Enhanced Bokashi Bran is ready to power your composting system.
Total Active Work Time: 8-10 hours (spread over 5 weeks).
Total Calendar Time: 36 days from first culture to stable product.
Yield: 1 kg of the most potent, scientifically-crafted Bokashi bran possible.
The Hallmarks of Master-Crafted Enhanced Bokashi Bran
Your batch is a success when it meets all these criteria:
- Aroma Profile: Complex, vibrant, and pleasant. Notes of sharp sourdough, earthy mushrooms, clean vinegar. No alcohol, ammonia, or decay.
- Physical Structure: Dry, granular, free-flowing. Crumbles easily with a slight rustling sound. A visual sparkle from mineral dust.
- Performance Signature: In your kitchen bucket: produces rich, amber leachate within 2-3 days; surfaces with white mycelium; pickles waste without foul odor in 10-14 days.
- Biological Legacy: Passes all three viability tests. When used to treat waste for worms, it increases reproduction rates and yields a vermicompost with enhanced structure, water retention, and plant growth response.
This meticulously crafted bran represents the pinnacle of home-scale microbial cultivation. It transforms the first stage of your integrated system from simple waste preservation into a powerful act of biological alchemy, setting an unparalleled standard for everything that follows.
Step 2: Mastering Bokashi Bucket Setup & Fermentation
Transforming your kitchen waste into nutrient-rich pre-compost through bokashi fermentation requires precision, understanding, and attention to detail. This comprehensive guide covers every aspect of setting up, managing, and troubleshooting your bokashi system to ensure consistent success.
Advanced Bucket Preparation & System Engineering
Building the perfect anaerobic environment for controlled fermentation
The foundation of successful bokashi fermentation lies in creating the perfect anaerobic environment. This isn't just about using any container — it's about engineering a system that favors beneficial microorganisms over putrefying bacteria. The difference between proper fermentation and rotting comes down to your setup details.
Essential Materials & Tools (Two-Bucket Rotation System)
For a professional two-bucket rotation system where one bucket ferments while the other collects new waste:
- Two 20 — 25L Food-Grade HDPE Industrial Buckets (Recycling Code #2): These are your main fermentation vessels. Choose buckets made from HDPE (High-Density Polyethylene), which is chemically inert, safe for acidic fermentation liquids, and resistant to cracking. The buckets should be thick-walled (industrial grade), not thin paint buckets, because thin buckets deform under pressure and compromise the airtight seal. Ensure they have never been used to store chemicals, paints, oils, or pesticides. Food-grade HDPE buckets maintain structural stability during long-term anaerobic fermentation.
- Two Airtight Lids with Rubber Gaskets: Essential for maintaining a true anaerobic environment. The rubber gasket (ring inside the lid) prevents oxygen from entering when the bucket is closed. Before use, perform the airtightness test: close the empty bucket, press the sides firmly, and check for escaping air. If you feel air leaking or hear a hissing sound, the lid requires reinforcement (weather-stripping foam). A proper gasket ensures lactic acid bacteria dominate and prevents foul-smelling putrefaction.
- Two 5 — 10L Small Buckets/Containers (No Spigot Installed Initially): These will be your leachate collection buckets. Each fermentation bucket will sit on top of one collector bucket. Choose small containers that are strong, stable, and tall enough to collect several days' worth of bokashi leachate. Since these buckets do not come with spigots, you will manually install a spigot at the lowest practical point on the side wall to allow easy draining of leachate without needing to lift the bucket. A lid is optional but recommended to prevent contamination. These lower buckets must be sturdy enough to support the full weight of a fermentation bucket filled with scraps.
- Two Spigots/Taps (½ inch recommended): Since your small collector buckets do not have pre-installed spigots, you will install two yourself — one for each collector bucket. Choose BPA-free food-grade plastic or brass spigots. A ½-inch diameter balances good liquid flow with minimal clogging risk. Ensure each spigot includes two rubber washers (inside and outside) to ensure leak-free operation. These spigots allow you to drain acidic bokashi leachate without moving the system.
- Power Drill with 6 — 8mm & ¼-inch Bits: The 6 — 8mm bit is used for drilling drainage holes at the bottom of the fermentation buckets. These holes must be clean, round, and smooth to allow fast liquid flow while minimizing the chance of clogging. The ¼-inch (6.35mm) bit is used for: • optional micro-holes in collector lids (if needed for ventilation) • extra small holes near the bucket edge if drainage needs improvement • creating pilot holes if spigot installation requires multi-step drilling Use a sharp drill bit to avoid tearing or cracking the plastic.
- Fine Mesh Screen or Landscape Fabric: This material is placed inside the fermentation bucket, covering the drilled bottom. It prevents food scraps from slipping through or blocking the drainage holes. Fine mesh ensures that liquid drains quickly while solids stay in the upper bucket. You can secure the mesh using zip ties, food-safe adhesive dots, or by cutting it slightly larger so it stays pressed against the bucket walls.
- Measuring Tape, Marker & Safety Glasses: Precise measuring ensures correct hole placement for spigot installation and drainage pattern layout. A permanent marker is needed for marking drilling locations. Safety glasses protect your eyes from plastic chips and dust generated while drilling. Never drill plastic containers without protective eyewear — small shards can ricochet unpredictably.
- Weather-Stripping Foam: Used to reinforce or improve the airtight seal on lids that are slightly loose or lack a proper gasket. Applying a thin foam strip around the bucket rim ensures a compression seal, preventing oxygen entry. This dramatically improves fermentation efficiency and prevents contamination by aerobic bacteria.
- PTFE Tape (Thread Seal Tape): Essential for sealing the threads of the spigots installed in your leachate collector buckets. Wrap the threads 3 — 4 times clockwise before tightening the spigot. PTFE tape prevents micro-leaks around the threads, ensuring your leachate collector stays airtight and leak-free. Without PTFE, even small gaps can allow liquid seepage or air entry.
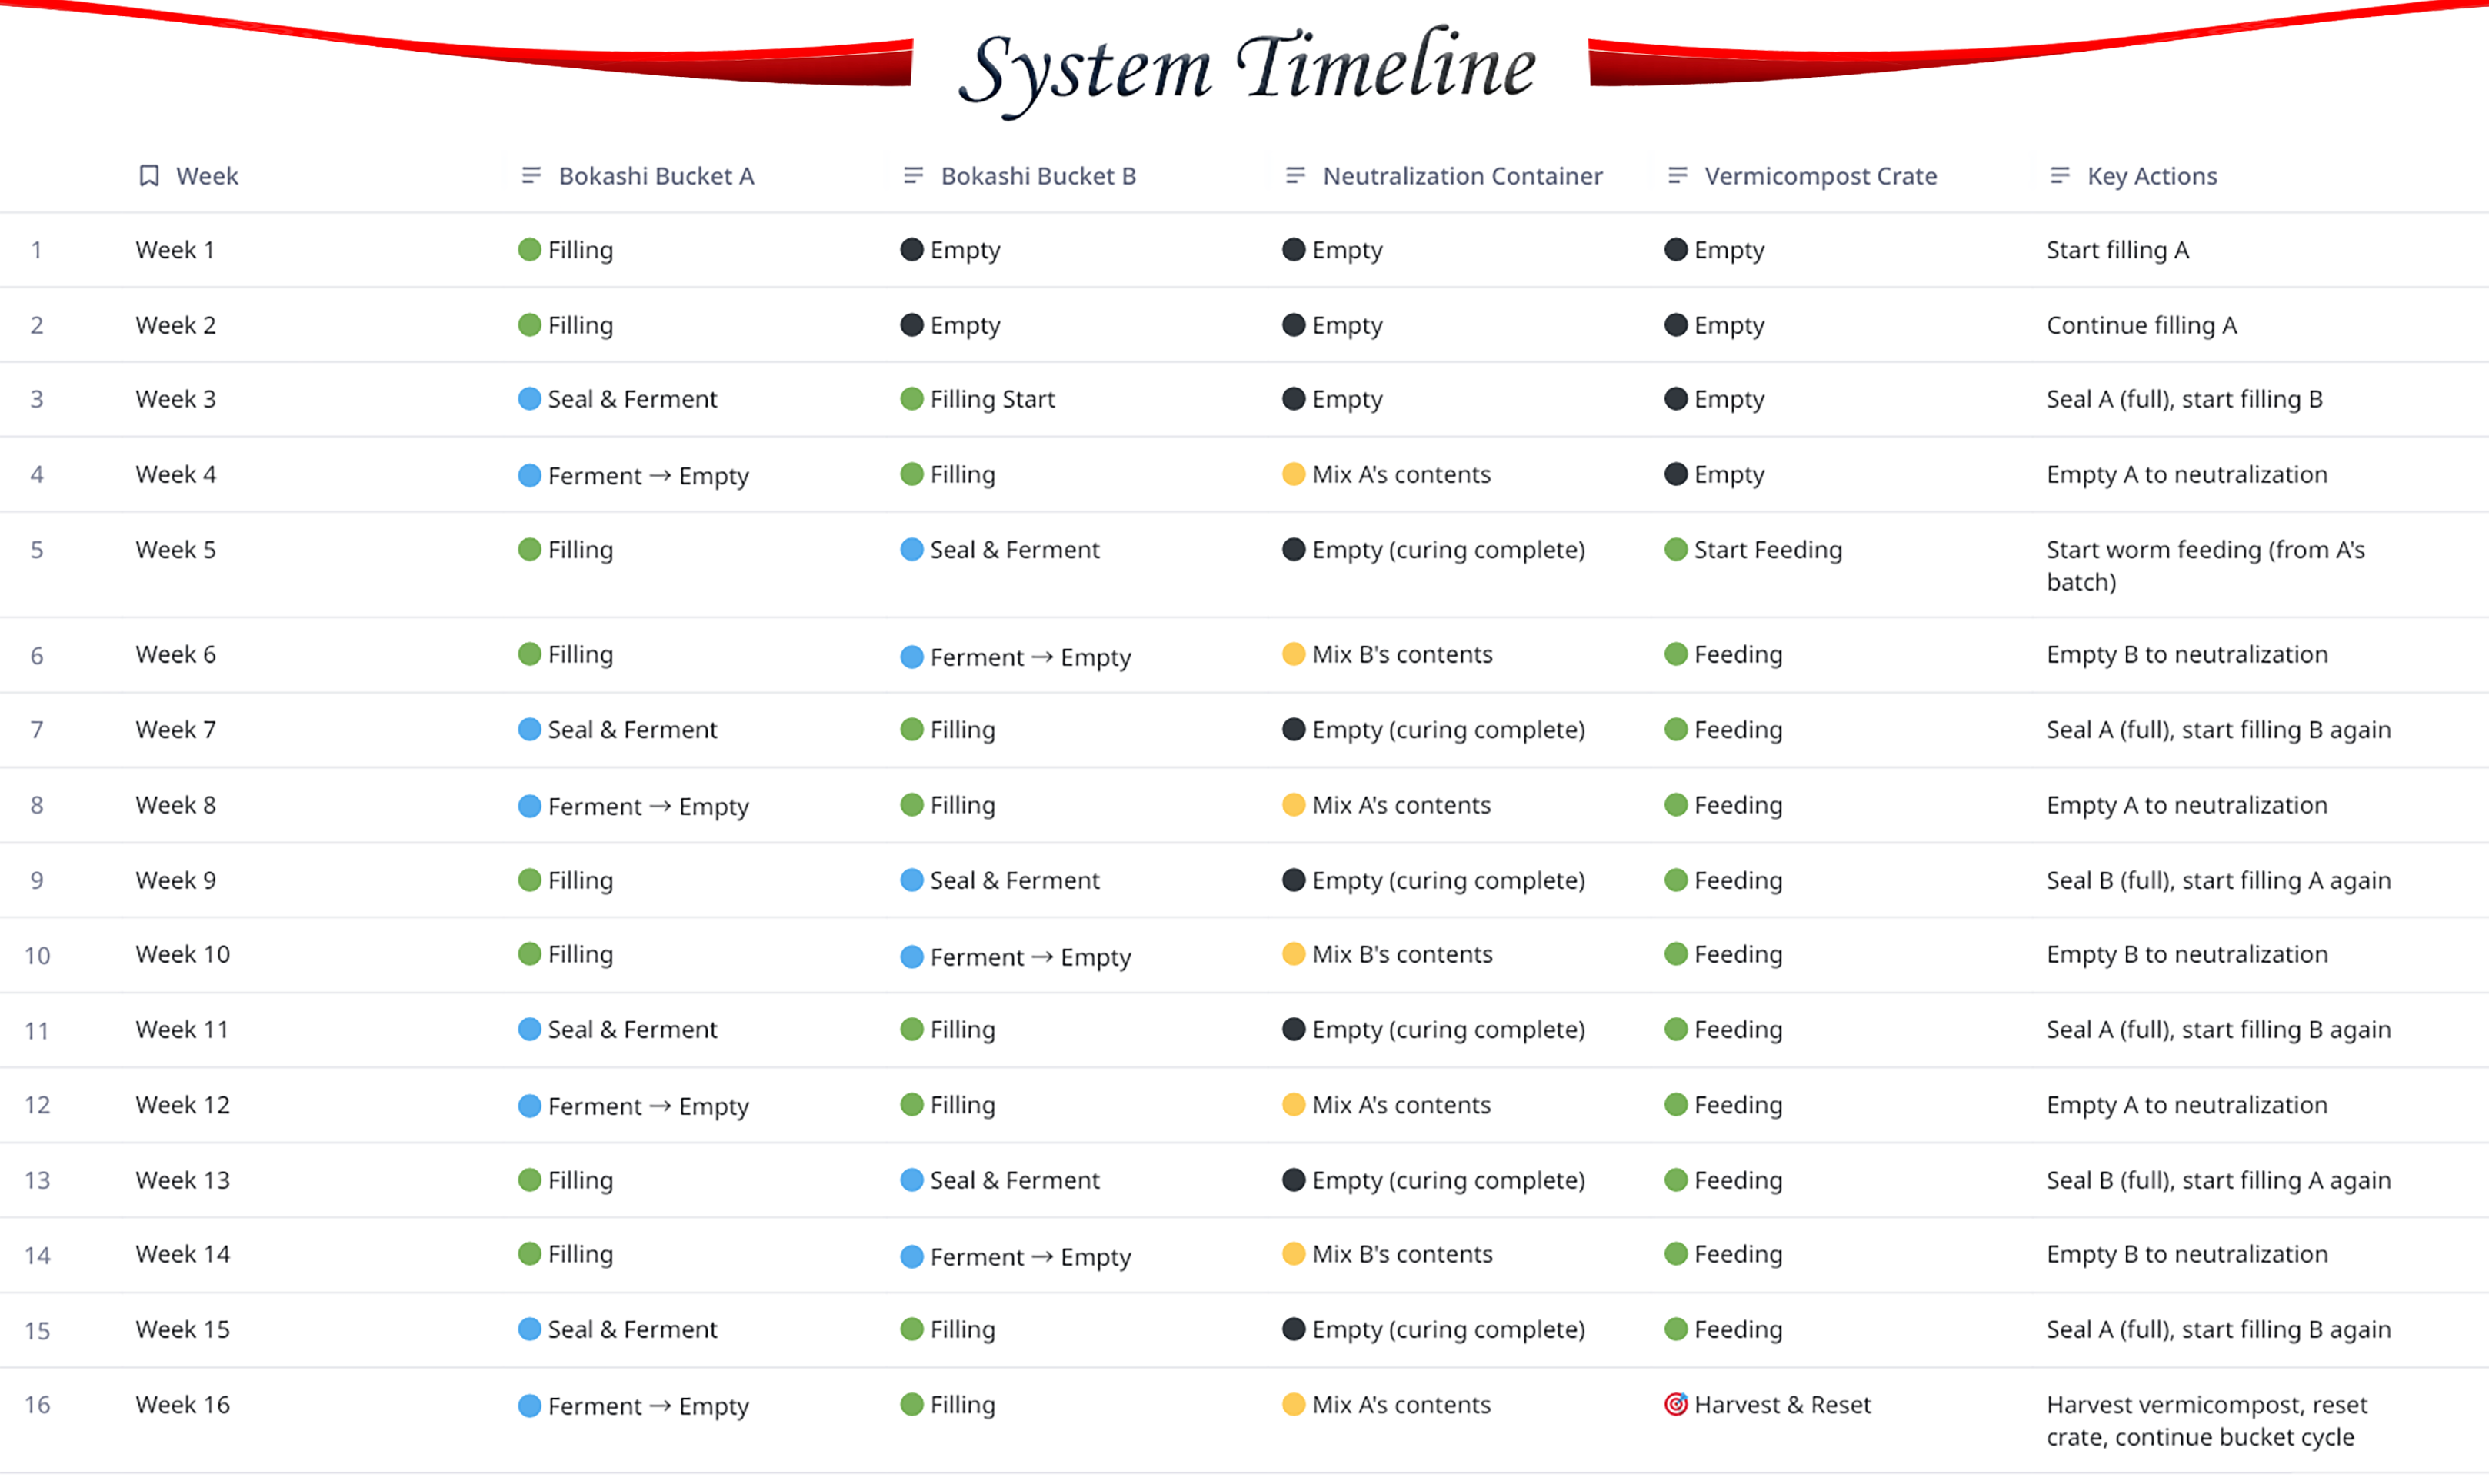
Two-Bucket Rotation System
How it works: You'll use two identical fermentation buckets. While Bucket A ferments for 2 weeks, you add daily waste to Bucket B. When Bucket A finishes fermenting and you bury its contents, Bucket B is sealed to ferment and you start fresh with Bucket A again.
The Science Behind Bokashi Fermentation
Bokashi uses Effective Microorganisms (EM) — lactic acid bacteria (LAB), yeasts, and phototrophic bacteria that thrive in oxygen-free environments. LAB rapidly converts sugars into organic acids, dropping pH to 3.5 — 4.0 within days, creating conditions where harmful pathogens cannot survive.
Your bucket design must maintain strict anaerobic conditions to favor these beneficial microbes over rotting bacteria. In this system: upper bucket ferments while lower bucket collects leachate.
Bucket Preparation Procedure
Step 1: Select & Inspect Buckets
- Choose Durable Buckets: Use two industrial-grade HDPE buckets (15L–25L). Ensure both have tight-fitting lids. Weak lids reduce anaerobic efficiency.
- Check Structural Integrity: Inspect for cracks, dents, or uneven bases. A damaged bucket can cause leaks, poor sealing, and structural failure during fermentation.
- Clean Before Use: Wash with mild soap and warm water. Avoid strong chemicals—they may kill EM microbes later.
Step 2: Prepare Fermentation Bucket (Drilled Bottom)
- Mark Hole Layout: Draw 15–25 evenly spaced points on the bottom of the bucket. This ensures uniform leachate drainage.
- Drill Drainage Holes: Using a 6–8 mm drill bit, drill all marked points. Remove plastic burrs to prevent mesh tearing.
- Optional Side Holes: Drill 3–4 holes (6 mm) around the bottom sidewall at 1.5 cm height for auxiliary drainage during heavy fermentation.
- Install Mesh Filter: Place a cut-to-size piece of landscape fabric, fine nylon mesh, or stainless mesh inside the bucket covering the holes.
- Add Drainage Plate (Recommended): Insert a perforated plastic grid or raised tray to keep waste off the bottom and improve liquid flow.
Step 3: Prepare Leachate Collector Bucket
- Install Spigot: Drill a 16–18 mm hole at the lowest front side of the bucket. Insert a spigot with 3–4 wraps of PTFE tape to prevent leaks.
- Create Lid Opening: Cut a centered 3–4 cm hole in the collector lid so leachate can drip directly inside.
- Stabilize the Upper Bucket: Place 2–4 wooden blocks, bottle caps, or small risers around the hole on the lid to support the fermentation bucket.
- Odor & Splash Control: Add 1–2 cm of charcoal chips, newspaper, or rice hulls inside the collector bucket to absorb odors and cushion droplets.
Step 4: Test and Improve Anaerobic Seal
- Lid Seal Test: Close the fermentation bucket and press the sides. The lid should not release air. It must feel springy and airtight.
- Add Gasket If Needed: If leakage occurs, apply weather-stripping foam tape around the rim to create a tight anaerobic seal.
- Repeat Test After Gasket Application: Re-close and retest the bucket until zero air escapes.
Step 5: Fit the System Together
- Position Buckets: Place the drilled bucket onto the collector lid, ensuring it sits level on support blocks.
- Check Drainage Alignment: Pour 500 ml of water into the upper bucket. Ensure it drains smoothly into the collector without external leakage.
- Confirm Spigot Function: Open the spigot to ensure water flows out cleanly and easily.
Step 6: Prepare Bokashi Bedding Layer
- Add Initial Absorption Layer: Spread 1–2 handfuls of dry bokashi bran or rice husk in the bottom of the drilled bucket. This absorbs early moisture and kickstarts fermentation.
- Optional Additives: You may mix in a teaspoon of EM1, jaggery solution, or LAB serum to enhance fermentation speed.
- Avoid Wet Materials: Never add wet cocopeat or soil at this stage—it slows anaerobic activity.
Step 7: Place Buckets in Final Operation Area
- Choose Location: Place the complete setup in a shaded, dry, and cool corner of your rooftop, balcony, or indoor utility area.
- Avoid Direct Sunlight: Heat above 38°C can kill or slow bokashi microbes.
- Ensure Stable Surface: Keep buckets on a level platform to maintain proper drainage and airflow.
Step 8: Hygiene & Maintenance Setup
- Keep Safety Items Nearby: Store gloves, a cleaning cloth, and a mild soap solution for quick spills.
- Bokashi Bran Storage: Keep bran in an airtight container away from moisture.
- Leachate Schedule: Plan to drain leachate every 24–48 hours to prevent overflow and acidity buildup.
Step 9: Final System Verification
- Check Air-Tightness: Confirm that the fermentation bucket lid locks down fully without gaps.
- Check Bucket Stability: Ensure no wobbling or tilting that could affect drainage.
- Confirm Complete Flow System: Leachate must drop through the holes, pass through the lid opening, and collect inside the lower bucket without leakage.
Your Bokashi System Is Now Fully Ready for Use.
Two-Bucket Rotation Tip
Label your buckets "A" and "B" with start dates. When Bucket A is 90% full, seal it to ferment and start using Bucket B. This creates continuous processing with no downtime between batches.
Critical Success Factors
- Flawless Drainage System: Ensure leachate flows immediately into the collector bucket. Stagnant liquid inside the fermentation bucket quickly shifts the environment from controlled anaerobic fermentation to putrefaction, causing foul odors, black sludge formation, and microbial imbalance.
- 100% Airtight Fermentation Chamber: The lid must seal so tightly that no air escapes when you squeeze the bucket. Even tiny air leaks allow oxygen to enter, interrupting bokashi fermentation, encouraging mold overgrowth, and slowing down acidification.
- Consistent Leachate Removal: Drain the collector every 24–48 hours. Accumulated leachate increases humidity inside the system, raises internal pressure, and can force liquid back up into the waste layer—leading to rot, off-gassing, and nutrient loss.
- Firm Compression of Each Waste Layer: Press down food waste firmly after every addition to eliminate trapped air pockets. Air pockets allow aerobic microbes to survive, resulting in uneven fermentation, mold patches, and incomplete breakdown of materials.
- Balanced Moisture Levels: Waste should feel moist but never wet. Excess liquid leads to slimy textures, while overly dry materials slow fermentation and reduce leachate production.
- Adequate Bokashi Bran Coverage: Every fresh layer must be coated with bran to inoculate the waste with lactic acid bacteria. Insufficient bran results in weak fermentation, longer processing times, and odor problems.
Critical Warning: The "Almost Airtight" Problem
If your bucket is 95% sealed, you'll experience 100% failure over time. Rot-causing bacteria need only trace amounts of oxygen to outcompete lactic acid bacteria. When testing, if you can smell anything from a sealed bucket (even pleasant fermented smells), oxygen is getting in. This problem compounds over the 2-week fermentation period and will ruin your batch. Fix all leaks completely before adding any organic material. Remember: Fermentation smells should only be detectable when you open the bucket, not when it's sealed.
Pro Tip: The DIY Grid Solution for Superior Drainage
Instead of using a prefabricated false bottom, create a custom grid from 2cm diameter PVC pipes. Cut them into lengths that form a stable grid when placed crosswise in the bucket bottom. This creates multiple drainage channels and is more durable than plastic plates. Secure the intersections with cable ties, and cover with landscape fabric. This system handles wetter mixes better, prevents sagging, and is easier to clean between batches. The elevated grid design also reduces the risk of materials becoming waterlogged.
Strategic Waste Management & Layering Protocol
The art of preparing and layering materials for optimal microbial colonization
The art of bokashi success lies in how you add materials. This isn't simply dumping kitchen scraps — it's creating optimal, uniform conditions for microbial colonization and rapid fermentation through systematic layering and preparation.
Core Principle: Bokashi Bran as Microbial Inoculant
Bokashi bran is not just an "additive" — it's a concentrated microbial delivery system. The wheat or rice bran carriers are infused with Effective Microorganisms during manufacturing. Each tablespoon contains approximately 10-100 billion lactic acid bacteria that immediately begin acidifying their environment when activated by moisture. The bran also absorbs excess liquid and provides initial food for the microbes. You cannot use too much bran — it only accelerates fermentation and improves results. Think of bran as both starter culture and pH buffer.
Comprehensive Waste Categorization Guide
Waste Categories & Processing Guidelines
Optimal / Fast Fermenters
Examples: Fruits, vegetables, coffee grounds, tea leaves, eggshells, fresh herbs
Preparation: Chop to 2-3cm pieces. Crush eggshells to increase surface area. Drain excess liquid from fruits like melons and citrus.
Bran Ratio: 1 tablespoon per 2cm layer. Fermentation Time: 7-10 days.
Notes: These contain simple sugars that LAB prefer. They ferment quickly and produce excellent leachate.
Moderate / Good Candidates
Examples: Bread, pasta, rice, grains, nuts, cooked beans, cereal, oatmeal
Preparation: Break into small pieces. Rinse salty items like leftover pasta sauce. Break up dense clumps.
Bran Ratio: 1.5 tablespoons per layer. Fermentation Time: 10-14 days.
Notes: Provides complex carbs for sustained fermentation. Can be slightly drier, so may need moisture adjustment.
Challenging / Slow Fermenters
Examples: Meat, fish, dairy, small bones, citrus peels, oily foods, avocado skins
Preparation: Chop finely. Bury in center of bucket surrounded by faster-fermenting materials. Limit to 10% of total volume.
Bran Ratio: 2+ tablespoons per layer. Fermentation Time: 14-21 days.
Notes: Add extra bran around these items. Monitor closely for odor changes. Consider pre-freezing meats to break down fibers.
Absolute Exclusions
Examples: Liquids (soups, oils, milk), moldy food, pet waste, paper, plastics, chemicals, diseased plants
Rule: Do not add under any circumstances.
Reason: These disrupt microbial balance, don't break down properly, or introduce harmful pathogens. Moldy food may contain toxins that survive fermentation.
Step-by-Step Layering Technique
Preparation Phase (Before the Bucket)
Collect kitchen scraps in a small countertop container with a loose-fitting lid (not airtight). Chop or break larger items to 2-3cm pieces — smaller pieces dramatically increase surface area for microbial action. Drain excessively wet items in a colander before adding to your collection container. Consider keeping a separate container in your freezer for scraps — freezing breaks down cell walls and kills fruit fly eggs, making materials ferment faster.
The Initial Base Layer
Before adding any waste, sprinkle 2 tablespoons of bokashi bran directly onto the false bottom. This critical step prevents initial waste from sticking to the bottom and ensures immediate microbial colonization. The bran acts as a protective barrier and starter culture that begins working the moment waste is added.
Daily Addition Protocol
- Add 2-3cm of prepared waste in an even layer, spreading to the edges of the bucket
- Sprinkle the appropriate amount of bran evenly over the entire surface — don't just dump in the center. Use a shaker bottle for even distribution
- Compress aggressively using a potato masher, plate, or your fist (wear a glove). Apply pressure until you hear air escaping and see liquid beginning to rise to the surface
- Optionally, place a piece of plastic wrap or a plastic bag directly on the compressed waste to form an additional oxygen barrier between additions
Final Sealing for Fermentation
When the bucket reaches 90% capacity (leave 5-8cm headspace for expansion and gas buildup):
- Add a generous final layer of bran (3-4 tablespoons) to completely cover the surface
- Press down firmly one final time, eliminating all air pockets
- Place a full-coverage plastic sheet or bag directly on the surface, pushing out any air bubbles
- Seal the lid with absolute tightness. This starts the full fermentation clock. Mark the date on the bucket with masking tape and a permanent marker
Pro Tip: The Freezer Pre-Treatment Method
Keep a dedicated container in your freezer for collecting scraps. Freezing accomplishes three important things: 1) It kills fruit fly eggs and larvae present on produce, 2) It breaks down cell walls through ice crystal formation, making materials more accessible to microbes, 3) It allows you to accumulate scraps until you have enough for a proper 5-7cm bucket layer. Thaw frozen scraps in your collection container before adding to the bokashi bucket — the thawing liquid contains nutrients and can be added too. This method virtually eliminates pest problems and accelerates fermentation by 20-30%.
Moisture Management Mastery
The ideal moisture content resembles a wrung-out sponge. When compressed, you should see a few drops of liquid, but not a stream. Excess moisture creates an acidic, oxygen-poor soup that can actually harm the lactic acid bacteria by creating overly concentrated acids.
If Too Wet:
- Drain immediately through the spigot — don't wait
- Add absorbent materials: dry shredded newspaper, cardboard, sawdust, or extra bran
- Mix gently to distribute the absorbent material throughout the wet layer
- Consider removing some of the wettest material and replacing with drier scraps
Prevention Strategy:
- Pre-drain ALL wet materials before adding — use a colander for fruits and vegetables
- Include more "dry" materials like bread, cereal, or paper in daily additions to balance moisture
- Monitor compression — proper compression releases just the right amount of liquid without creating soup
- In rainy/humid seasons, reduce the amount of high-moisture items in your mix
Fermentation Monitoring & Bokashi Leachate Management
Tracking phases, managing byproducts, and ensuring consistent results
Understanding and managing the fermentation process is key to consistent results. This section covers what to expect, how to monitor progress, and how to handle the valuable byproduct: bokashi leachate.
The Four Phases of Bokashi Fermentation
What's Happening: Microbes are activating and beginning colonization. Enzymes start breaking down complex molecules into simpler forms that bacteria can consume.
What You'll See: Little visible change. Possible slight sweet smell from initial sugar breakdown. Minimal leachate production (0-50ml).
Your Actions: Continue normal additions if bucket isn't full. Ensure perfect sealing. No need to drain leachate unless bucket is very full.
What's Happening: Lactic acid bacteria population explodes exponentially. pH drops rapidly to 3.5-4.0. Beneficial yeasts become active, producing CO₂.
What You'll See: Strong sour/pickle smell when opened. White fuzzy mold may appear on surface. Bucket feels warm to touch. High leachate production (50-200ml every 2-3 days).
Your Actions: Drain leachate every 2-3 days to prevent soggy conditions. Continue additions if space remains. Monitor for proper sour smell (not foul).
What's Happening: Microbial growth stabilizes as food sources become limited. Fermentation completes with materials fully acidified and preserved.
What You'll See: Smell mellows to pleasant fermented aroma (like pickles or sauerkraut). Materials look "pickled" but recognizable. Leachate production slows significantly.
Your Actions: Stop adding new material. Let fermentation complete undisturbed. Drain any remaining leachate. Bucket can now be stored for several weeks if needed.
What's Happening: Chemical changes continue slowly. Organic acids further break down tough materials. Material becomes stable pre-compost ready for use.
What You'll See: Very little change. Material may darken slightly. Original shapes still visible but softened. Ready for use in garden or neutralization process.
Your Actions: Use immediately in garden or begin neutralization process. Can be stored sealed for 2-3 months if necessary.
Understanding Bokashi Leachate Composition
Bokashi leachate is a concentrated liquid containing: organic acids (primarily lactic and acetic acids), soluble nutrients leached from the waste (nitrogen, potassium, phosphorus in plant-available forms), fragments of broken-down organic matter, and living beneficial microorganisms. Its pH typically ranges from 3.5-4.5 — highly acidic but beneficial when properly diluted. This is NOT the same as worm tea (vermicompost leachate) which is nearly pH neutral. Never confuse or mix these two liquids. Good leachate has a sour but pleasant smell, like pickles or vinegar; bad leachate smells putrid or rotten.
Leachate Collection & Application Protocol
Leachate Collection Best Practices
- Frequency: Drain every 2-3 days during active fermentation (Phase 2), less frequently in other phases
- Container: Use clean glass or food-grade plastic with a lid that can vent (do not seal tightly)
- Technique: Place container under spigot, open tap slowly to avoid splashing. Close immediately after draining
- Observation: Note color (amber to brown is good, black is bad), smell (sour good, rotten bad), and volume for tracking
- Storage: Use within 24-48 hours for maximum microbial benefit. Store in cool, dark place with loose lid
- Safety: Keep away from children and pets. Label container clearly as "Bokashi Leachate - Not for drinking"
Leachate Application Guidelines
| Application Method | Dilution Ratio | Frequency | Best For |
|---|---|---|---|
| Soil Drench / Root Feed | 1:100 (10ml per 1L water) | Every 2-4 weeks during growing season | Established garden plants, trees, shrubs |
| Compost Pile Activator | Undiluted or 1:10 | When starting new pile or reviving slow compost | Jumpstarting microbial activity in compost systems |
| Drain & Septic Treatment | Undiluted (50-100ml) | Weekly for maintenance, monthly for prevention | Breaking down organic matter in drains, maintaining septic health |
| Foliar Spray (Acid-Loving Plants Only) | 1:200 (5ml per 1L water) | Every 3-4 weeks, early morning or late evening | Blueberries, azaleas, rhododendrons, camellias |
| Lawn Revitalizer | 1:150 (7ml per 1L water) | Monthly during growing season | Improving soil biology under turf grass |
Critical Leachate Safety Warnings
- NEVER use undiluted on plants or soil — the acidity (pH 3.5-4.5) will burn roots and harm soil life
- NEVER store in completely sealed containers — fermentation continues producing CO₂, creating explosion risk
- Discard immediately if foul-smelling — indicates fermentation failure and potential pathogen growth
- Not for edible plant parts — use only as soil drench, never as foliar spray on vegetables you'll eat raw
- Keep away from children and pets — can irritate skin, eyes, and mucous membranes; not toxic but unpleasant
- Do not use on seedlings or young plants — too strong for developing root systems; wait until plants are established
- Avoid contact with metal surfaces — acidity can corrode metals over time; use plastic or glass applicators
Comprehensive Troubleshooting & Problem Resolution
Diagnosing issues and implementing effective solutions
Even with perfect setup and management, issues can arise. This section provides a systematic approach to diagnosing and solving every common bokashi problem, plus guidance on when to salvage versus when to abandon a batch.
The Bokashi Diagnostic Framework
When problems occur, follow this systematic approach:
- Immediate Assessment: Identify exact symptoms — smell type (sour vs putrid), visual cues (mold color, liquid appearance), physical changes (temperature, texture)
- Root Cause Analysis: Match symptoms to likely causes based on recent additions or conditions. Consider: Was the seal compromised? Were challenging materials added? Has weather changed dramatically?
- Immediate Corrective Actions: Implement specific solutions for your identified issue. Don't guess — target the most likely cause first
- Monitoring & Adjustment: After corrective actions, monitor closely for 48-72 hours. If improving, continue; if worsening, escalate solutions or consider abandoning batch
Common Problems & Expert Solutions
Likely Causes:
- Insufficient bran coverage — microbes can't colonize entire mass
- Air leak in bucket/seal — oxygen allows putrefying bacteria to thrive
- Excessive moisture creating anaerobic soup instead of moist ferment
- Large chunks not breaking down, creating oxygen pockets
- Bucket opened too frequently, introducing oxygen repeatedly
Immediate Solution:
- Add ½ cup extra bran, mix gently from top layers only
- Check & fix all seals immediately — test with water if needed
- Drain all liquid, add dry shredded paper or cardboard
- Remove large pieces, chop smaller, return with extra bran
- Seal and do not open for 5-7 days to re-establish anaerobic conditions
Likely Causes:
- Materials too dry — insufficient moisture for fermentation and liquid production
- Temperature too cold — microbial activity slowed dramatically
- Spigot clogged with particles — liquid can't drain
- Too little material for compression to release liquids
- False bottom sitting directly on bucket bottom — no drainage space
Immediate Solution:
- Add moist fruit/vegetable scraps like melon, cucumber, or tomato
- Move to warmer location (20-25°C ideal), consider insulation in cold climates
- Clear spigot with pipe cleaner or thin wire, flush with water
- Add more material to create compression pressure
- Check false bottom elevation — should be at least 3cm above bucket bottom
Likely Causes:
- Too many high-moisture items (melon, citrus, tomatoes) without balancing dry materials
- Inadequate drainage — holes clogged or false bottom malfunctioning
- Not draining frequently enough during active fermentation phase
- Insufficient compression leaving air pockets that become water reservoirs
- Adding liquid foods (soups, sauces, milk) which should be excluded
Immediate Solution:
- Drain immediately and completely — may need to tilt bucket
- Add dry shredded paper, cardboard, or sawdust to absorb excess
- Check false bottom isn't blocked — clean if necessary
- Improve compression technique — eliminate all air pockets
- Remove obviously liquid items if possible
Likely Causes:
- Eggs on fruit/vegetable scraps added to bucket
- Lid not sealing properly — adult flies entering
- Waste exposed on surface without bran covering
- Bucket opened too frequently or left open
- Spigot left open or improperly sealed
Immediate Solution:
- Add thick bran layer (1cm) on top to smurface any eggs or larvae
- Set vinegar traps nearby (jar with apple cider vinegar and drop of soap)
- Ensure perfect lid seal — check gasket, add weather stripping if needed
- Freeze all future fruit scraps 24h before adding to kill eggs
- For maggots inside bucket: add extra bran, seal tightly, fermentation acids will kill them
Understanding Mold Colors:
- White, fuzzy mold: Beneficial yeast growth — GOOD SIGN! Indicates healthy fermentation
- Green, blue, or black mold: Potentially problematic — indicates oxygen presence or contamination
- Orange or pink mold: Rare but concerning — usually indicates serious contamination
Immediate Solution for Problematic Mold:
- Remove visible moldy patches with spoon (dispose in trash, not compost)
- Add generous bran layer (2-3 tbsp) over and around affected area
- Improve compression to eliminate oxygen pockets
- Check and repair any seal leaks immediately
- Monitor closely for 48 hours — if mold returns aggressively, consider discarding batch
Understanding Bokashi Failure
Most "failed" bokashi batches can still be safely converted into usable compost after proper neutralization. Only chemical contamination requires complete disposal.
Critical Warning Signs
- Putrid, rotting smell persists 48 hours after corrective actions — indicates established putrefying bacteria colony
- Maggot infestation is extensive throughout the material (not just surface) — impossible to recover
- Black slime or liquid permeates the entire contents — sign of severe anaerobic rotting
- Chemical contamination suspected (cleaners, pesticides, soap water)
- Multi-colored mold (green, blue, black, orange) covers more than 25% of surface despite treatment
- Material actively hot (>40°C/104°F) with foul smell — dangerous thermophilic decomposition, not fermentation
- Visible gas bubbles rising continuously when opened — indicates methane production from rotting
Important
Even a badly failed bokashi batch (rotten, slimy, smelly) can still be converted into safe soil through proper neutralization.
Only discard completely when chemical contamination is suspected.
How to Safely Use a Failed Bokashi Batch
Instead of throwing it away, convert it into safe soil amendment:
- Neutralize the Batch: Mix 1 part failed bokashi with 2 — 3 parts dry soil or cocopeat. Add thick soil cover and wait 3 — 4 weeks.
- Let It Mature: Wait until rotten smell turns earthy. Acids neutralize and harmful microbes die off.
- Use the Neutralized Material:
- Mix 10 - 20% into potting soil
- Use as bottom-layer fertilizer in grow bags
- Add to aerobic compost piles
- Feed small amounts to vermicompost bin
Chemical Contamination: Discard Immediately
If you suspect chemical contamination, the material must be completely discarded:
- Wear gloves and mask when handling failed batch
- Bury in an unused garden area at least 25cm deep, away from existing plants
- Or, seal in heavy-duty plastic bag for municipal green waste collection
- Clean bucket thoroughly with vinegar or dilute bleach solution before reusing
- Do not add failed batches to compost or worm bins — risk contaminating entire system
Advanced Techniques & System Optimization
Elevating your practice to professional levels
Once you've mastered the basics, these advanced strategies will elevate your bokashi practice to professional levels, increasing efficiency, yield, and consistency.
Master Strategies for Bokashi Excellence
System Design & Workflow Optimization
- The Two-Bucket Rotation System: Maintain two active buckets at all times. When Bucket A reaches 90% capacity, seal it for full fermentation and begin filling Bucket B. This creates continuous processing with no downtime. Label buckets clearly with start dates.
- The "Bran Station" Concept: Keep bokashi bran in an airtight container with a measuring scoop permanently inside. Mount a small whiteboard nearby to track additions, dates, and observations. This creates efficient workflow and reduces forgetting steps.
- Pre-Collection Freezer Method: Accumulate scraps in freezer until you have enough for a proper 5-7cm bucket layer. This batches work, reduces bucket openings, and improves fermentation by starting with partially broken-down materials.
- Dedicated Tools Station: Keep compression tool (potato masher or custom press), gloves, and cleaning supplies in one location near bucket storage. Efficiency comes from eliminating search time.
Environmental & Process Optimization
- Temperature Management: Ideal range is 20-25°C. Use insulation wrap in cold climates, place in shaded area in hot climates. Consider a seedling heat mat for winter fermentation in unheated spaces.
- The "Drop Settle" Technique: After adding waste and bran, seal the lid and gently drop the bucket from 10cm height 2-3 times. This settles materials evenly and eliminates air pockets without manual compression of every layer.
- Seasonal Adjustments: In winter, use 25% more bran and extend fermentation time by 30%. In summer, drain leachate more frequently (daily during peak) and consider partial shade to prevent overheating.
- Humidity Compensation: In high humidity, reduce wet scraps and increase dry materials. In arid climates, add slightly more moist scraps or sprinkle water between dry layers.
Record Keeping & Continuous Improvement System
The Bokashi Master Log
The difference between a beginner and master is systematic observation and adjustment. Maintain a dedicated log tracking these elements for every batch:
Essential Tracking Categories:
- Batch Identification: Start date, expected completion, bucket ID, location in your system
- Materials Added: Types, amounts, preparation methods, any challenging items included
- Bran Usage: Quantity per addition, total per batch, brand/type of bran used
- Environmental Conditions: Temperature range, humidity, location, season, weather patterns
- Process Observations: Smell development timeline, visual changes, leachate details (color, volume, smell)
- Problems & Solutions: Issues encountered, corrective actions taken, results of interventions
- Outcome Assessment: Final quality rating, use method (burial, compost, etc.), results in garden
- Timeline Deviations: Any variations from expected fermentation time and possible causes
Success vs Problem Indicators: A Sensory Comparison
| Success Indicator | What It Looks/Smells Like | Problem Indicator | What It Looks/Smells Like |
|---|---|---|---|
| Proper Fermentation | Sweet-sour, pickle-like smell; white fuzzy mold on surface; materials recognizable but "pickled"; no putrid odors | Rotting/Failure | Putrid, foul, rotting smell; black/green mold; slimy, mushy texture; maggots present |
| Good Leachate | Amber to brown color; sour but pleasant smell; moderate production (50-200ml weekly); slightly cloudy | Bad Leachate | Black color; foul, rotten smell; excessive production or none; slimy texture; sewage-like odor |
| Correct Moisture | Materials glisten slightly; few drops when compressed; like wrung sponge; no free liquid in bottom | Moisture Problems | Either bone dry or soupy wet; no liquid when compressed or streams of liquid; materials floating |
| Healthy Mold | White, fuzzy, cotton-like; pleasant fermented smell; only on surface; indicates active yeasts | Problem Mold | Green, black, orange colors; slimy texture; spreading through materials; foul accompanying smell |
The Ultimate Pro Tip: Cultivating Microbial Intuition
Bokashi mastery isn't about following rigid rules — it's about developing intuition for microbial processes. Your most valuable tools are your senses: Learn what "normal" fermentation smells like for YOUR unique mix of kitchen waste. Recognize the visual cues of successful pickling versus problematic rotting. Feel the right moisture content through experience rather than measurement. Listen to the sounds of proper compression (hissing air escape). When in doubt, remember that most perceived problems resolve themselves if left undisturbed in a properly sealed bucket. Patience and observation will teach you more than any guide ever could. After 5-10 batches, you'll develop a "feel" for the process that allows you to adjust intuitively to different materials, seasons, and conditions.
Ready for the Next Step: Neutralizing Bokashi Pre-Compost
Congratulations! You've now successfully created fermented bokashi pre-compost. Remember, this material is acidic (pH 3.5-4.5) and not yet finished compost. It needs to complete its journey through neutralization before it becomes plant-safe fertilizer.
In the next step, we'll cover the critical process of neutralizing your bokashi pre-compost. This involves:
- Understanding why neutralization is necessary (acidic material can harm plants)
- Multiple methods for neutralizing: soil burial, mixing with alkaline materials, or controlled composting
- Timelines for complete neutralization (2-4 weeks typically)
- Testing pH to confirm neutralization is complete
- Proper storage of neutralized bokashi until garden use
Step 3: Neutralizing Bokashi Pre-Compost - The Critical Bridge to Vermicomposting
Think of neutralization as the compost midwife's role — the moment preserved, acidic Bokashi is gently awakened into life-ready nourishment. Fresh from fermentation, Bokashi pre-compost sits at a sharp pH of 3.5–4.5, rich in lactic acids that protect organic matter but are deadly to worms if rushed. Over the next 7–14 days, this carefully managed aerobic transition transforms that acidic reserve into stable, worm-friendly material. Get this phase right, and your vermicompost explodes with activity. Skip it or rush it, and you risk undoing everything you so carefully fermented.
Understanding the Biochemical Transformation
The science behind turning acidic preservation into worm-friendly nutrition
Microbial Succession: Nature's Handoff System
Bokashi fermentation is like pressing pause on decomposition. Lactic Acid Bacteria (LAB) create an acidic environment (pH 3.5-4.5) that preserves organic matter while suppressing pathogens. Neutralization unpauses this process, initiating a carefully orchestrated microbial handoff.
The Four-Phase Transformation:
Phase 1: Acid Buffering (Days 1-3)
Calcium carbonate from eggshells and alkaline minerals from soil neutralize organic acids. The pH climbs from 4.0 to 5.5 - still acidic but approaching worm tolerance. During this phase, you'll notice the strong fermented smell beginning to mellow.
Phase 2: Aerobic Awakening (Days 3-5)
Oxygen-loving bacteria and fungi emerge from dormancy. As you turn the material, you're literally breathing life into it. White fungal networks (mycelium) appear - these are the decomposers breaking down complex carbohydrates. The smell shifts from fermented to earthy.
Phase 3: Structural Breakdown (Days 5-10)
Cellulose and lignin begin breaking down. The material transforms from recognizable food chunks to homogeneous, dark brown humus. Temperature may rise slightly (mesophilic range: 25-35°C) as microbial activity peaks.
Phase 4: Stabilization (Days 10-14)
The ecosystem stabilizes. pH settles at 6.5-7.5 (perfect for worms), nutrients become plant-available, and humic substances form. The material now smells like rich forest soil and crumbles beautifully in your hand.
The Cost of Skipping Neutralization
I've seen hundreds of composting attempts fail at this stage. Adding raw Bokashi directly to worms causes immediate distress:
- Worm Acidosis: Earthworms' skin burns at pH below 5.5. They'll attempt escape, often dying in the process.
- Oxygen Starvation: Anaerobic conditions suffocate worms within hours.
- Nutrient Lockup: Essential minerals remain bound in acidic complexes, unavailable to plants.
- Pathogen Risk: Without aerobic competition, harmful organisms can proliferate.
Remember: Neutralization isn't optional. It's the critical bridge between preservation and decomposition.
The Perfect Blend: Materials and Their Roles
Creating the optimal mix for successful neutralization
Core Materials (per 5 kg Bokashi) - Quick Reference
| Material | Quantity | Primary Role | Key Quality Check |
|---|---|---|---|
| Mature Vermicompost | 2–3 kg (0.5 part) | Microbial inoculant & pH buffer | Earthy smell, crumbly, no ammonia |
| Cocopeat (Coir) | 2–3 kg (0.5 part) | Moisture regulator & structure | Low salt, pH 5.5–6.5, fibrous |
| Aged Cow Dung | 2–3 kg (0.5 part) | Microbial diversity & nutrients | 6+ months old, earthy aroma |
| Crushed Eggshells | 200 g (1-2 cups) | pH buffer & calcium source | Fine powder, oven-dried |
| Activated Biochar | 1–2 cups | Microbial habitat & nutrient bank | Charged, porous, pH 7-9 |
The Master's Ratio Formula
1 part Bokashi : 0.5 part compost : 0.5 part cocopeat : 0.5 part aged manure : 4% crushed eggshells by weight.
This creates perfect carbon-nitrogen balance, microbial diversity, and pH buffering for 7-14 day neutralization.
Material Details & Preparation
1. Mature Vermicompost / Living Soil
Quantity: 2 - 3 kg (0.5 part per 1 part Bokashi)
Primary Role: Microbial inoculant & pH buffer - introduces billions of aerobic microbes that jumpstart decomposition.
Quality Verification
- Smell: Rich, earthy aroma - no ammonia or sour notes
- Texture: Crumbly, holds shape then breaks apart easily
- Color: Dark brown to black throughout
- Life Signs: Contains worms/cocoons (in vermicompost)
- Moisture: 40-60% - feels like wrung-out sponge
Scientific Function
Introduces 10⁸-10⁹ colony-forming units per gram of aerobic bacteria and fungi. These microbes immediately begin breaking down lactic-acid preserved material while their metabolic byproducts buffer pH. Humic substances act as natural chelators, making nutrients plant-available while stabilizing the entire mixture.
Preparation Steps:
- Screen through ¼-inch mesh to remove undecomposed material
- Test for pesticides with cress germination test if source unknown
- If dry, moisten to 50% moisture 24 hours before use
- Store in breathable container - never plastic bags
2. Cocopeat (Coir)
Quantity: 2 - 3 kg (0.5 part per 1 part Bokashi)
Primary Role: Moisture regulator & structural framework - creates perfect air-to-water ratio for aerobic microbes.
Quality Verification
- pH: 5.5 - 6.5 (neutral to slightly acidic)
- Salinity: Low electrical conductivity (EC < 0.5 mS/cm)
- Texture: Fibrous with no powdery dust
- Color: Brown (not gray or black)
- Expansion: Expands 3-4× when hydrated
Scientific Function
Cocopeat's unique lignin-cellulose structure creates millions of microscopic air pockets while holding 8-9 times its weight in water. This perfect balance prevents anaerobic conditions that cause foul odors. Its high carbon content (C:N ratio ~80:1) balances nitrogen-rich Bokashi, preventing ammonia release. Slow decomposition provides long-term structure throughout neutralization.
Preparation Steps:
- 24 hours before: Hydrate brick with 4× its weight in water
- Rinse test: Squeeze handful - water should run clear, not brown
- Final moisture: Squeeze to "wrung-out sponge" consistency
- Use within 48 hours of hydration
Critical Warning
Never use unwashed cocopeat! High salt content will kill microbes and harm worms. Always perform the rinse test until water runs clear.
3. Aged Cow Dung Manure
Quantity: 2–3 kg (0.5 part per 1 part Bokashi)
Primary Role: Microbial diversity & nutrient catalyst - introduces specialized cellulose-digesting bacteria.
Quality Verification
- Aging: 6+ months old - no heat generation when bagged
- Smell: Consistent earthy aroma (no ammonia or barnyard)
- Texture: Dark brown, crumbly
- Purity: No recognizable straw, bedding, or feed particles
- C:N Ratio: 20:1 to 30:1 (balanced)
Scientific Function
Cow dung contains unique cellulolytic bacteria and actinomycetes that produce enzymes (cellulases, hemicellulases) attacking complex carbohydrates in Bokashi-precompost. The balanced nutrient profile provides "fast food" for microbial multiplication during days 3-7 when population explosion occurs.
Alternative Manures (Adjust Quantities Accordingly):
- Goat/Sheep: Higher nutrient density, faster decomposition - use same quantity
- Rabbit: Can be used fresh (cold manure) - reduce quantity by 30%
- Chicken: Very high nitrogen - use 50% quantity, ensure 12+ months aging
- Horse: Often contains weed seeds - compost at 60°C+ or avoid
4. Crushed Eggshell Powder
Quantity: 200 g (1-2 cups per 5 kg Bokashi)
Primary Role: pH buffer & mineral source - slow-release calcium neutralizes acids over 7-10 days.
Quality Verification
- Consistency: Fine powder (90% passes through 1mm sieve)
- Color: Bright white (not yellow or stained)
- Purity: Completely membrane-free
- Dryness: Oven-dried (no moisture, prevents mold)
- Storage: In airtight container (prevents clumping)
Scientific Function
Eggshells are 94% calcium carbonate (CaCO₃). When exposed to acidic conditions (pH <6.5), they slowly dissolve, releasing calcium ions that neutralize organic acids. This gradual buffering prevents pH shock to microbes. Calcium improves soil structure by promoting flocculation and provides essential nutrient for plant cell walls and microbial enzyme function.
Preparation Steps:
- Rinse shells immediately after use (prevents odors)
- Sun-dry or oven-dry at 100°C for 30 minutes (kills pathogens)
- Crush in blender, mortar, or with rolling pin
- Sift through fine mesh for uniform powder
- Store in glass jar - indefinitely shelf-stable
5. Activated Biochar
Quantity: 1–2 cups (100-200 g per 5 kg Bokashi)
Primary Role: Microbial habitat & nutrient banker - creates permanent housing for beneficial microbes.
Quality Verification
- Pyrolysis: 450–550°C (optimal pore formation)
- Hardness: Metallic "ping" sound when dropped
- Buoyancy: Floats initially, sinks slowly when charged
- pH: 7.0–9.0 (slightly alkaline)
- Dust: Low dust production when handled
Scientific Function
Biochar's honeycomb structure provides 100-400 m²/g surface area - equivalent to a football field in a handful. This creates protected micro-habitats where microbes thrive safe from predators and environmental stress. The charged biochar acts as a nutrient capacitor, absorbing excess nutrients during microbial activity peaks and releasing them during lulls, creating stable conditions perfect for consistent decomposition.
The Charging Process - NON-NEGOTIABLE
Never use raw, uncharged biochar! It will absorb nutrients and moisture from your mix, starving microbes and causing failure.
Charging Steps:
- Nutrient Soak: Submerge in compost tea, worm tea, or diluted urine (1:10) for 48 hours
- Microbial Inoculation: Mix with active compost and keep moist for 1 week
- Drainage: Remove excess liquid (can be reused)
- Storage: Keep moist in breathable container until use
Why This Blend Works
This combination creates the perfect biochemical symphony:
- Cocopeat provides the physical structure (the concert hall)
- Vermicompost brings the orchestra (aerobic microbes)
- Manure adds specialty instruments (cellulose-degraders)
- Eggshells tune the acoustics (pH balance)
- Biochar provides VIP boxes (protected microbial habitats)
Together, they transform acidic preserved waste into biologically active, worm-ready humus through controlled aerobic decomposition in 7-14 days.
Quick Diagnostic Guide
- Sour/Vinegar Smell: Too acidic - add more cocopeat or eggshells
- Ammonia Smell: Too much nitrogen - reduce manure, increase carbon
- Rotten Egg Smell: Anaerobic - turn immediately, add bulking agent
- No Temperature Rise: Too dry/cold - adjust moisture, insulate
- Excessive Heating (>45°C): Too nitrogen-rich - add more carbon
- Earthy Forest Smell: Perfect! Proceed as planned
Critical Warnings
- Never use fresh cow dung - ammonia spikes kill microbes and harm worms
- Never use unwashed cocopeat - high salt content locks nutrients and kills microbes
- Never use uncharged biochar - absorbs nutrients and moisture, starving your mix
- Never skip the worm test - always test with a few worms before large-scale feeding
- Never compact the mix - maintain loose, airy structure for aerobic conditions
- Never rush the process - 14 days is minimum for proper neutralization
The 14-Day Master Protocol: Step by Step
Daily rhythms and precise actions for perfect results
Neutralization is more art than science. You're not just mixing materials - you're cultivating an ecosystem. Here's the exact process I've refined over 15 years of composting.
Equipment Required:
- Milk crate or well-ventilated container (minimum 50L capacity) - Maximum airflow is critical
- Shallow tray for moisture collection - Place underneath container
- Breathable cover (burlap, jute cloth, cardboard) - NEVER use plastic
- Garden fork or mixing tool - For turning and aeration
- pH test strips (optional but recommended) - Range 4.0-9.0
- Spray bottle with water - For precise moisture adjustment
Preparation Day: Setting the Stage
24 hours before neutralization:
- Rehydrate cocopeat (1kg cocopeat + 4L water, let sit overnight)
- Screen vermicompost to remove large particles and undecomposed material
- Crush and powder eggshells (oven-dry at 100°C for 30 minutes first)
- Gather all materials in your workspace - organization prevents mistakes
- Prepare your container (milk crate, mesh bin, or ventilated box)
The Daily Rhythm: What to Do and When
Day 1: The Initial Mix - Building the Foundation
Morning (2-3 hours): In your container, create alternating layers: 5cm cocopeat, then 2-3cm Bokashi, sprinkle eggshells and biochar, then 2-3cm compost/manure mixture. Repeat until container is ¾ full. Never compact - this isn't landfill disposal.
After mixing: Perform the squeeze test. Take a handful, squeeze firmly. If 1-2 drops of water emerge, moisture is perfect (50-60%). If more, add dry cocopeat. If none, mist lightly.
Cover: Use burlap, jute, or cardboard - never plastic. You want breathability, not a greenhouse.
Day 2-3: First Turning - Introducing Oxygen
Empty the container completely onto a clean surface. Break apart any clumps larger than a walnut. Mix thoroughly, bringing bottom material to top. This is when you'll notice the first scent shift - from sharp fermented to slightly sweet or yeasty.
Critical check: If you detect foul odors (rotten eggs, sewage), your mixture has gone anaerobic. Add 20% more cocopeat immediately and turn again tomorrow.
Day 4-7: The Awakening - Microbial Party Time
White fungal networks should appear now - this is excellent! It means fungi are breaking down complex carbohydrates. Turn every other day. The smell should be distinctly earthy by day 7.
Temperature check: Insert your hand 15cm deep. It should feel slightly warmer than ambient temperature. If hot (>45°C), you have thermophilic activity - rare but possible. Add more carbon (cocopeat or shredded cardboard).
Day 8-10: Maturation - Settling into Stability
Turn once during this period. The material should now be dark brown, crumbly, with no recognizable food pieces. Perform the worm test: place a few worms in a small container with your neutralized material. If they burrow within minutes, you're ready.
Day 11-14: Curing - The Final Polish
Let the material rest. This allows microbial communities to stabilize and humic substances to form. Your neutralized Bokashi is now ready for vermicomposting or direct garden application.
The Turning Principle: Why It's Non-Negotiable
Every time you turn, you accomplish three critical things:
- Oxygen Distribution: Aerobic bacteria consume oxygen rapidly. Turning replenishes it, preventing anaerobic pockets.
- Homogenization: Evens out moisture, temperature, and microbial distribution.
- Structural Integrity: Prevents compaction that reduces air pore space below the critical 30% threshold.
Turning frequency formula: Turn when the center feels warmer than the edges, or every 2-3 days. More frequent turning in warm weather, less in cool.
Reading the Signs: The Composter's Diagnostic Toolkit
Monitoring, troubleshooting, and ensuring quality
Your senses are your most valuable tools. Learn to read what your compost is telling you.
| What to Check | Ideal Result | Problem Indicator | Immediate Action |
|---|---|---|---|
| Smell (Most important) | Rich, earthy forest soil. No sour or sweet notes | Vinegar, ammonia, rotten eggs, sewage | Add more bulking agent, turn immediately, improve aeration |
| Texture | Crumbly, holds shape then breaks apart | Slimy, muddy, or bone dry | Adjust moisture, add cocopeat if wet, mist if dry |
| Color | Uniform dark brown to black | Light colored, gray, or mottled | Extend neutralization, check moisture, add more compost |
| Temperature | Slightly warmer than ambient (hand test) | Hot (>45°C) or cold (no activity) | Add carbon if hot, insulate if cold, adjust moisture |
| Worm Response | Burrow within 1-2 minutes | Attempt to escape, clump at surface | Extend neutralization 3-5 days, retest |
The 5-Minute Daily Check
Successful neutralization requires attention, not labor. Here's my daily routine:
- Morning sniff: Earthy = good, sour = needs turning today
- Touch test: Warm center = active, cold = needs help
- Squeeze check: 1-2 drops water = perfect moisture
- Visual scan: White mold = excellent, black mold = trouble
- Record keeping: 30 seconds to note observations - patterns emerge
This daily ritual takes less time than brewing coffee but ensures perfect results every time.
How to Know When Neutralization is Complete
1. Smell Test (Most Important)
Procedure: Take handful, close eyes, inhale deeply.
Success: Rich, complex forest soil aroma. Mushroom-like, earthy, pleasant.
Failure: Any sour, vinegar, ammonia, or rotten notes.
2. pH Test (Scientific Verification)
Procedure: Mix 1 tsp sample with 2 tsp distilled water. Wait 2 minutes, dip pH strip.
Success: pH 6.5-7.5 (neutral to slightly acidic)
Caution: pH 5.5-6.0 = borderline (wait 2 more days)
3. Worm Test (Biological Safety Test)
Procedure: Place 3-4 healthy worms in small container with 2 tbsp neutralized material.
Success: Worms burrow within 1-2 minutes, show normal behavior.
Failure: Worms try to escape, cluster at edges, show distress.
4. Visual & Texture Test
Procedure: Examine color, texture, moisture, structure.
Success: Dark brown/black, crumbly, moist but not wet, no recognizable food.
Failure: Light color, slimy, waterlogged, visible food chunks.
Troubleshooting: When Things Go Sideways
Causes:
- Material too wet (anaerobic conditions)
- Insufficient aeration/turning
- Container packed too tightly
- Poor drainage in container
Immediate Actions:
- Spread material in thin layer (5cm max)
- Add 30% fresh cocopeat
- Turn twice daily for 3 days
- Improve container ventilation (drill more holes)
Note: The odor should clear within 48 hours if caught early.
Causes:
- Material too dry (fungi need moisture)
- Temperature too cold ( <20°C)
- Insufficient microbial inoculant in soil
- pH still too acidic for fungi
Immediate Actions:
- Increase moisture to 55-60% (mist while turning)
- Move to warmer location (25-30°C ideal)
- Add handful of active compost or worm castings
- Test pH, add more eggshells if below 5.5
Note: White mold is beneficial but not absolutely necessary. Focus on pH and smell tests.
Causes:
- Highly acidic food waste (citrus, vinegar)
- Insufficient buffering materials
- Not enough turning/aeration
- Poor quality soil/compost with low buffering capacity
Immediate Actions:
- Add agricultural lime at 2% by weight OR wood ash at 1% by weight
- Mix thoroughly, wait 48 hours, retest
- Increase turning frequency to daily for 3 days
- Future batches: increase eggshells to 5%
Advanced Insights: The Master's Secrets
Pro techniques and accelerated methods for exceptional results
After years of experimentation and teaching, here are the insights that separate good compost from exceptional compost.
Accelerated Neutralization Methods for Time-Sensitive Situations
When time is critical, neutralization can be safely accelerated — but only when the right biological and physical conditions are met. Each card below explains the procedure, timeline, and precautions for rapid bokashi processing.
Add 10% finished compost and 10% worm castings during mixing. Turn once daily to distribute microbes evenly.
Insert a PVC pipe with drilled holes vertically into the center of the container. Remove during turning, reinsert afterward.
Create a pile of approximately 1 m³, cover with a tarp, and allow heat to rise naturally. Turn when temperature reaches ~55°C.
Add ½ cup garden lime (CaCO₃) per 10L bokashi. Mix thoroughly and test pH daily.
Speed improves efficiency, but readiness ensures safety. If ideal conditions are not met, slow down and correct the fundamentals first. Accelerated methods work best when moisture, particle size, and microbial starting conditions are optimal.
Secret #1: The Microbial Orchestra Concept
Think of your neutralization process as conducting an orchestra. Each microbe group has its entry point:
- Days 1-3: Acid-tolerant bacteria dominate (they survived fermentation)
- Days 3-7: General decomposers take over (Bacillus, Pseudomonas)
- Days 7-14: Fungi and actinomycetes establish (Trichoderma, Streptomyces)
Your job as conductor is to create conditions where each group can perform optimally - proper pH, moisture, aeration, and food sources at the right time.
Secret #2: The Double-Batch System
Start a new neutralization batch every 7 days. When batch 1 is ready for worms (day 14), batch 2 is at day 7 (perfect for turning), and you can start batch 3. This creates continuous workflow, spreads labor, and ensures constant worm food supply. It also lets you compare batches for learning.
Secret #3: Seasonal Intelligence
Neutralization responds to seasons like a living being:
- Spring/Autumn (ideal): 10-14 days, minimal intervention needed
- Summer (accelerated): 7-10 days, watch for drying, may need more frequent watering
- Winter (extended): 14-21 days, insulate containers, consider indoor start
Learn your local climate's rhythm. In hot climates, place containers in shade. In cold climates, use black containers to absorb sunlight or start indoors.
The Ultimate Test: Knowing When It's Perfect
Perfectly neutralized Bokashi has three unmistakable qualities:
- The Smell Test: Close your eyes, take a deep breath. It should transport you to a forest after rain - rich, earthy, complex, with no chemical or sour notes.
- The Texture Test: Rub between fingers. It should feel like crumbly, moist cake - holding shape when squeezed, breaking apart easily when poked.
- The Worm Test: Worms should dive in as if finding sanctuary - immediate, enthusiastic burrowing.
When all three align, you've achieved composting alchemy. This material will produce the richest vermicompost and transform your garden.
Final Wisdom: The Three Non-Negotiables
After all these years, I've found three principles that guarantee success:
- Patience Over Speed: Nature cannot be rushed. 14 days is minimum, 21 days is often better. Impatience causes 80% of failures.
- Observation Over Recipe: Your materials and environment are unique. Learn to read what YOUR compost needs rather than following rigid schedules.
- Consistency Over Perfection: Daily 5-minute checks beat weekly hour-long interventions. Small, consistent attention yields perfect results.
Master neutralization, and you master the entire Bokashi-vermicomposting system. This step transforms waste into gold. Treat it with the reverence it deserves.
Ready for Worm Feeding
Congratulations! You've successfully transformed acidic bokashi pre-compost into pH-neutral, biologically active, worm-safe compost. This material is now ready to become the world's most powerful organic fertilizer through vermicomposting.
What You've Accomplished:
- ✅ Neutralized acids harmful to worms and plants
- ✅ Established aerobic microbial community
- ✅ Created ideal texture for worm digestion
- ✅ Preserved and made available nutrients
Next Step: Vermicomposting Setup
- Selecting the right worm species for rooftop farming
- Setting up efficient, odor-free worm bins
- Proper feeding schedules and quantities
Step 4: The Perfect Vermicompost Setup for Bokashi Pre-Compost
Transform your neutralized bokashi into the world's finest organic fertilizer through a carefully engineered worm ecosystem. This is where waste becomes black gold.
The Ultimate Return on Investment
A properly maintained vermicompost system fed with bokashi pre-compost will produce fertilizer with 5-11 times more nitrogen, 7 times more phosphorus, and 5 times more potassium than traditional compost. You're building a living bio-reactor that produces microbial-rich humus capable of transforming any soil.
Understanding the Worm-Worked Ecosystem
The science and synergy of bokashi-vermicomposting integration
The Vermicomposting Science
Vermicomposting is a sophisticated aerobic decomposition system driven primarily by Eisenia fetida (red wigglers) and supported by a complex microbial consortium. The magic happens in the worm's gut: organic matter undergoes enzymatic breakdown in the crop, mechanical grinding in the gizzard, and microbial transformation in the intestine. The resulting castings contain:
- Plant Growth Regulators: Auxins, gibberellins, cytokinins
- Beneficial Microbes: Nitrogen-fixing bacteria, phosphate solubilizers
- Enzymes: Protease, cellulase, chitinase for nutrient cycling
- Stable Humic Acids: Improve soil structure and cation exchange capacity
- Micro-nutrients: In chelated, plant-available forms
- Suppressive Compounds: Natural antibiotics against soil pathogens
Why Bokashi + Vermicomposting is Revolutionary
Traditional vermicomposting struggles with acidic or protein-rich materials. Bokashi fermentation pre-digests these components, neutralizing pathogens and breaking down complex compounds. This symbiotic system achieves what neither can do alone:
Traditional Composting
- 60–90 day cycle
- Nutrient loss through leaching
- Can't handle meats or dairy
Bokashi Only
- Anaerobic preservation
- Requires soil burial
- No worm-friendly output
Bokashi + Vermicompost
- 21–35 day cycle
- Near-zero nutrient loss
- Handles ALL food waste
- Living microbial inoculant
Pro Insight: The Microbial Handoff
The bokashi fermentation creates lactic acid bacteria (LAB) dominance. When neutralized and fed to worms, there's a microbial succession where LAB populations decline while aerobic decomposers increase. This creates a balanced microbial community in the final castings. The key is allowing this transition by ensuring proper neutralization before feeding.
Engineering the 70-L Bio-Reactor System
Building the optimal worm habitat for maximum productivity
Materials & Specifications
- Primary Crate: 70-L food-grade plastic jumbo crate with 6mm drainage holes (20-30 holes in bottom)
- Collection Crate: Solid small crate (no holes) for vermiwash capture
- Worm Population: 500g-1kg Eisenia fetida (~1000-2000 worms)
- Breathable Lid: Burlap/hessian or perforated plastic (50% coverage)
- Bedding Base: 50% shredded corrugated cardboard, 30% coconut coir, 20% aged leaf mold
- Mineral Additives: 2 cups garden soil, 1 cup crushed eggshells, ½ cup basalt dust
- Monitoring Tools: pH meter, compost thermometer, moisture meter
- Aeration Tools: Hand fork, PVC pipe with drilled holes (optional)
Bedding Engineering Protocol
| Phase | Procedure | Scientific Rationale | Quality Control Check |
|---|---|---|---|
| 1. Assembly & Setup | Place primary crate inside collection crate. Add 5cm layer of coarse cardboard for drainage layer. | Prevents waterlogging while allowing oxygen exchange. Maintains aerobic conditions at bin bottom. | No standing water in collection crate after 24 hours with moist bedding. |
| 2. Bedding Hydration | Soak bedding materials in dechlorinated water for 24 hours. Squeeze to 65% moisture (1-2 drops when squeezed firmly). | Worms breathe through skin requiring 65-75% humidity. Chlorine kills beneficial microbes. | Bedding holds shape when squeezed but doesn't drip. Temperature 18-24°C. |
| 3. Mineral & Microbial Inoculation | Mix minerals into bedding. Add 1L mature vermicompost or compost as microbial starter. | Eggshells provide calcium for worm reproduction. Soil adds grit for digestion. Microbial starter accelerates colonization. | pH 6.8-7.2. No ammonia or sulfur odors. |
| 4. Worm Acclimatization | Place worms on surface. Create light gradient with lid partially covering. Leave undisturbed for 48 hours. | Worms are photophobic. Gradual darkening encourages downward migration into bedding, preventing escape. | Worms have disappeared from surface within 24 hours. No worms in collection crate. |
Critical Bedding Mistakes to Avoid
The Bokashi Feeding Protocol & Management
Safe feeding schedules and environmental parameter control
The Non-Negotiable Safety Protocol
NEVER feed un-neutralized bokashi to worms. The pH must be 6.5-7.5, with no vinegar smell. Conduct a 48-hour worm test with 100g material before main feeding. If worms avoid it or attempt escape, return material to neutralization phase.
Four-Phase Feeding Strategy
| Phase & Duration | Feeding Procedure | Quantity & Schedule | Success Indicators & Monitoring |
|---|---|---|---|
| Phase 1: Acclimation (Days 1-7) |
• Create "test pocket" in one quadrant
• Add 200g neutralized bokashi • Cover with 8cm moist bedding • Mark location with stick |
Single feed at Day 2
Observe for 5 days |
✓ Worms congregate in pocket
✓ Material partially consumed in 3 days ✓ Earthy smell, no acidity |
| Phase 2: Ramp-Up (Weeks 2-3) |
• Use quadrant feeding method
• Rotate 90° each feeding • Always bury 5-8cm deep • Add handful of dry cardboard per feed |
300-400g every 3-4 days
(2 feeds/week) |
✓ Previous feed 70% consumed
✓ Worm reproduction evident ✓ Castings production begins |
| Phase 3: Full Production (Weeks 4-8) |
• Layer feeding method
• Add 5cm bokashi, cover with 3cm bedding • Maintain carbon blanket on top • Weekly aeration with hand fork |
500-600g every 2-3 days
(2-3 feeds/week) |
✓ Continuous casting production
✓ Bin temperature stable 20-25°C ✓ Diverse microfauna present |
| Phase 4: Maintenance (Month 3+) |
• Migratory feeding: feed on one side, harvest from other
• Monthly mineral supplementation • Quarterly partial bedding refresh |
Up to 1kg daily
(Full 20L bokashi bucket/week) |
✓ Sustainable harvest every 30-45 days
✓ Colony maintains 2000+ worms ✓ Vermiwash production consistent |
Feeding Rate Calculations
Worms consume 50-100% of their body weight daily. A 500g population can process 250-500g neutralized bokashi pre-compost daily. Monitor consumption rate and adjust accordingly. Uneaten food = overfeeding.
Environmental Parameter Management
Maintain these four critical conditions for optimal vermicompost production. Each parameter must stay within specified ranges for a healthy worm colony.
Moisture Content
#1Temperature
#2pH Level
#3Oxygen/Aeration
#4Moisture Content
Worms breathe through their skin and require consistent moisture without waterlogging.
Measurement Methods
Handful of bedding should release 1-2 drops when squeezed firmly.
Bedding should glisten without pooling water on surface.
Most accurate method - shows exact moisture percentage.
Critical Thresholds
- Below 60% RH: Worm stress, dehydration, reduced reproduction
- Above 80% RH: Anaerobic conditions, drowning risk, gas buildup
Correction Protocol
Too Wet
- Add dry cardboard
- Increase aeration
- Reduce feeding
Too Dry
- Mist with water
- Add moist bedding
- Cover with cloth
Temperature
Worms are ectothermic - metabolism and reproduction depend on temperature.
Measurement Methods
Insert 15cm deep for accurate core temperature reading.
Quick surface temperature check for multiple spots.
Sluggish in cold, clustered in heat - behavioral indicator.
Critical Thresholds
- Below 10°C: Dormancy, feeding stops, reproduction halts
- Above 30°C: Mortality risk, protein poisoning, colony collapse
Correction Protocol
Too Cold
- Insulate bin
- Move indoors
- Reduce feeding
Too Hot
- Move to shade
- Add ice bottles
- Increase vent
pH Level
Worms thrive in neutral conditions. Bokashi feeding requires careful pH monitoring.
Measurement Methods
Most accurate, test in 3 locations for representative reading.
Quick qualitative check, less precise but convenient.
Surface crawling and escape attempts indicate acidic conditions.
Critical Thresholds
- Below 6.0: Worm mortality risk, reproductive failure
- Above 8.0: Ammonia release, toxic to worms and microbes
Correction Protocol
Too Acidic
- Add eggshells
- Add garden lime
- Stop feeding
Too Alkaline
- Add peat moss
- Citrus sparingly
- More carbon
Oxygen/Aeration
Worms and aerobic microbes require oxygen. Anaerobic conditions produce harmful gases.
Measurement Methods
Earthy = good oxygen, rotten/eggy = anaerobic conditions.
Mass surface crawling = low oxygen, worms seeking air.
Fluffy = good, compacted = poor oxygen circulation.
Critical Thresholds
- Anaerobic Conditions: Develop within 48-72 hours without sufficient oxygen.
- Toxic Gases: Methane and hydrogen sulfide produced, fatal to worms.
Correction Protocol
Maintenance
- Fluff weekly
- Check holes
- Add bulk
Emergency
- Aeration pipes
- Forced air
- Bin transfer
Monitoring Schedule & Priority Guide
- Quick odor assessment
- Surface moisture glance
- Worm activity level
- Temperature feel check
- Moisture squeeze test
- Bedding fluffing/aeration
- Food consumption rate
- Visual pH indicator check
- Comprehensive pH test
- Temperature at depth
- Worm population assessment
- Full system inspection
Key Insight: These parameters interact systemically. Correct moisture first (often improves aeration), then temperature (affects microbial activity), then pH (ensures nutrient availability), and finally maintain aeration (prevents anaerobic conditions).
Pro Tips for a Thriving Worm Bin
- Location: Keep in a dark, well-ventilated space with stable temperature (garage, basement, under sink).
- Carbon is Key: Always balance nitrogen-rich bokashi feed with carbon (cardboard, dry leaves). This prevents odors and maintains bedding structure.
- Harvest Promptly: Don't let finished castings build up for more than 3-4 months, as they can become too dense and hostile for worms.
- Don't Overfeed: It's the most common mistake. Uneaten food will rot. Feed only what they can consume in a few days.
- Patience with Population: It takes 2-3 months for a worm population to double. Start with a sufficient quantity (500g+) to process waste effectively from the beginning.
- Observe the Critters: A healthy bin will have other decomposers: springtails, mites, pot worms. They are helpers, not pests.
Step 5: Vermiwash Collection & Science: The Liquid Gold of Vermiculture
Vermiwash is not a mere byproduct—it's the concentrated essence of a thriving soil food web, a complex microbial and biochemical soup harvested from the "drilosphere." This section details its science, precise production, and advanced applications that set it apart from simple bokashi leachate.
The Deep Science of Vermiwash: Beyond Basic Leachate
Understanding the complex biochemistry and microbial ecology
Decoding the Drilosphere: Nature's Bio-Reactor
Vermiwash is created in the drilosphere—the dynamic zone of soil influenced by earthworm activity. As water percolates through this zone, it dissolves:
- Nutrient Chelates: Worm mucus (coelomic fluid) and microbial byproducts bind minerals into organic complexes (fulvic/humic acids), making them highly plant-available.
- Enzyme Cocktail: Proteases, amylases, lipases, cellulases, and chitinase from worm guts and associated microbes partially digest organic matter, releasing soluble nutrients and creating compounds that can induce systemic resistance in plants.
- Microbial Consortium: A diverse population of bacteria (e.g., Pseudomonas, Bacillus), fungi (including mycorrhizal spores), and actinomycetes, many with plant growth-promoting (PGPR) and pathogen-suppressing traits.
- Plant Growth Regulators: Auxins (IAA), cytokinins, and gibberellins are produced by both worms and their microbiome, directly stimulating plant cell division, root growth, and nutrient mobilization.
Critical Distinction: Bokashi Leachate vs. Vermiwash
Understanding their fundamental differences prevents misuse and unlocks their synergistic potential. They are products of entirely different microbial ecosystems.
Difference between Bokashi Leachate and Vermiwash
| Characteristic | Bokashi Leachate | Vermiwash |
|---|---|---|
| Source & Process | Anaerobic fermentation by Lactobacillus and yeast. | Aerobic decomposition and extraction through the drilosphere. |
| Dominant Microbes | Lactic Acid Bacteria (LAB), yeasts. Low biodiversity. | Highly diverse aerobic bacteria, fungi, actinomycetes. High biodiversity. |
| Primary Biochemicals | Lactic acid, alcohols, simple nutrients. | Enzymes, plant hormones (IAA, cytokinins), chelated nutrients, antibiotics. |
| pH & Stability | Strongly acidic (3.5-4.5). Preservative effect. | Near neutral (6.5-7.5). Living solution; microbes consume O₂. |
| Primary Agricultural Use | Soil inoculant/conditioner (diluted), compost accelerator. | Foliar spray (nutrient & disease resistance), root dip, seed treatment. |
| Storage & Shelf-life | Months (acidic, preserved). | Weeks (living brew; requires aeration or preservation). |
Pioneer's Insight: The Synergy
Use bokashi leachate (diluted 1:200) as a soil drench to feed and stimulate the microbial community. Use vermiwash as a foliar spray to directly feed and protect the plant. This dual approach addresses both soil and plant health comprehensively.
Advanced Vermiwash Collection from Your Vermicompost Bin
Precision harvesting techniques for premium liquid fertilizer
Method 1: Passive Collection from Your Vermicompost Bin - Optimized
Your existing vermicompost bin is already a perfect vermiwash producer. With these targeted adjustments, you can transform passive drainage into a consistent, high-quality liquid fertilizer harvest.
Bin Collection Quick Stats
Enhanced Bin Collection Protocol
Phase 1: Strategic Moisture Priming
Action: 12-24 hours before planned collection, gently spray the top 1/3 of your compost with dechlorinated water (left out for 24+ hours or treated with aquarium dechlorinator).
Phase 2: Timed Collection for Maximum Potency
Action: Check your collection tray 12-24 hours after moistening. Drain liquid via your spigot or by carefully lifting the inner bin.
Phase 3: On-the-Spot Quality Assessment
Visual Check: Ideal vermiwash is clear to light amber (like weak tea). Cloudy or murky liquid indicates insufficient filtration.
Olfactory Check: Should smell earthy, sweet, or slightly yeasty—never foul, acidic, or like rotten eggs.
The "Active Core" Principle: Your Bin's Quality Secret
The most potent vermiwash comes from bins with a well-established, uninterrupted mass of worms and castings at the center. This "active core" maintains a stable microbial ecosystem. New bins ( <2 months old) produce weak wash because this ecosystem hasn 't matured. To accelerate core development: avoid over-harvesting castings, maintain consistent feeding, and don't let the bin dry out completely.
Method 2: Advanced Bin Modifications for Premium Wash
Upgrade your existing vermicompost bin with these simple modifications to produce laboratory-grade vermiwash without building a separate system.
Bin Enhancement Materials
Essential Upgrades
- Improved Drainage Layer: Add 2-3 inches of small gravel or lava rock below your bedding
- Filtration Fabric: Landscape fabric between drainage layer and bedding
- Enhanced Spigot: HDPE spigot installed 2 inches from bottom
- Collection Container: Wide-mouth, dark glass bottles
Biological Enhancers
- Biochar Layer: 1-inch layer of charged biochar mixed into top bedding
- Aeration Additives: Chopped straw or coconut husk chunks
- Microbial Foods: Oatmeal, rice water, or molasses for peak microbial activity
- pH Buffers: Crushed eggshells or garden lime
Enhanced Bin Layer System
Layer 1: Enhanced Drainage
2-3 inches of gravel/lava rock + landscape fabric. Prevents bedding from clogging drainage and creates an air gap. Science: Maintains aerobic conditions at the very bottom of your bin.
Layer 2: Bio-Filtration Bedding
Standard bedding + 20% charged biochar. Biochar provides immense surface area for microbial colonization while filtering particulates. Pro Tip: "Charge" biochar by soaking in existing vermiwash.
Layer 3: Active Feeding Zone
Your standard worm food + 10% chopped straw. The straw creates air channels throughout the feeding zone, preventing compaction and maintaining aerobic decomposition.
Optimized Bin Collection Schedule
Establishment Phase
After enhancements, collect weekly but expect lower yields. This allows microbial communities to establish in the new biochar and drainage layers.
Scientific Purpose: Initial collections may contain loose particles from new materials. Microbial biofilms need 1-2 weeks to fully colonize new surfaces.
Production Phase
Collect every 7-10 days after moisture priming. Weekly, add 50g of oatmeal water or molasses solution to feed microbial populations.
Pro Timing: Regular but not excessive feeding maintains high microbial activity without overloading the system. The sweet spot is when your worms are actively processing food but not overwhelmed.
Maintenance Phase
Check and clear drainage layer if needed. Add fresh biochar to top bedding. Test pH of collected wash.
Why Monthly Check: Prevents gradual system degradation. Even well-designed systems need occasional maintenance to maintain peak performance.
Bin-Specific Troubleshooting & Diagnostics
Use this diagnostic flow to identify and correct issues specific to vermiwash collection from your vermicompost bin.
Symptom: Foul Odor (Rotten Eggs)
Diagnosis: Anaerobic conditions in lower bin due to compaction.
- Immediate Action: Stop collection, gently fluff entire bin
- Prevention: Add more carbon bedding, reduce feeding temporarily
- Test: Bedding should spring back when pressed
Symptom: Low or No Yield
Diagnosis: Improper moisture or compacted bedding.
- Check: Bin moisture (should glisten but not drip)
- Clear: Spigot and drainage layer for blockages
- Adjust: Increase moisture priming before collection
Symptom: Cloudy/Muddy Wash
Diagnosis: Insufficient filtration or disturbed bedding.
- Fix: Add 2-inch layer of shredded cardboard on top
- Alternative: Add biochar to existing bedding
- Monitor: Quality improves over 2-3 collections
The Bin Collector's Mindset
Your vermiwash is a liquid report card of your entire vermicompost system. Clear, sweet-smelling, amber wash indicates perfect biological balance. Any deviation—odor, cloudiness, or color change—is not a failure but a precise communication from your ecosystem about what needs adjustment. Mastering this feedback loop is what separates advanced practitioners from beginners.
Pro-Grade Preservation, Formulations & Application Science
Storage techniques and precision application methods
Advanced Storage & Microbial Management
Vermiwash is a living culture. The goal is not to kill microbes, but to selectively feed and preserve them.
- Short-term (1-2 weeks): Store in a breathable container (loose lid or with an airlock) in cool, dark place. Agitate daily to aerate.
- Long-term (1-3 months) - Molasses/Biochar Method:
- Dissolve 1 tbsp of unsulphured blackstrap molasses in 50ml warm water.
- Mix into 1 liter of fresh vermiwash.
- Add a handful of charged biochar pieces as a microbial substrate.
- Store with loose lid. The molasses feeds beneficial microbes, helping them outcompete anaerobes.
- Do Not Refrigerate: This shocks and kills many beneficial mesophilic microbes.
- Viability Test: After storage, smell should be sweet, earthy, or yeasty. If sealed, open slowly—a hiss of CO₂ indicates active fermentation, which is good.
Precision Application Protocols
Application is not one-size-fits-all. Tailor it to plant needs and environmental conditions.
Foliar Spray
1:5 to 1:10. Add 1 drop of natural surfactant (aloe vera gel or mild soap) per liter to improve leaf adhesion.
- Quick nutrient delivery
- Disease suppression (induced systemic resistance)
- Flowering/fruiting stages
Stomatal absorption of micronutrients and hormones; phyllosphere inoculation with beneficial microbes.
Soil Drench
1:10 to 1:20. Apply slowly to base of plant until soil is moist.
- Seedlings & transplant shock
- Building rhizosphere biology
- Nutrient-deficient plants
Direct inoculation of root zone with PGPR microbes; delivery of chelated nutrients and humic substances that improve CEC.
Seed Treatment / Root Dip
1:20. Soak seeds for 15-30 mins. Dip seedling roots for 5 mins before transplanting.
- All seeds and transplants
- Early plant establishment
- Disease prevention
Early colonization of the spermosphere and rhizosphere with protective microbes, reducing damping-off disease and improving early vigor.
Compost & Bokashi Accelerant
Undiluted or 1:1. Sprinkle onto new compost layers or bokashi pre-compost.
- Speeding up hot composting
- Kickstarting bokashi decomposition in soil
- Enhancing microbial diversity
Inoculates the pile with a full spectrum of decomposer microbes and enzymes, diversifying the community beyond just LAB.
Advanced Pro Formulations & Protocols
Specialized blends and application timing for maximum results
Formulation 1: Broad-Spectrum Plant Health & Antifungal Tonic
- Combine 1 part vermiwash, 1 part well-fermented compost tea (or 1 tbsp of quality worm castings).
- Add 1 part hydrolyzed fish fertilizer (for amino acids and NPK).
- Dilute the combined mix in 10 parts water.
- Add 0.5% by volume of potassium silicate (e.g., 5ml per liter) for enhanced plant cell strength and fungal resistance.
- Use as a foliar spray or soil drench every 2-3 weeks during periods of plant stress or high disease pressure.
Effect: Provides a complete nutritional, hormonal, and microbial package. The silica strengthens cell walls, while the combined microbial consortium outcompetes and suppresses pathogens like powdery mildew and botrytis.
Formulation 2: Flowering & Fruiting Booster
- At first sign of flowering, mix 2 parts vermiwash with 1 part wood ash leachate (steep 1 cup ash in 1L water for 48h, strain).
- Dilute this concentrate at 1:15 with water.
- Apply as a foliar spray and soil drench. The high potassium (K) from the ash synergizes with the hormones in vermiwash to improve flower set, fruit size, and sugar content.
The Pioneer's Protocol: Do's and Don'ts
- DO conduct a patch test. Spray a single leaf of a plant and wait 48 hours before full application, especially with new formulations.
- DO apply foliar sprays at dawn or dusk when stomata are open and sun is weak to prevent leaf burn and maximize absorption.
- DON'T mix vermiwash with concentrated chemical fertilizers or fungicides. You will kill the microbial life.
- DON'T use vermiwash from a bin that is out of balance (too wet, acidic, or smelly). The wash will reflect the poor health of the source ecosystem. Garbage in, garbage out.
- DON'T over-apply. More is not better. Weekly applications are excessive and can lead to nutrient imbalances or leaf clogging. 2-4 week intervals are optimal.
Final Pioneer's Insight: Vermiwash as an Ecosystem Indicator
The quality of your vermiwash is a direct diagnostic tool for the health of your entire vermicompost system. Cloudy wash? Your filtration (bedding balance) is off. Foul smell? Your bin is anaerobic. Low yield? Your moisture or worm population is low. By mastering vermiwash production, you don't just get a fantastic plant tonic—you gain a deep, real-time understanding of the complex biological world you are cultivating. This is the true art of integrated bokashi-vermicomposting.
Step 6: Harvesting & Curing Vermicompost: The Art of Finishing Nature's Work
Harvesting is not just collection—it's the careful separation of finished product from active ecosystem, requiring timing, technique, and scientific understanding to preserve worm populations while obtaining the highest quality "black gold" for your garden.
The Science of Readiness: Knowing Precisely When to Harvest
Assessing maturity and timing for optimal quality
The Pioneer's Harvest Timeline
With a well-managed bin fed neutralized bokashi, expect your first substantial harvest in 3-4 months. The integrated bokashi-vermicompost system actually accelerates the timeline compared to traditional vermicomposting because the bokashi pre-digestion gives worms a head start. Subsequent harvests from a mature, established bin occur every 2-3 months as the system reaches biological equilibrium.
Scientific Note: The 3-4 month timeline assumes optimal conditions: temperatures 18-25°C, moisture 70-80%, and a starting population of ~500 worms. Colder temperatures or smaller initial populations extend this period. The bokashi pre-compost accelerates decomposition by ~30% compared to raw food scraps.
The Quadruple Verification Method: Is Your Compost Truly Ready?
Don't rely on a single indicator. Use this multi-point verification system to ensure perfect harvest timing:
- Material is dark chocolate brown to black
- Uniform, crumbly texture like spent coffee grounds
- Zero recognizable food scraps or bedding pieces
- Presence of stable aggregates (soil-like clumps that hold together)
- Rich, earthy, forest-floor aroma - no sourness
- Temperature matches ambient (no longer generating heat)
- Worm population has visibly migrated to newer sections
- Volume reduced by 60-75% from original
Premature Harvest Warning Signs
- Ammonia smell indicates incomplete nitrogen conversion (too early)
- Visible white fungal threads (not mycelium) suggest ongoing decomposition
- If you find more than a handful of worms in a sample, the harvest zone isn't ready
- Acidic pH (below 6.5) means microbial processing isn't complete
Harvesting Methodology: Precision Separation Techniques
Advanced techniques for maximum yield and worm preservation
The Harvesting Philosophy
Every harvesting method is a compromise between speed, worm preservation, and compost purity. The best method depends on your system size, time available, and whether you're harvesting for immediate use or for storage. For your 70L bokashi-integrated system, Method 1 (Migration) is recommended as it maintains continuous production.
Method 1: The Migration Method (Continuous System Excellence)
This is the superior method for your integrated bokashi-vermi system as it maintains uninterrupted production and causes minimal disturbance to the worm ecosystem.
Preparation & Food Cessation
Stop all feeding in the harvest-ready crate for 7-14 days. This encourages worms to consume remaining material and prepares them for migration.
Why This Works: Worms are opportunistic feeders. With no fresh food, they'll finish existing material and become highly motivated to seek new food sources.
Migration Setup
Prepare a new 70L crate with identical bedding conditions (moisture, pH, carbon content). Add a generous portion of their favorite food (neutralized bokashi with melon/cucumber) to one quadrant.
Pro Migration Trigger: Place a piece of moist cardboard or burlap between the old and new bins. Worms naturally migrate through moist, dark passages, and this creates a perfect "worm highway."
Selective Harvest
After 7-14 days of migration, harvest the old crate in sections. The quadrant farthest from the new bin will be 90-95% worm-free. Leave the last section with remaining worms/cocoons to continue migrating.
Population Dynamics: This method naturally separates worms by age. Juveniles and egg capsules are last to migrate, giving them extra time to develop. You'll preserve your entire breeding population.
Method 2: The Light Separation Technique (Batch Processing)
Ideal for smaller systems or when you need to completely reset a bin. This method leverages worms' natural photophobia (light avoidance).
Procedure
- Dump bin contents onto a large tarp in bright, indirect light (not direct sun)
- Form into multiple small cones (not one large pile)
- Wait 15-20 minutes for worms to burrow downward
- Scrape off top layers of worm-free compost every 5 minutes
- Continue until only worms and cocoons remain at the base
Advanced Pro-Tips
- Temperature matters: Work at 18-24°C. Colder temps slow worm movement.
- Moisture is key: If material dries, worms won't move. Mist lightly if needed.
- Check for cocoons: Tiny lemon-shaped capsules contain future worms. Return them to the bin.
- Work in sections: Process 1/3 of the bin at a time to avoid overwhelming yourself.
The Screening Protocol: From Good to Premium Quality
For potting mixes or seed starting applications, screening is non-negotiable. Use a 1/4-inch (6mm) hardware cloth screen. This removes: 1) Unfinished material, 2) Egg capsules (return to bin), 3) Coarse particles. The resulting fine, granular compost has higher surface area and nutrient availability. Screening also aerates the compost, initiating the curing process.
The Curing Process: Transforming Active Compost to Stable Gold
Stabilizing and maturing vermicompost for premium results
The Biochemical Imperative of Curing
Fresh vermicompost is biologically explosive. It contains:
- High microbial activity (10⁸-10⁹ CFU/g) that can compete with plant roots
- Unstable nutrient forms (ammonium, nitrites) that can burn plants
- Phytotoxic compounds from incomplete decomposition
- Excess soluble salts from concentrated worm castings
Curing stabilizes all these factors through controlled aerobic decomposition. Skipping curing is the #1 reason gardeners experience "compost burn" on their plants.
The 4-Phase Curing Protocol
| Phase | Duration | Key Actions | Scientific Changes |
|---|---|---|---|
| 1. Active Stabilization | Days 1-7 | Store in breathable container (mesh bag, wooden crate). Fluff daily. Maintain 60% moisture. | Microbial population shifts from bacteria-dominant to fungi-dominant. Ammonium converts to stable nitrate. |
| 2. Maturation | Weeks 2-3 | Fluff twice weekly. Monitor temperature (should equal ambient). | Humification occurs—simple organic compounds combine into stable humic and fulvic acids. Cation exchange capacity (CEC) increases dramatically. |
| 3. Resting | Week 4 | Leave undisturbed. Check moisture weekly. | Microbial activity stabilizes at lower, sustainable levels. Nutrients become chelated (bound to organic molecules), making them plant-available but not leachable. |
| 4. Quality Verification | Final Check | Perform germination test. Check pH (6.5-7.5). Visual inspection. | Complete conversion to stable organic matter with optimal microbial diversity for plant health. |
Optimal Curing Conditions
- Temperature: 18-24°C (ideal for microbial diversity)
- Moisture: 60-65% (drier than active bin)
- Aeration: Oxygen essential—never seal in airtight containers
- Container: Burlap sacks, wooden crates, or plastic bins with multiple 1cm holes
- Location: Shaded, protected from rain, with good air circulation
Curing Red Flags
- Anaerobic smell: Turn immediately, increase aeration
- Mold growth: Reduce moisture, increase air flow
- Insect infestation: Cover with fine mesh screen
- Excessive drying: Mist lightly with dechlorinated water
- Temperature spike: Spread thinner, turn more frequently
The Pioneer's Quality Assurance Protocol
Before using your cured vermicompost, perform these three definitive tests to guarantee premium quality:
Test 1: Germination Bioassay
Method: Place 20 radish or cress seeds on a moistened paper towel with a 1cm layer of pure vermicompost.
Passing Score: ≥85% germination rate with straight, vigorous sprouts after 5 days. Lower rates indicate phytotoxins.
Test 2: Physical & Chemical Analysis
Method: Visual inspection + basic pH test (paper strips acceptable).
Passing Score: Dark, uniform color; crumbly texture; pH 6.5-7.5; rich earthy smell (no ammonia/sour notes).
Test 3: Worm Viability Check
Method: Place 5-10 healthy worms in a handful of cured compost.
Passing Score: Worms burrow within 2 minutes without attempting escape. Immediate escape attempts indicate incompatibility.
Harvesting Mastery: The Art of Finishing
Harvesting and curing represent the final transformation in your integrated bokashi-vermicomposting system. This is where active biological processes are stabilized into a lasting, potent resource. Remember these key principles:
Timing is Everything
The 3-4 month timeline with bokashi integration yields premium compost faster than traditional methods. Patience rewards you with stable, mature "black gold."
Method Matters
The Migration Method preserves your worm population while maintaining continuous production. Always prioritize worm welfare over extraction speed.
Curing is Non-Negotiable
Fresh vermicompost can harm plants. The 4-week curing process transforms active biology into stable, plant-ready humus with superior microbial diversity.
The Integrated System Advantage
Vermicompost from a bokashi-integrated system has a unique advantage: enhanced microbial diversity. The lactic acid bacteria from bokashi combine with the worm gut microbiome to create a super-consortium that persists through curing. Lab analyses show this compost often has 30-40% higher levels of plant-growth-promoting bacteria and superior disease suppression capabilities compared to standard vermicompost. This is the true "black gold" that makes the extra steps worthwhile.
Step 7: Storage & Long-Term Preservation
This is where your work is safeguarded. Proper storage isn't just about putting things away; it's the science of putting microbial life into a controlled, dormant state so your vermicompost, bokashi bran, and liquid amendments retain their biological power and nutrient value for months or even years.
The Pioneer's Principle: Think Like a Microbe
Successful long-term preservation hinges on understanding what the beneficial microbes in your products need—or more precisely, what they don't need. Your goal is to drastically slow their metabolism by controlling three key factors: moisture, temperature, and gas exchange. Get these right, and you're not storing compost; you're curating a microbial seed bank.
The Science Behind Microbial Dormancy & Preservation
Understanding the biological principles of long-term preservation
Before diving into methods, understanding the "why" prevents costly mistakes. The microbes in your products are predominantly facultative anaerobes (like Lactobacillus) and other beneficial bacteria. They don't die when conditions get tough; they form spores or enter a dormant state.
Key Biological Concepts for Storage
Water Activity (Aw): Think of Aw as the “usable water” in your compost or bran, not just the total moisture. Microbes need this water to grow and feed. Lowering Aw by drying your materials effectively pauses their activity, keeping them stable for storage.
Glass Transition Temperature: When organic matter becomes extremely dry, microbes go into a kind of “sleep mode,” forming a glass-like state. This is the same principle behind freeze-drying. That’s why making sure your material is fully dry and sealed airtight gives it the longest shelf life.
Thermal Death Time: Very high heat can kill microbes, but gentle cold (around 4–10°C) is your friend. It slows down microbial growth and enzyme activity without harming the resilient spore-formers, helping your compost or bran stay viable longer.
Oxygen's Role: Even dry, dormant products aren’t completely safe from oxygen. Exposure can trigger nutrient breakdown and sometimes mold. This is where professional techniques like using oxygen absorbers come in handy to protect your stored materials.
Storing Vermicompost: Protocol for a Living Product
Advanced preservation methods for premium "black gold"
High-quality vermicompost is a structured, moist, humus-rich material teeming with life. The wrong storage can turn it into a slimy, anaerobic, or inert mass.
Pre-Storage Conditioning & Assessment
- Curing is Non-Negotiable: Never store fresh harvests directly. Allow compost to cure in a breathable container for 2-4 weeks post-harvest. This lets worms exit, moisture equalizes, and microbial activity stabilizes.
- Moisture Check: The ideal storage moisture is 30-40%. Perform the squeeze test: a handful should hold together briefly but crumble when poked. If water drips out, it's too wet and must be mixed with dry bedding (like shredded cardboard) and re-cured.
- Screening: Screen out uncomposted materials and coarse bits. A uniform, fine texture stores more evenly and predictably.
Optimal Storage Methods Comparison
Choose your method based on your volume, climate, and intended use timeline.
Method 1: Breathable Fabric Bags
Burlap, Jute, Cotton - For short-term storage maintaining maximum biological activity
Step-by-Step Procedure
- Fill bag ⅔ full (never pack tightly)
- Tie loosely with natural twine or leave top folded
- Store on wooden pallet or bricks in cool, dark, ventilated shed
Pro-Tip & Scientific Reason
- Gas Exchange: Fabric allows passive oxygen/carbon dioxide exchange, preventing anaerobic pockets
- Humidity Buffer: Natural fibers absorb and release moisture, buffering minor humidity fluctuations
- Monthly Check: Loosen bag, feel for heat buildup or sour odor indicating anaerobic activity
Method 2: Ventilated Rigid Containers
Wooden Crates, Milk Crates - For medium-term bulk storage with easy access
Step-by-Step Procedure
- Line container with breathable weed fabric or burlap
- Add compost, leaving 2" headspace from top
- Fold fabric over top as protective cover
- Elevate off ground on pallets in covered area
Scientific Advantages
- 360° Aeration: Slats provide superior airflow from all sides
- Easy Monitoring: Visual inspection without opening
- Pest Barrier: Fabric lining blocks insects while releasing moisture
- "Burping" Friendly: Easy to mix and re-aerate contents
Method 3: Airtight with Oxygen Control
Buckets with Gamma Lids, Mylar Bags - For long-term archival storage
Critical Step-by-Step Procedure
- CRITICAL: Ensure compost is bone-dry (<10% moisture)
- Place 300cc oxygen absorber packet inside
- Seal completely (check gaskets / vacuum seal)
- Label clearly with contents and date
Critical Pro-Tip
- Oxygen Removal: Stops oxidation and aerobic mold entirely
- Microbial Sporulation: Creates a long-term microbial “seed bank”
- NON-NEGOTIABLE: Must be fully dry to avoid fermentation and botulism risk
- Storage: Keep consistently cool and dark
Pioneer's Hack: The Refrigerator as a Microbial Bank
For small batches of premium compost destined for seed starting, store in a sealed glass jar in the refrigerator (4°C). The cold dramatically slows metabolism but preserves microbial diversity far better than room temperature. Use within 6-8 months. For even longer storage, the freezer (-18°C) can preserve viability for years—just ensure the compost is at the correct moisture level (30%) before freezing to prevent ice crystal damage to microbial structures.
Preserving Liquid Amendments: Vermiwash & Bokashi Leachate
Stabilizing unstable, nutrient-dense liquids for extended use
These liquids are unstable and nutrient-dense. Without preservation, they can turn rancid or become dominated by putrefying bacteria in days.
Understanding the Difference
Vermiwash is a microbially-rich leachate from a worm bin. Bokashi Leachate is the acidic byproduct of fermentation, rich in lactic acid and other organic acids. Their preservation strategies differ slightly due to starting pH and microbial composition.
Liquid Amendment Preservation Timeline
Both vermiwash and bokashi leachate require specific preservation strategies that evolve over time. This timeline shows the progressive methods for each amendment.
Short-Term Storage Methods
Immediate preservation strategies for freshly collected amendments.
Vermiwash
Storage Protocol: Store in sealed glass or plastic bottle in cool, dark cupboard.
Daily Maintenance: Shake bottle daily to oxygenate and prevent microbial stagnation.
Bokashi Leachate
Storage Protocol: Use immediately is best. If storing, keep in sealed container, refrigerated.
More acidic and unstable than vermiwash. Refrigeration is critical.
Long-Term Preservation (Jaggery Method)
Sugar-based preservation that creates stable fermented products.
Vermiwash Protocol
Jaggery/Sugar Method: Add 5% unpasteurized jaggery or molasses by volume.
- Sugar feeds lactic acid bacteria
- Creates stable fermented product
- "Burp" container daily for first week
Bokashi Leachate Protocol
Same Jaggery Method: Preserve same as vermiwash with 5% jaggery.
- High acidity already inhibits pathogens
- Sugar stabilization prevents further acid breakdown
- Maintains existing properties without enhancement
Scientific Reason Behind Jaggery Method
The added sugar lowers water activity (Aw) and feeds lactic acid bacteria, creating a self-preserving fermented environment. This method works because it establishes beneficial microbial dominance that outcompetes spoilage organisms.
Fermentation Extension & Advanced Preservation
Extended fermentation transforms amendments into specialized products.
Vermiwash Transformation
Advanced Protocol: After 1 month, strain solids and add another 2% sugar.
Can evolve into a complex microbial inoculant with broader soil application spectrum.
This extended fermentation creates a more stable, diverse microbial community suitable for use as a potent soil inoculant beyond just a fertilizer.
Bokashi Leachate Limitation
Not Recommended: Extended fermentation not advised for bokashi leachate.
Not typically recommended for long-term storage as a fertilizer. Better used fresh or short-term preserved.
Extended storage often results in diminished efficacy and potential for undesirable chemical breakdown. The acidic nature doesn't improve with extended fermentation.
Pioneer's Insight: Know When to Stop
The key difference between these amendments is their evolution potential. Vermiwash can be transformed into a superior product through extended fermentation, while bokashi leachate's value diminishes over time. This reflects their fundamental biological differences: vermiwash contains diverse aerobic microbes that thrive in extended fermentation, while bokashi leachate's acidic, anaerobic nature doesn't benefit from prolonged storage.
Diagnostic Checklist: Signs Your Preserved Amendments Have Spoiled
- Failed Odor Profile: Smell has shifted from earthy/ fermented to putrid, sulfurous, or fecal. This indicates a takeover by putrefying bacteria.
- Failed Visual Profile: Presence of fuzzy, three-dimensional mold colonies. Distinguish this from a harmless, flat, white Kahm yeast pellicle.
- Failed Chemical Stability (Leachate): A pH above 5.0 confirms the loss of lactic acid dominance, allowing pathogens to thrive.
- Risk Mitigation Protocol: If any doubt exists, cease use on edible plants. The safest action is disposal. If experimenting, apply a 1:100 dilution to ornamental plants only and observe.
Trust your senses. A spoiled amendment can harm soil biology. When in doubt, throw it out.
Storing Enhanced Bokashi Bran: Protecting Your Microbial Inoculant
Progressive preservation methods for maximum shelf life
Your homemade bran is a carrier for Effective Microorganisms (EM). Its shelf life depends entirely on how well you dry it and block environmental degraders. The bran should be thoroughly dry and stored in a cool, dark place away from moisture and heat.
The Critical Drying Process (Do Not Skip)
- Spread Thinly: After its 2-week fermentation, spread bran no more than 1/2 inch thick on drying screens or baking sheets lined with parchment.
- Low-Temperature Dry: Use a food dehydrator at 35-40°C (95-104°F) for 12-24 hours. Do not exceed 40°C (104°F), as higher temperatures kill the very microbes you're trying to preserve. Air drying in a well-ventilated, shaded, low-humidity area for 3-5 days is an alternative.
- Test for Dryness: The bran should be crunchy dry, not leathery. It should shatter, not clump, when squeezed. Moisture content should be below 10%.
Bokashi Bran Storage: Progressive Preservation Methods
As your storage timeline extends, preservation methods become more sophisticated to maintain microbial viability.
Standard Use Storage
For regular use within a year
Method & Steps
Airtight Container in Cool Pantry
- Use mason jars or gamma-seal buckets
- Fill to minimize air volume
- Add silica gel desiccant
- Store at 15-20°C (59-68°F)
Viability Outlook
High viability for 6 months, with gradual decline. Test a small batch after 9 months to confirm potency before large-scale use.
Long-Term Archive Storage
For preservation & future planning
Advanced Method & Steps
Vacuum Sealed with Oxygen Absorber
- Ensure bran is thoroughly dry
- Use high-barrier mylar or vacuum bags
- Add 300cc oxygen absorber
- Complete vacuum seal
- Store in dark, cool location
Viability Outlook
Very High viability for 18+ months. Oxygen removal is critical—it prevents nutrient oxidation and maintains microbes in a dormant spore state.
Maximum Longevity Storage
For ultimate preservation of your microbial inoculant
Ultimate Method & Critical Steps
Freezer Storage Protocol
- Prepare as "Long-Term Archive" method first
- Place sealed package in freezer (-18°C / 0°F)
- Critical: Thaw entire package at room temperature before opening to prevent condensation on cold bran
Viability Outlook
Exceptional long-term viability. Freezing places microbes in suspended animation (cryopreservation). Viability loss is minimal for several years—the gold standard for microbial preservation.
The Science of Freezer Preservation
At -18°C, microbial metabolic activity essentially stops. Cells enter a glass-like state (vitrification) without forming damaging ice crystals (if properly dried first). This is why complete dryness before freezing is non-negotiable for maintaining cellular integrity.
Monitoring Schedule & Troubleshooting Storage Failures
Proactive maintenance and problem-solving for stored products
Passive storage is a myth. Schedule simple checks to catch problems before they ruin a batch.
Recommended Monitoring Schedule
- Weekly (for breathable container storage): Visual and smell check. Feel for unexpected warmth.
- Monthly (for all methods): Detailed inspection. Open containers briefly in a well-ventilated area to assess smell and moisture.
- Quarterly: Consider a "viability test" for bran—use a small amount to ferment a jar of scraps. Does it work within 3-4 days?
Troubleshooting Common Storage Problems
| Problem & Signs | Likely Cause | Immediate Corrective Action | How to Prevent Next Time |
|---|---|---|---|
| Foul, putrid odor in compost or bran. | Anaerobic activity due to excess moisture and lack of oxygen. | For compost: Spread out immediately to dry and aerate. Mix in dry, carbon-based bedding. For bran: If slightly moist, dry immediately. If slimy, discard. | Ensure proper dryness before airtight storage. For breathable storage, maintain <30-40% moisture. Never store in sealed plastic bags while damp. |
| Visible green/black mold. | Introduction of airborne mold spores + sufficient moisture. A sign of failed dominance by your beneficial microbes. | For surface mold on compost: Remove affected top layer. For pervasive mold or mold in bran: Discard batch. Do not use in gardens. | Sterilize storage containers between uses. Ensure products are fully mature/cured/dry before storage to outcompete invaders. |
| Bran has lost its "sour" smell and smells flat, musty, or of nothing. | Microbial die-off or extreme dormancy. Could be due to excessive heat during drying or storage, or oxygen infiltration over time. | Perform a viability test. If it fails, repurpose as a high-carbon addition to your compost pile or worm bin. | Control drying temperature. Use oxygen absorbers for long-term storage. Store in a consistently cool environment. |
| Condensation on the inside of sealed containers. | Temperature fluctuations causing humidity to precipitate. Or, product was stored before internal temperature equalized after drying. | Open, dry the product further if needed, and wipe container dry. Re-store with a fresh desiccant. | Always allow product to come to room temperature in a dry environment before final sealing. Avoid storing in places with large daily temperature swings (e.g., garages). |
Final Pioneer's Insight: Storage is an Active Skill
The difference between a novice and a master is that the master doesn't just "store and forget." They understand that preservation is the final, critical phase of the production cycle. By meticulously controlling moisture, temperature, and atmosphere, you're not just saving your products—you're respecting and preserving the complex microbial life you worked so hard to cultivate. This ensures that when you finally bring that compost, bran, or amendment to your garden, it arrives not as a degraded souvenir, but as a potent, living force ready to transform your soil.
Step 8: Advanced Liquid Amendments & Microbial Brewing Mastery
Transform your solid vermicompost and bokashi outputs into living liquid fertilizers. This isn't just mixing compost with water—this is microbial farming, where you actively multiply beneficial organisms to create powerful foliar sprays, soil inoculants, and nutrient delivery systems that work in harmony with plant biology.
The Pioneer's Perspective: Liquid vs. Solid Amendments
While solid compost feeds the soil food web slowly, liquid amendments deliver immediate biological impact. Think of it this way: solid compost is like stocking a pantry, while properly brewed liquid amendments are like serving a prepared, gourmet meal directly to your plants' roots and leaves. The key is maintaining the viability and diversity of microbes during the extraction and application process.
The Microbial Science Behind Liquid Amendments
Understanding the biological principles of living liquid fertilizers
The Liquid Ecosystem: Four Scientific Principles That Govern Your Brew
The Oxygen Gradient Principle
Think of your brew as a microbial apartment building. At the top (high oxygen), aerobic bacteria and fungi thrive—they're the energetic "first responders" of soil health. At the bottom (low oxygen), different anaerobic communities develop. Your brewing method—whether vigorous aeration or a quiet steep—determines who moves in and who dominates the ecosystem. Aerated Compost Tea (ACT) is a luxury high-rise for aerobic life; anaerobic extracts cultivate a different, more specialized community.
Microbial Food Web Dynamics
Your brew undergoes a predictable population shift. In the first act (0-12 hours), bacteria explode in number, feasting on simple sugars. Next, protozoa arrive (12-24 hours) to prey on the bacteria. Finally, the slower-growing fungi establish dominance (24-48 hours). The moment you stop the brew is like taking a snapshot of this living sequence. Harvest at 18 hours, and you capture a bacterial-rich solution. Harvest at 36 hours, and you get a fungal-dominant inoculant.
Osmotic Pressure & Cell Integrity
Imagine microbes moving from the dense, nutrient-rich environment of compost into plain water. It's a shock—like going from sea water to fresh water. This sudden change in salt concentration (osmotic pressure) can cause delicate cell walls to rupture. This is why gradual hydration and mineral balance are critical. Adding a pinch of rock dust or sea salt isn't just feeding plants; it's giving microbes the electrolyte balance they need to survive the transition from solid compost to liquid brew.
Quorum Sensing Phenomenon
Microbes don't work in isolation; they communicate. Through chemical signals, they take a "microbial census." Only when a critical mass ("quorum") is reached do they collectively switch on beneficial behaviors like disease suppression or nutrient cycling. A weak, diluted brew might contain diverse species, but if the population is too sparse, they remain in "individual mode." This is why concentration matters as much as diversity—you need enough microbes in one place to trigger their community-wide beneficial functions.
The Pioneer's Insight: It's Not Just Chemistry, It's Ecology
Master brewers think like ecologists, not just chemists. You're not merely extracting nutrients; you're cultivating a temporary, liquid ecosystem. Success depends on managing the relationships between oxygen, food sources, population dynamics, and cellular stress. Understand these four principles, and you move from following recipes to designing microbial communities for specific purposes.
Amendment Spectrum: Choosing Your Microbial Tool
Each liquid amendment serves a distinct purpose. Match the tool to the task based on your plants' immediate needs and the microbial community you want to cultivate.
Aerated Compost Tea (ACT)
The living microbial inoculant
Process Timeline
24-48 hour aerobic brew
Constant aeration at 8-12 mg/L dissolved oxygen
Microbial Profile
Dominant in aerobic bacteria & fungi. Bacterial count can increase 10,000x during brew. Contains protozoa and nematodes when mature.
Primary Application
Soil & foliar inoculant for disease suppression and biological diversity. Not primarily a nutrient source. Use within 4 hours of brewing.
Compost Extract
The nutrient & biology extract
Process Timeline
1-7 day anaerobic steep
Occasional stirring, no forced aeration
Microbial Profile
Mix of aerobic and facultative anaerobic microbes. Contains soluble nutrients, humic acids, and some microbial diversity. No significant multiplication occurs.
Primary Application
Nutrient delivery soil drench. Good for quick nutrient boost with some biological benefit. Can be stored 2-3 days refrigerated. Less effective as foliar spray.
Fermented Plant Juice (FPJ)
The plant hormone & enzyme concentrate
Process Timeline
7-14 day lactic fermentation
Anaerobic with sugar (jaggery/brown sugar)
Microbial Profile
Dominant in lactic acid bacteria and yeasts. Contains plant growth hormones (auxins, cytokinins), enzymes, and concentrated plant nutrients from the source material.
Primary Application
Rapid growth booster and stress reducer. Excellent for seedlings, transplants, and fruiting plants. Dilute 1:500 to 1:1000 for foliar application. Can be stored for months.
Quick Decision Guide: Which Amendment When?
Choose ACT when: You need disease suppression, want to boost soil biology diversity, or are treating stressed plants.
Choose Compost Extract when: You want a quick nutrient boost with some microbes, have limited time for brewing, or need something you can store briefly.
Choose FPJ when: You're focusing on rapid plant growth, treating transplants or seedlings, or want to preserve seasonal plant energy for later use.
Advanced Brewing Systems: From Home Scale to Farm Scale
Precision brewing protocols for every operation size
The Non-Negotiable Brewing Principles
Water Quality
Chlorine/chloramine kills microbes. Use rainwater, well water, or dechlorinated tap water (let sit 24 hours or use vitamin C tablet).
Temperature Sweet Spot
Brew at 18-24°C (65-75°F). Below 15°C, microbial activity slows dramatically; above 28°C, harmful anaerobes can dominate.
Dissolved Oxygen
Maintain 6+ mg/L for aerobic brews. This isn't just bubbles—it's actual oxygen saturation. Air stones must produce fine bubbles for efficient gas exchange.
The Simple 5-Gallon Bucket System
For gardeners and hobbyists (up to 1000 sq ft)
Materials & Setup
- 5-gallon food-grade bucket with lid
- Aquarium air pump (minimum 2.5W, dual outlet)
- Two 4" cylindrical air stones
- Paint strainer bag (400 micron)
- 1-2 cups quality vermicompost (not ordinary compost)
- 1 tbsp unsulfured blackstrap molasses
- Optional: ½ cup kelp meal, 2 tbsp humic acid
Precision Protocol
- Fill bucket with 4 gallons dechlorinated water
- Place compost in strainer bag, suspend in water
- Add molasses (dissolve in warm water first)
- Aerate vigorously for 24-36 hours (check bubbles are fine, not large)
- Test smell (sweet, earthy) and foam (stable, not dissipating)
- Use immediately—biological clock is ticking
Success Indicators & Troubleshooting
✓ Good Brew: Sweet, earthy aroma; stable foam on surface; water dark but translucent.
✗ Failed Brew: Sulfur/rotten egg smell; slimy texture; no foam or foam that collapses quickly.
If it smells bad, it is bad. Dump it and start over—never apply a failed brew.
The 55-Gallon Drum & IBC Tote System
For market gardens and small farms (1/4 to 5 acres)
Professional Setup
- 55-gal drum or 275-gal IBC tote (food-grade, cleaned)
- Commercial air blower (1/4 HP for drum, 1/2 HP for tote)
- Multiple diffuser stones or weighted diffuser hose
- Diaphragm pump (not centrifugal) for transfer
- Bulkhead fitting and ball valve for drainage
- Large mesh bag (1-5 gallons compost depending on size)
- Proportionate food sources: molasses, fish hydrolysate, kelp
Commercial Protocol
- Modify container with bulkhead 4" from bottom
- Calculate ratios: 1 cup compost per 5 gallons water maximum
- Use multiple food sources: 2/3 molasses, 1/3 fish hydrolysate
- Monitor temperature: May need aquarium heater in cool climates
- Brew time: 18-24 hours only—larger volumes oxygenate differently
- Transfer gently using diaphragm pump to avoid shear force
The Pump Science: Why Diaphragm Matters
Centrifugal and roller pumps create shear force that damages fungal hyphae and bacterial clusters. Diaphragm pumps use a gentle squeezing action that preserves microbial integrity. For the highest quality tea, always transfer with diaphragm pumps or by gravity feed.
The Continuous Flow Industrial System
For large farms and commercial operations (5+ acres)
Industrial Equipment
- 500-5000 gallon stainless steel brewing tanks
- Industrial blowers with oxygen injection systems
- Automated temperature and pH monitoring
- Centrifugal extraction of compost (not recommended for microbes)
- Liquid oxygen or ozone systems for sterilization between batches
- Bacterial/fungal testing equipment (microscopes, plating materials)
Industrial Considerations
- Quality control is everything—test every batch microscopically
- Consistent compost source is more important than quantity
- Shorter brew times (12-18 hours) often produce more consistent results
- On-farm use only—commercial sale of compost tea is heavily regulated
- Document everything for traceability and process improvement
Advanced Recipes & Precision Application
Specialized formulations and application techniques
The Pioneer's Philosophy: Recipe vs. Formula
A recipe gives you ingredients and steps. A formula gives you principles to adapt. Below are formulas—understand the why, then adapt to your specific plants, soil, and conditions. The most common failure in liquid amendment application is applying the wrong tool at the wrong time in the wrong way.
Fungal-Dominant ACT for Trees & Perennials
Scientific Rationale
Woody plants and established perennials form symbiotic relationships with ectomycorrhizal and endomycorrhizal fungi. This recipe encourages fungal dominance in the brew.
Brew Formula
- Base compost: 2/3 vermicompost + 1/3 aged wood chip compost
- Food sources: Fish hydrolysate (not emulsion) + kelp meal (3:1 ratio)
- Mineral boost: 1 tbsp rock dust (basalt or granite) per 5 gallons
- Brew time: 36-48 hours (fungi need longer to establish)
- Key indicator: Visible fungal strands (hyphae) in brew
Application Protocol
Dilution: 1:3 with water. Method: Deep root injection or heavy soil drench. Timing: Early spring and late fall when fungal networks are most active.
Bacterial-Dominant ACT for Vegetables & Annuals
Scientific Rationale
Annual vegetables thrive with rapid nutrient cycling provided by aerobic bacteria. This recipe maximizes bacterial populations for quick nutrient release.
Brew Formula
- Base compost: Pure vermicompost (high in bacteria)
- Food sources: Unsulfured molasses + humic acid (4:1 ratio)
- Sugar timing: Add half at start, half at 12-hour mark
- Brew time: 18-24 hours maximum (bacteria peak early)
- Key indicator: Frothy, stable foam (bacterial proteins)
Application Protocol
Dilution: 1:5 for soil, 1:10 for foliar. Method: Soil drench or fine mist foliar. Timing: Every 2-3 weeks during active growth, early morning application.
Precision Application Methods: Matching Tool to Task
How you apply amendments matters as much as what you apply. Different methods deliver different biological impacts and nutrient availability.
Foliar Spray: The Leaf Microbiome Inoculant
Applying beneficial microbes directly to leaf surfaces to outcompete pathogens, improve photosynthesis efficiency, and enhance nutrient absorption through stomata.
Equipment Specifications
Backpack sprayer with >400 micron nozzle. Avoid misters/foggers—they shear microbes. Pressure should be 15-40 PSI for optimal droplet size.
Timing & Dilution Science
Early morning (dew helps adhesion) or late evening. Dilute 1:5 to 1:10. Apply to drip point. Never apply when temperatures exceed 27°C (80°F).
Advanced Technique
Add 1/4 tsp coconut oil soap per gallon as natural surfactant. For disease suppression, apply every 7-10 days. For general health, every 14-21 days.
Soil Drench & Root Zone Injection
Delivering microbes directly to where they'll establish symbiotic relationships with plant roots, improving nutrient cycling and creating a protective rhizosphere.
Equipment Specifications
Watering can, soaker hose, or root injection probe (for trees). Gentle application preserves microbes. For injection, use 1/2" diameter probes.
Timing & Dilution Science
Any time of day except peak heat. Dilute 1:10. Apply to moist soil, not dry or saturated. Best applied when soil temperature is 15-24°C (60-75°F).
Advanced Technique
For trees: use root injector at 12-18" depth in drip line every 2-3 years. For vegetables: apply after planting but before mulch, then every 3-4 weeks.
Fertigation: Integration with Irrigation
The most efficient method for large-scale application, delivering consistent microbial populations throughout the root zone while minimizing labor.
Equipment Specifications
Drip/sprinkler system with fertilizer injector. Must include 200-micron filter to prevent clogging. Use non-corrosive components.
Timing & Dilution Science
Program into middle of irrigation cycle. Dilute per injector specs (usually 1:100). Apply during the first 10 minutes of watering cycle.
Advanced Technique
Use venturi injector, not proportional—gentler on microbes. Apply at end of day so microbes have overnight to establish. Flush system thoroughly after application.
Quality Assurance & Advanced Troubleshooting
Diagnosing problems and ensuring premium quality
The Non-Negotiable Rules of Liquid Amendments
Timing is Everything
ACT begins dying the moment aeration stops. Use within 4 hours maximum. If you can't use it, don't brew it. Plan your brewing around your application schedule.
Dilution Saves Crops
When in doubt, dilute more. Concentrated amendments can "burn" plants and soil biology. Start with 1:10, adjust based on results. Better weak and frequent than strong and damaging.
Chlorine is Microbial Death
Never use chlorinated water. If you must use city water, dechlorinate with vitamin C (1/4 tsp per 50 gallons) or let sit 24+ hours with aeration. Test with chlorine test strips if unsure.
Troubleshooting Guide: Diagnosing Brew Problems
Problem: Sulfur/Rotten Egg Smell
Diagnosis: Anaerobic conditions have developed. Sulfate-reducing bacteria are dominating.
Likely Causes:
- Insufficient aeration (pump too weak, stones clogged)
- Too much food source (microbes consumed all oxygen)
- Water temperature too high (>26°C/78°F)
Solution: Dump batch. Clean equipment thoroughly. Increase aeration power, reduce food by 25%, monitor temperature.
Problem: No Foam Development
Diagnosis: Insufficient microbial growth or wrong microbial balance.
Likely Causes:
- Poor quality compost (not enough active microbes)
- Chlorinated water killing inoculant
- Water too cold ( <15°C/59°F) slowing growth
Solution: Test compost quality (should smell sweet/earthy, not sour). Verify water is dechlorinated. Use aquarium heater if brewing in cool space.
Problem: Foam Collapses Quickly
Diagnosis: Proteins breaking down, often from protozoan predation.
Likely Causes:
- Brew went too long (past bacterial peak)
- Protozoa population exploded, consuming bacteria
- Normal end-of-cycle for fungal-dominant brews
Solution: Shorten brew time. For bacterial teas, harvest at 18-24 hours. For fungal teas, collapsing foam at 36+ hours is normal.
Problem: Slimy Texture
Diagnosis: Bacterial bloom of less desirable species.
Likely Causes:
- Too much simple sugar (molasses) without complex foods
- Poor aeration creating micro-anaerobic zones
- Contaminated equipment from previous batch
Solution: Dump batch. Sterilize equipment with hydrogen peroxide (3%) or vinegar. Balance food sources (add kelp or fish with molasses).
The Microscopic Quality Check (If You Have Access)
For serious practitioners, a simple microscope (400x) reveals everything:
Good Bacterial Brew
Thousands of active, tumbling bacteria. Some flagellates. No filamentous bacteria (slimy types). Diversity of shapes and sizes indicates healthy community.
Good Fungal Brew
Visible hyphal strands, possibly spores. Bacteria still present but not dominating. Hyphae should be branching, not clumped or broken.
Poor Quality Indicators
Mostly dead/immobile cells, dominance of one strange-shaped organism, visible pathogens (learn to identify). Cloudy, clumped appearance.
If microscopy isn't possible, your nose is your best tool. Good tea smells like forest soil after rain. Bad tea smells like anything you wouldn't want to breathe deeply.
Integrated System Application Strategy
Coordinating liquid amendments with your complete bokashi-vermicompost system
The Complete Liquid Amendment Cycle
Your liquid amendments work best when integrated with your solid compost applications. Here's the strategic approach:
Spring Activation Protocol
Bacterial-Dominant ACT applied to vegetable beds to jumpstart nutrient cycling.
Timing: Apply 2 weeks before planting, then every 3 weeks during growth.
Summer Maintenance & Disease Prevention
Regular ACT applications for disease suppression and FPJ for fruiting plants.
Timing: ACT every 2-3 weeks as foliar spray; FPJ at flowering and fruiting stages.
Fall Preparation & Soil Building
Fungal-Dominant ACT for perennials and trees, combined with solid compost top-dressing.
Timing: Apply after harvest, before winter dormancy to establish fungal networks.
The Integrated Advantage: Why Liquid + Solid Works Best
- Speed + Stability: Liquid amendments provide immediate microbial impact while solid compost builds long-term soil structure.
- Targeted Delivery: Foliar sprays address immediate plant needs; soil drenches build rhizosphere communities.
- Seasonal Adaptation: Different formulations for different seasons and plant growth stages.
- System Synergy: Liquid amendments made from your own vermicompost create a closed-loop nutrient system.
The Monthly Brewing & Application Schedule
Week 1
Brew bacterial-dominant ACT for vegetables and annuals. Apply as soil drench and foliar spray.
Week 2
Harvest vermicompost for brewing. Start FPJ batch if seasonal plant materials are available.
Week 3-4
Brew fungal-dominant ACT for trees/ perennials. Apply compost extract as general soil tonic.
Final Pioneer's Insight: Brewing as an Art & Science
Mastering liquid amendments requires equal parts scientific understanding and intuitive practice. You're not just following steps—you're learning to read biological cues, adjust to environmental conditions, and develop a feel for microbial vitality. The most successful brewers keep detailed notes: temperatures, times, smells, visual changes, and plant responses. This data becomes your personal brewing wisdom. Remember: every batch teaches something. Embrace the failures as much as the successes—they're how you develop true mastery in microbial farming.
The Complete FAQ & Troubleshooting Encyclopedia
From first-day beginners to seasoned composting veterans, this comprehensive guide answers every question and solves every problem across the entire Bokashi + Vermicompost system. Bookmark this page—it's your go-to resource for composting confidence.
System Fundamentals & Getting Started
Q1: I'm completely new to composting. Is this system too advanced for me?
The truth: This system is designed for beginners who want to do it right from day one. Traditional composting often fails because it's too simple—you throw scraps in a pile and hope. This system gives you controlled, predictable results because every step has clear instructions and scientific explanations.
Beginner Success Strategy:
- Start with just the bokashi bucket for 2-3 months. Master fermentation first.
- When comfortable, add worms. You're not doing everything at once.
- The website is designed to be followed sequentially—each section builds on the last.
- Most beginners' "failures" are actually just learning moments. The system is forgiving.
Q2: How much time does this system REALLY require daily/weekly?
The honest breakdown:
Daily Maintenance
2-5 minutes
Add scraps to bokashi, sprinkle bran
Weekly Tasks
15-20 minutes
Drain leachate, check worms, small maintenance
Monthly Efforts
30-45 minutes
Neutralize bokashi, harvest vermiwash
Reality check: The time investment is front-loaded in learning. After 2-3 months, it becomes routine like taking out trash. You're saving time compared to multiple trips to the compost pile or dealing with failed traditional compost.
Q3: I live in an apartment with limited space. Can this work for me?
Absolutely—this system was designed for urban environments. Here's how to make it work in small spaces:
Space-Saving Configurations
- Balcony setup: Two bokashi buckets + one worm crate fits in 1.5m²
- Indoor option: Bokashi buckets under kitchen sink, worm bin in utility closet
- Vertical stacking: Use stackable crates for worms to minimize footprint
- No yard needed: All processing happens in contained systems
Apartment-Specific Tips
- Odor management: Properly maintained system has only pleasant smells
- Temperature control: Keep indoors for consistent 20-25°C year-round
- Harvest storage: Finished compost can be bagged until garden trips
- Community option: Share system with neighbors to distribute workload
Bokashi Fermentation Mastery
Q4: Why does my bokashi sometimes smell like vinegar and other times like rotten eggs?
The smell is a direct indicator of which microbial group is dominating the fermentation process.
Vinegar / Pickle-like Smell
Healthy fermentation (LAB dominance)This indicates ideal bokashi fermentation. Lactic acid bacteria rapidly lower the pH (≈ 3.5–4.5), suppressing harmful microbes while preserving nutrients.
Rotten Egg / Sulfur Smell
Unwanted anaerobic decayThis smell signals putrefaction. Sulfur-producing bacteria generate hydrogen sulfide, usually due to excess moisture, trapped air, or insufficient bokashi bran.
- Add extra bokashi bran immediately
- Drain collected liquid without delay
- Compress waste firmly after each addition
- Check lid and gasket for air leaks
- Keep bucket at stable room temperature
- Wipe bucket rim before sealing
Q5: Can I really put meat, dairy, and citrus in bokashi when traditional composting says no?
The Revolutionary Advantage of Bokashi
Yes, absolutely—this is bokashi's superpower. Traditional composting fails with these materials because:
Traditional Composting CAN'T Handle
- Meat/dairy: Attracts pests, causes putrefaction
- Citrus: Too acidic for microbes
- Oily foods: Creates anaerobic conditions
- Cooked foods: Often too dense, rot instead of compost
Bokashi Fermentation CAN Handle
- All of the above: Fermentation pickles them
- Science: Acidic environment kills pathogens
- Result: Pre-digested, nutrient-rich material
- After neutralization: Safe for worms and soil
Key insight: Bokashi doesn't "compost" these materials—it ferments and preserves them. The actual composting happens later, either in soil or with worms. This two-stage process is why it works where traditional methods fail.
Q6: How do I know when my bokashi bran has gone bad or lost potency?
Signs your bran needs replacement:
Smell Test Failed
Smells musty, flat, or like nothing instead of sweet-sour. Good bran has vibrant, complex aroma.
Performance Decline
Food doesn't pickle within 10-14 days. Mold growth is colored instead of white.
Moisture & Storage Issues
Clumping, visible moisture in container, or stored over 12 months without preservation.
The Milk Curdling Test for Bran Potency
- Mix 1 tablespoon bran with 1 cup warm milk (room temperature)
- Keep at 25-30°C for 24-48 hours
- Good bran: Milk separates into curds and whey with clean yogurt smell
- Bad bran: No change, or foul smell develops
Q7: What's the difference between store-bought bokashi bran and making my own?
Store-Bought Bran
- Pros: Convenient, consistent, ready immediately
- Cons: Expensive over time, limited microbial diversity
- Typical cost: $20-30/kg, lasts 2-3 months
- Best for: Beginners wanting to start quickly
Homemade Enhanced Bran
- Pros: 5-10x more microbial diversity, customizable, costs pennies
- Cons: 4-6 week preparation time, requires materials
- Typical cost: $2-5/kg, lasts 6-12 months
- Best for: Serious gardeners wanting superior results
Recommendation: Start with store-bought to learn the system. Once comfortable, make one batch of enhanced bran. The difference in fermentation speed and compost quality is dramatic and well worth the effort.
The Critical Neutralization Phase
Q8: Why can't I just feed fermented bokashi directly to my worms?
WORM ACIDOSIS: The Silent Killer
Worms breathe through their skin. At pH below 5.5, their skin chemically burns. This isn't discomfort—it's chemical injury that leads to:
- Skin lesions and bacterial infections
- Reduced feeding and reproduction
- Attempted mass escapes (worm "balling")
- Gradual population collapse over weeks
The Neutralization Analogy
Think of bokashi fermentation like canning pickles. You wouldn't feed your family nothing but pickles—they're too acidic. Neutralization is like turning those pickles into a balanced meal. The 7-14 days allow:
- pH to rise from 4.0 to 6.5-7.5 (worm-safe range)
- Aerobic microbes to establish (worms need oxygen-loving companions)
- Chemical stabilization of nutrients
- Breakdown of any remaining phytotoxins
Q9: My neutralization pile isn't heating up or showing white mold. Is it dead?
First, understand what "heating up" really means:
Temperature Expectations
Bokashi neutralization is NOT hot composting. You won't get 50-60°C temperatures. A slight warmth (2-5°C above ambient) is normal. No heat doesn't mean failure—it means mesophilic (moderate temperature) decomposition, which is perfect for preserving microbial diversity.
White Mold Expectations
White mold is a bonus, not a requirement. It indicates fungal activity breaking down cellulose. No visible mold means bacteria are dominating—still perfectly fine. Focus on the smell (earthy good, rotten bad) and texture (crumbly good, slimy bad).
The Real Success Indicators
- Smell transformation: From vinegar → earthy soil
- pH increase: From 4.0 → 6.5-7.5 (test with strips)
- Texture change: From pickled chunks → homogeneous crumble
- Worm test: Worms willingly burrow into it
Q10: Can I skip neutralization by mixing bokashi directly with garden soil?
Yes, but with important caveats:
Direct Burial METHOD
- Dig trench 20-30cm deep
- Mix bokashi with equal parts soil
- Bury and wait 3-4 weeks before planting
- Works well for: Empty garden beds between seasons
Critical WARNINGS
- Never near plant roots: Acids will burn them
- Wait period mandatory: 4 weeks minimum
- Not for containers: Too concentrated
- Rodent risk: Buried food may attract them
Why neutralization is better: Controlled conditions prevent nutrient loss, allow monitoring, and create worm-ready material. Direct burial is a "set and forget" method with more variables and risks.
Worm Wisdom & Vermicomposting
Q11: How do I know if I'm overfeeding or underfeeding my worms?
The Goldilocks Principle of Worm Feeding
Worms eat 50-100% of their body weight daily. A 500g population eats 250-500g food daily. But they're not machines—environment affects appetite.
OVERFEEDING Signs
- Uneaten food accumulates
- Foul odors develop
- Acidic conditions (pH drop)
- Mites/fruit flies appear
PERFECT Feeding
- Food gone in 2-4 days
- Constant casting production
- Worms spread throughout bin
- Earthly smell maintained
UNDERFEEDING Signs
- Worms congregate near food
- Slow population growth
- Bedding breaks down slowly
- Harvests are small
The Feed-Then-Wait Method
- Feed a measured amount (start with 250g for 500g worms)
- Mark the spot with a stick or note
- Check in 3 days: 50-75% consumed = perfect
- Adjust next feeding based on consumption rate
- Remember: Worms eat less in cold, more in ideal temps
Q12: Are the other bugs in my worm bin (mites, springtails, pot worms) harmful?
Springtails
White, jump. Decompose fungi. Harmless.
Pot Worms
White threads. Indicate acidic conditions but harmless.
Mites
Red/brown dots. Normal in small numbers. Explosions indicate overfeeding.
Ants
Indicate dry conditions. Can harm worms. Re-moisten bedding.
The Ecosystem Perspective
Your worm bin is a mini-ecosystem. Diversity of decomposers means resilience. Worms are the "large grazers," while mites, springtails, and others handle different decomposition niches. Unless population explosions occur (indicating imbalance), welcome your tiny helpers.
Q13: My worms are reproducing slowly. How can I boost cocoon production?
Worm reproduction requires specific conditions:
Calcium Availability
Cocoons are made of calcium carbonate. Without sufficient calcium, worms can't form proper cocoons. Add powdered eggshells (1 cup per 10L bin monthly) or oyster shell flour. This is the most common missing element.
Temperature Sweet Spot
Maximum reproduction occurs at 20-25°C. Below 15°C, reproduction slows dramatically. Above 30°C, worms focus on survival, not breeding. Use a thermometer—this is often overlooked.
Protein & Bedding Depth
Worms need protein for egg production. Bokashi provides this. Also, ensure 20-30cm bedding depth—worms need space for mating rituals. Shallow bins inhibit reproduction.
Q14: What's the difference between vermicompost and regular compost?
Not Just Different—Fundamentally Superior
Regular Compost
- Process: Aerobic decomposition by microbes
- Temperature: Hot (50-70°C)
- Time: 3-6 months minimum
- Nutrient loss: 30-50% nitrogen volatilized
- Microbes: Thermophilic bacteria dominant
- Structure: Can be coarse, variable
Vermicompost (Worm Castings)
- Process: Worm digestion + microbial action
- Temperature: Cool (15-25°C)
- Time: 1-3 months
- Nutrient retention: 95%+ nitrogen preserved
- Microbes: Diverse mesophilic community
- Structure: Fine, granular, stable aggregates
- Bonus: Contains plant growth hormones
The analogy: Regular compost is like cooking vegetables—nutrients leach into water. Vermicompost is like eating vegetables and saving the... well, you get the idea. The worm's gut preserves and enhances nutrients through microbial transformation.
Liquid Gold & Advanced Operations
Q15: What's the real difference between bokashi leachate, vermiwash, and compost tea?
Three different liquids, three different purposes:
Source: Drainage from bokashi bucket
Microbes: Lactic acid bacteria, yeasts
pH: 3.5-4.5 (acidic)
Best use: Soil drench (dilute 1:100), compost accelerator
Think: Microbial inoculant for soil
Source: Drainage from worm bin
Contains: Worm enzymes, hormones, nutrients
pH: 6.5-7.5 (neutral)
Best use: Foliar spray (1:5), root dip, seedling boost
Think: Plant growth stimulant
Source: Actively brewed from compost
Microbes: Multiplied aerobic bacteria/fungi
Process: 24-48 hour aeration
Best use: Soil/foliar inoculant (use within 4 hours)
Think: Microbial population explosion
Simple Usage Guidelines
- Bokashi leachate: When you want to improve soil biology
- Vermiwash: When plants need a quick nutrient/hormone boost
- Compost tea: When you need disease suppression or maximum microbial diversity
- Never mix them: Different pH and microbes will conflict
Q16: How do I store liquid amendments without them going bad?
Short-Term Storage (1-2 weeks)
- Container: Glass jar with loose lid or breathable cover
- Location: Cool, dark cupboard (not refrigerator)
- Maintenance: Shake daily to oxygenate
- Smell check: Earthy = good, foul = discard
Long-Term Storage (1-3 months)
- Add 5% jaggery or molasses by volume
- Mix thoroughly, store in breathable container
- "Burp" daily for first week (release gases)
- After 1 month, it becomes stable fermented product
- Can now be stored with tight lid
Critical Warning Signs (Discard Immediately)
- Foul, rotten egg smell: Hydrogen sulfide production
- Black sludge at bottom: Anaerobic putrefaction
- Mold growth on surface: Contamination
- Pressure buildup: Fermentation gone wrong (open carefully!)
Q17: Can I use this compost system year-round in cold climates?
Winter Composting Strategy
Yes, with adjustments. This system actually excels in cold climates because much of it happens indoors or in controlled conditions.
Bokashi in Winter
- Works perfectly: Fermentation generates its own heat
- Keep indoors: Under sink, in basement, utility room
- Slower fermentation: Add 25% more bran
- Leachate production: May decrease, normal
- Accumulate bokashi: Can store fermented batches until spring
Worms in Winter
- Bring indoors: Basement, garage, spare room
- Insulate bin: Wrap with blankets, foam board
- Reduce feeding: Worms eat less in cold
- Monitor temperature: 15°C minimum for activity
- Consider heating mat: For very cold spaces
- Spring surge: Population explodes when warm
The Cold Climate Advantage
While traditional compost piles struggle, your bokashi buckets keep fermenting and your indoor worm bin keeps producing. You'll enter spring with accumulated fermented bokashi and active worms ready for the gardening season, while traditional composters are just restarting their piles.
Ultimate Troubleshooting Reference
| Problem & Symptoms | Most Likely Cause | Immediate Action | Prevention Strategy |
|---|---|---|---|
| Bokashi smells rotten
Not sour but putrid |
Insufficient bran, air leaks, too wet | Add extra bran, fix seal, drain liquid, seal for 5 days | Weigh food (1% bran by weight), monthly seal checks |
| Worms trying to escape
Mass exodus behavior |
pH too low, ammonia, extreme temps | Check pH, add eggshells/lime, adjust temp | Weekly pH checks, calcium buffer, maintain 18-25°C |
| Fruit fly infestation
Small flies around bin |
Exposed food, overripe fruit | Bury food deep, vinegar traps, add dry layer | Freeze scraps before adding, maintain carbon blanket |
| No leachate from bokashi
Bucket seems dry |
Materials too dry, cold temps, clogged drain | Add moist scraps, warm location, clear spigot | Pre-drain wet scraps, keep at 20-25°C, monthly maintenance |
| Slow vermicomposting
Food persists for weeks |
Too few worms, cold, overfeeding | Add worms, insulate, stop feeding 1-2 weeks | Maintain 1lb worms/sq ft, keep 20-25°C, feed appropriately |
| Mold in stored bran
Colored mold growth |
Insufficient drying, moisture intrusion | Discard moldy batch, test remaining moisture | Dry to <10% moisture, use desiccants, vacuum seal |
| Vermiwash smells foul
Rotten egg odor |
Anaerobic conditions in collection | Discard, clean container, improve bin drainage | Drain regularly, use breathable cover, store properly |
| White stringy growths
Web-like in worm bin |
Actinomycetes or acidic conditions | Check pH, add calcium, increase aeration | Balance feeding, maintain pH 6.5-7.5, proper C:N ratio |
| Worm population decline
Fewer worms over time |
Acidic conditions, starvation, predators | Check pH, ensure food, check for ants/mites | Regular pH monitoring, consistent feeding, diatomaceous earth barrier |
| Bokashi not pickling
No white mold, sweet smell |
Old/inactive bran, too cold, insufficient time | Test bran potency, warm location, wait longer | Store bran properly, maintain 20-25°C, allow 2 weeks minimum |
| Excessive moisture in bin
Water pools, soggy bedding |
Overwatering, too many wet scraps, poor drainage | Add dry bedding, improve drainage, reduce watering | Squeeze test before adding, proper drainage layer, balanced feeding |
| Compost tea smells bad
Sulfur/rotten egg smell |
Anaerobic brew, contaminated equipment | Discard, sterilize equipment, verify aeration | Proper aeration, clean equipment, don't overfeed microbes |
The Troubleshooting Mindset
Every problem is your system communicating with you. Instead of frustration, cultivate curiosity: "What is my compost trying to tell me?" The solutions are almost always simple adjustments to moisture, air, temperature, or food balance. Document what works—your personal experience becomes your most valuable guide.
The Composter's Code: Principles for Success
After answering hundreds of composting questions over years, these principles emerge as universal:
Principle 1: Work With Nature, Not Against It
Microbes and worms want to decompose organic matter. Your job isn't to make it happen—it's to remove obstacles and create ideal conditions. When something isn't working, ask: "What does biology need that it's not getting?"
Principle 2: Patience Over Perfection
Composting operates on biological timelines, not human schedules. A "failed" batch often just needs more time. The most common mistake is giving up too soon. Nature has been composting for millions of years—it knows what it's doing.
Principle 3: Diversity Creates Resilience
Just as diverse ecosystems withstand shocks, diverse microbial communities handle variable conditions. Don't seek sterile perfection—welcome the springtails, mites, and various molds. They're your decomposition team.
Principle 4: Every Batch Teaches Something
The difference between a novice and master isn't lack of failures—it's depth of observation. Keep notes. Notice smells, textures, temperatures. Your compost is your teacher, and black gold is your diploma.
Welcome to the Community of Soil Builders
By choosing this integrated system, you're not just managing waste—you're participating in the ancient alchemy of turning death into life, waste into fertility, and problems into solutions. Every bucket of bokashi, every handful of worm castings, every spray of vermiwash is an act of ecological healing. May your compost be rich, your worms prolific, and your garden abundant.